Click on thumbnails below for larger pics....
This was a pre-owned BMW that was purchased from Dwight Harrison VW, our sales
consultant Tom Board has sold us five cars including this one,
great buying experience AND after the sale assistance.
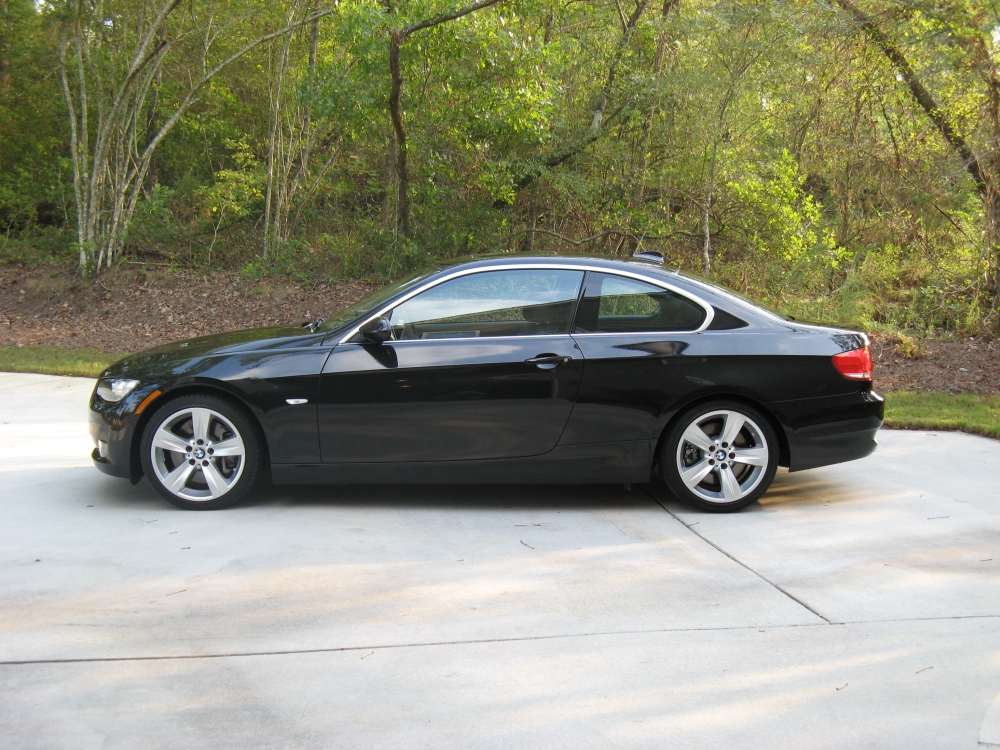
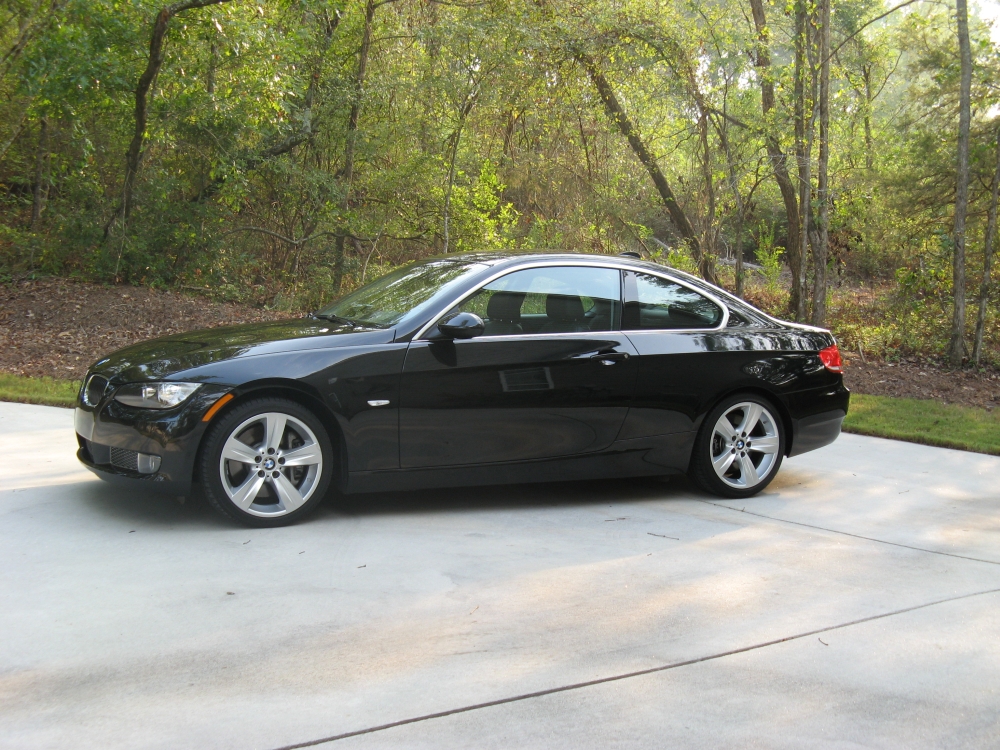
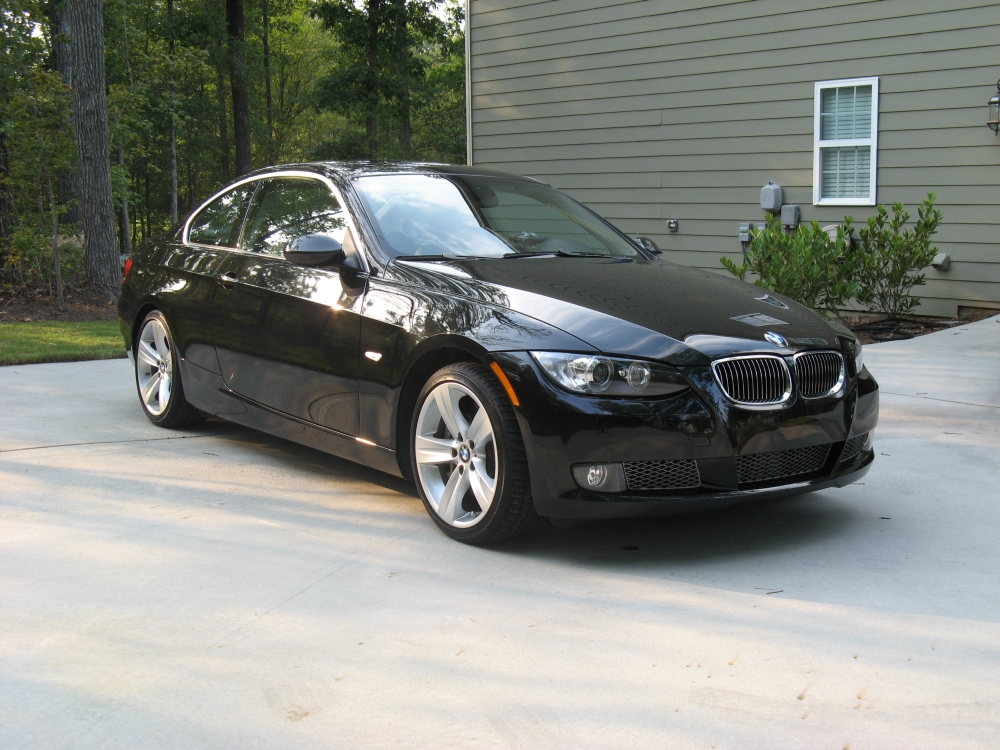
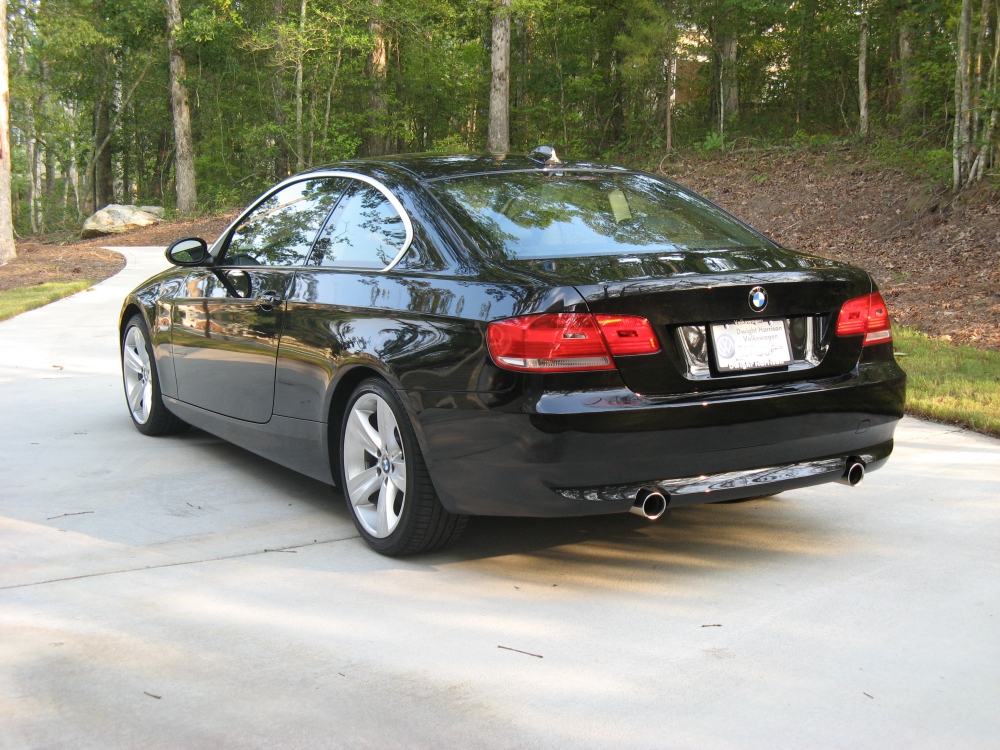
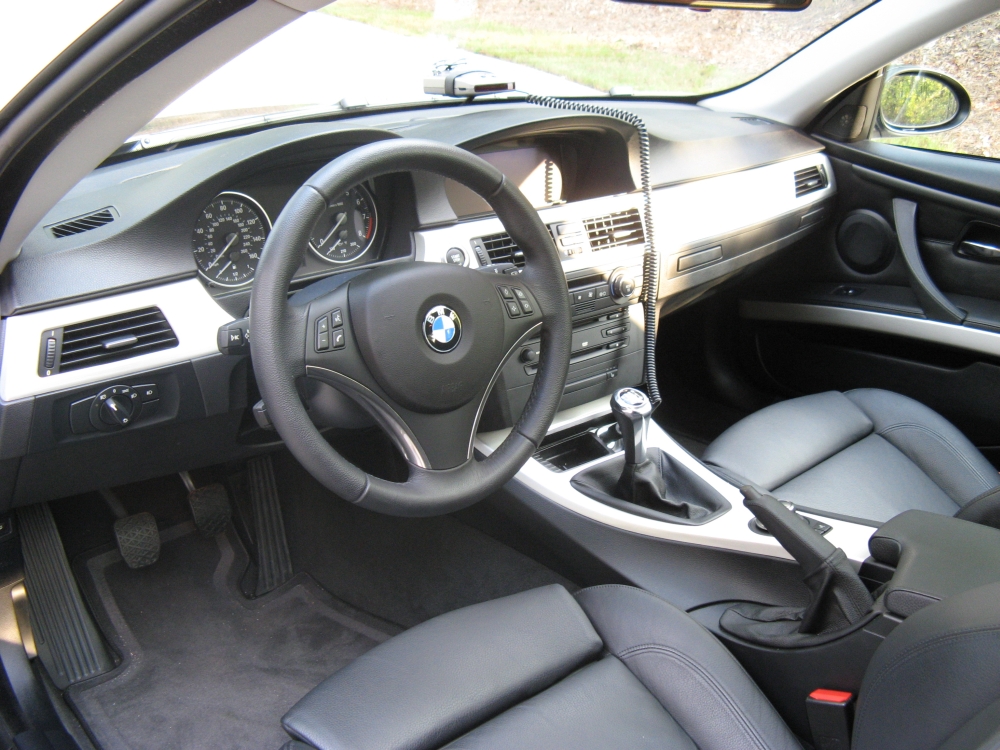
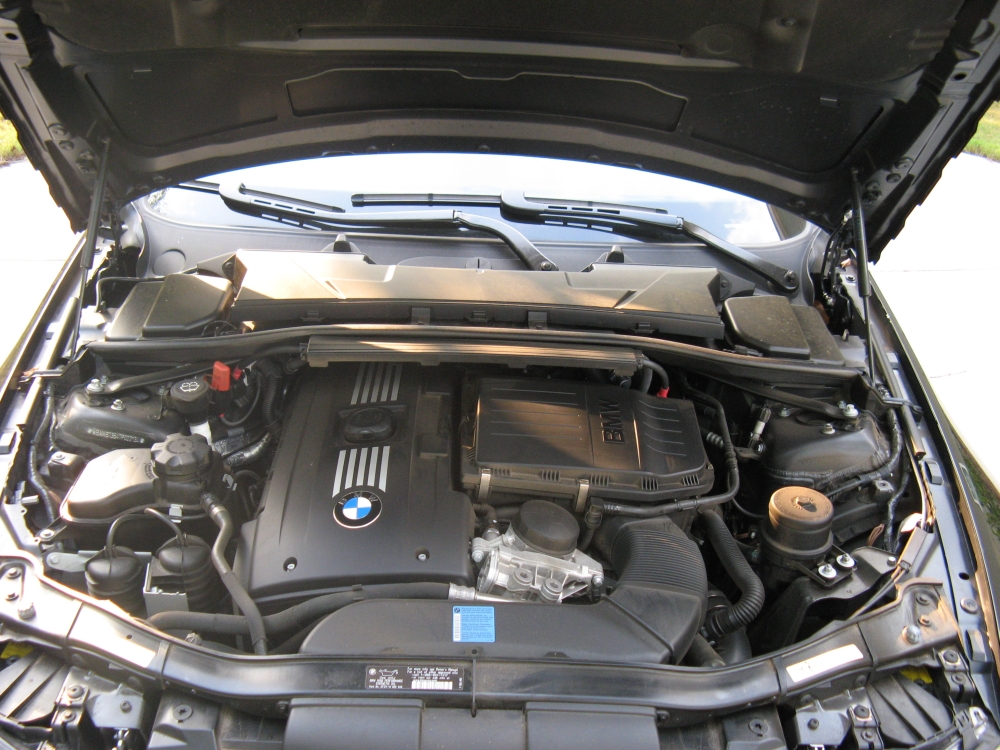
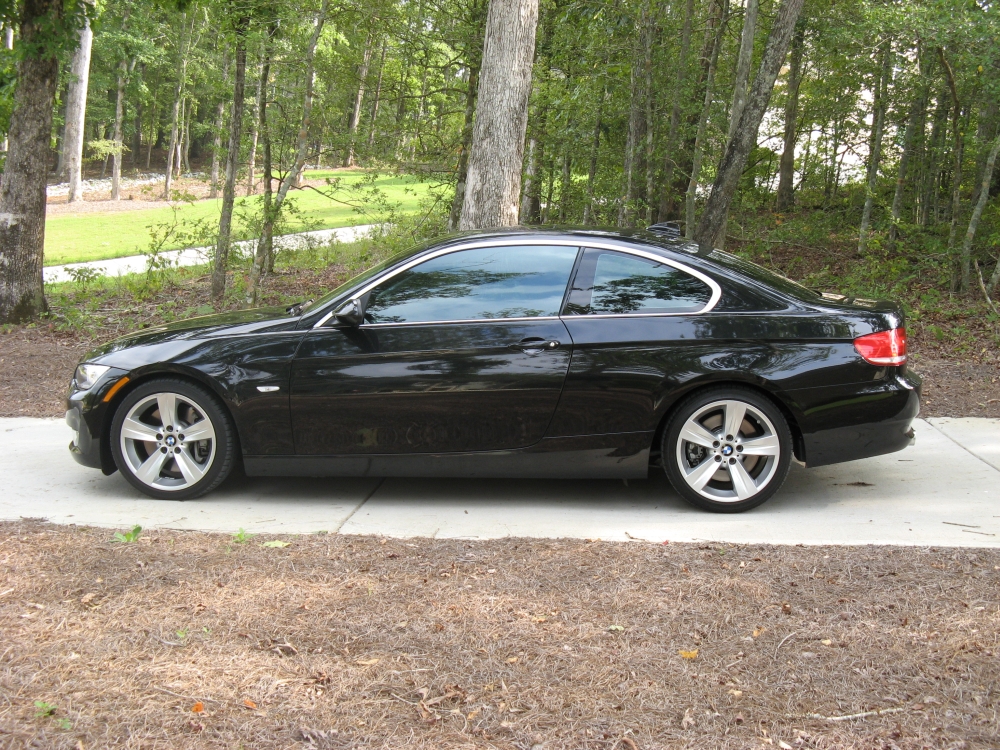
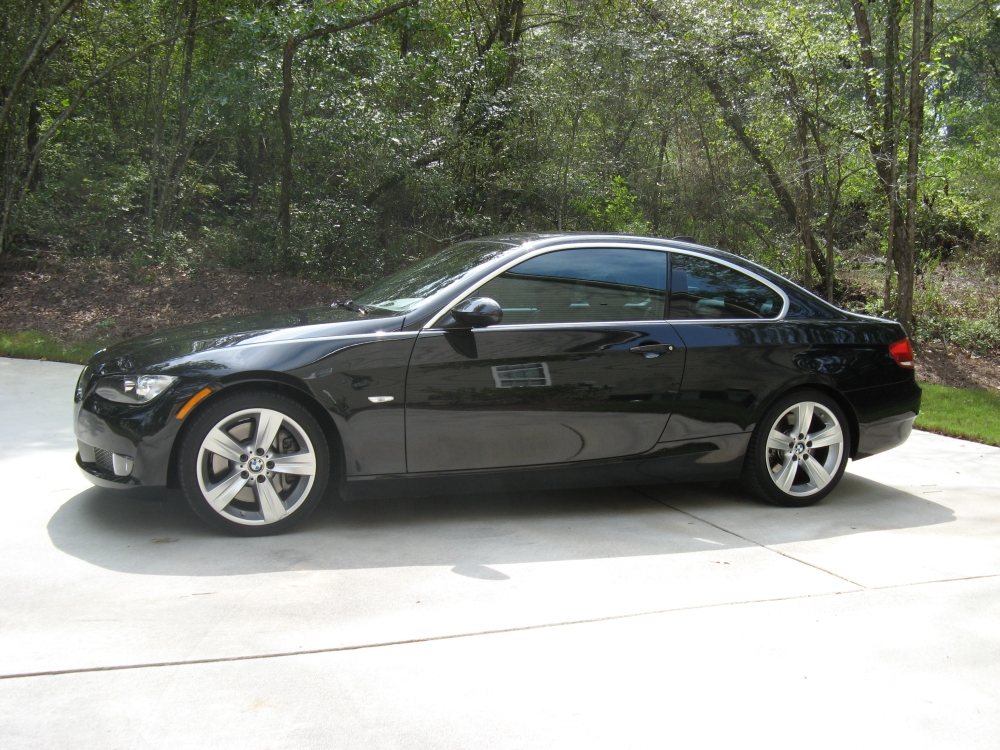
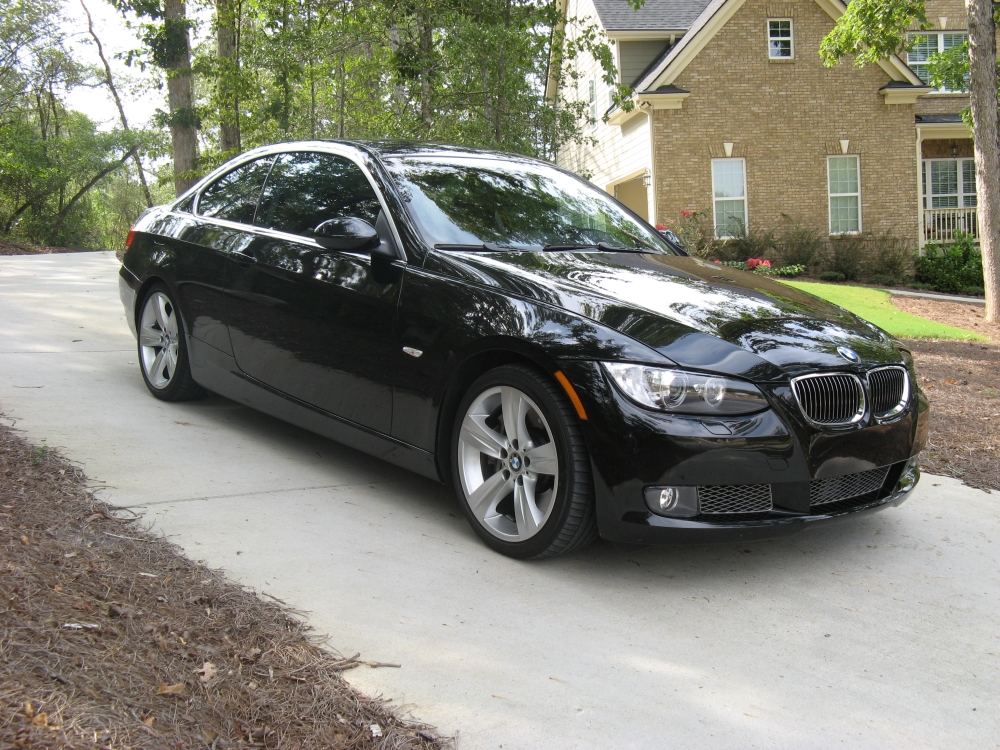
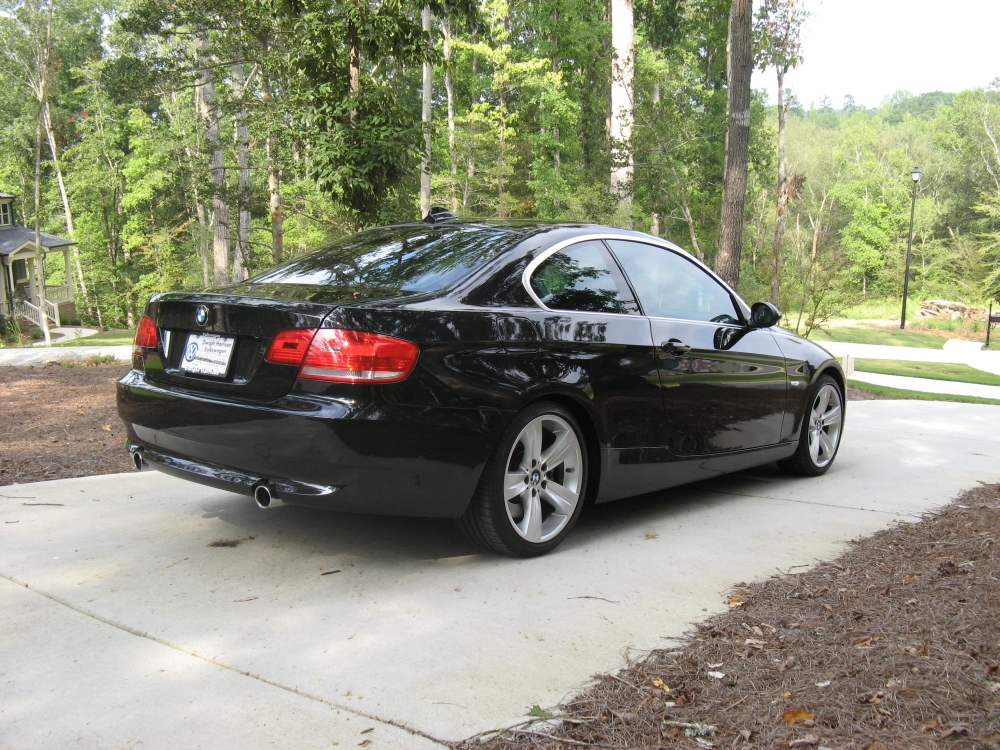
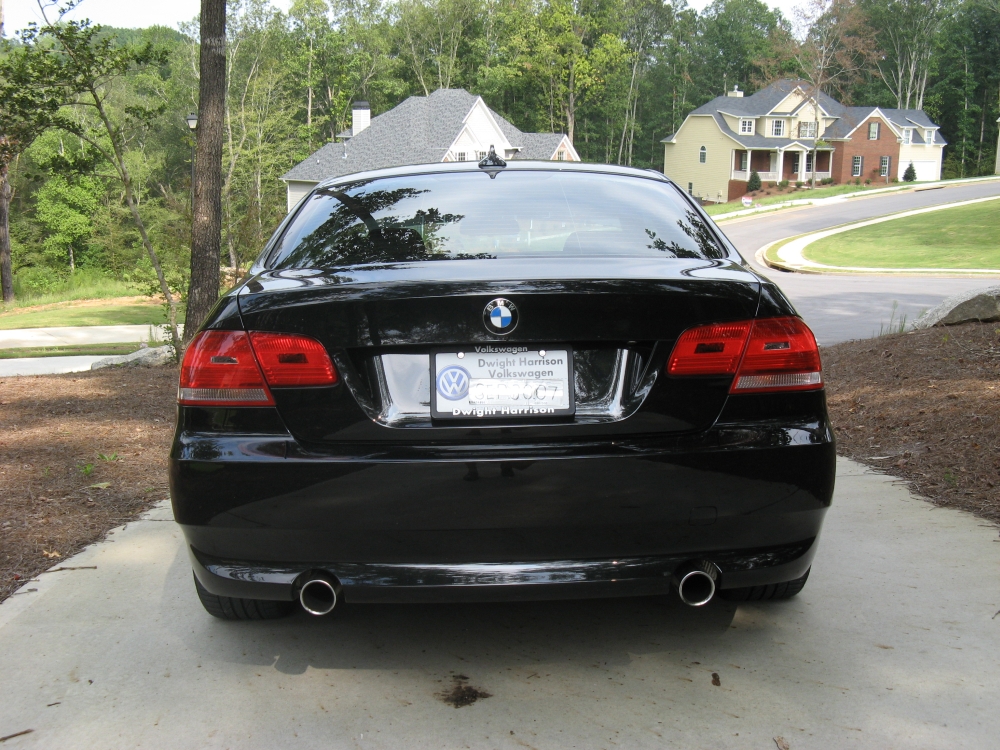
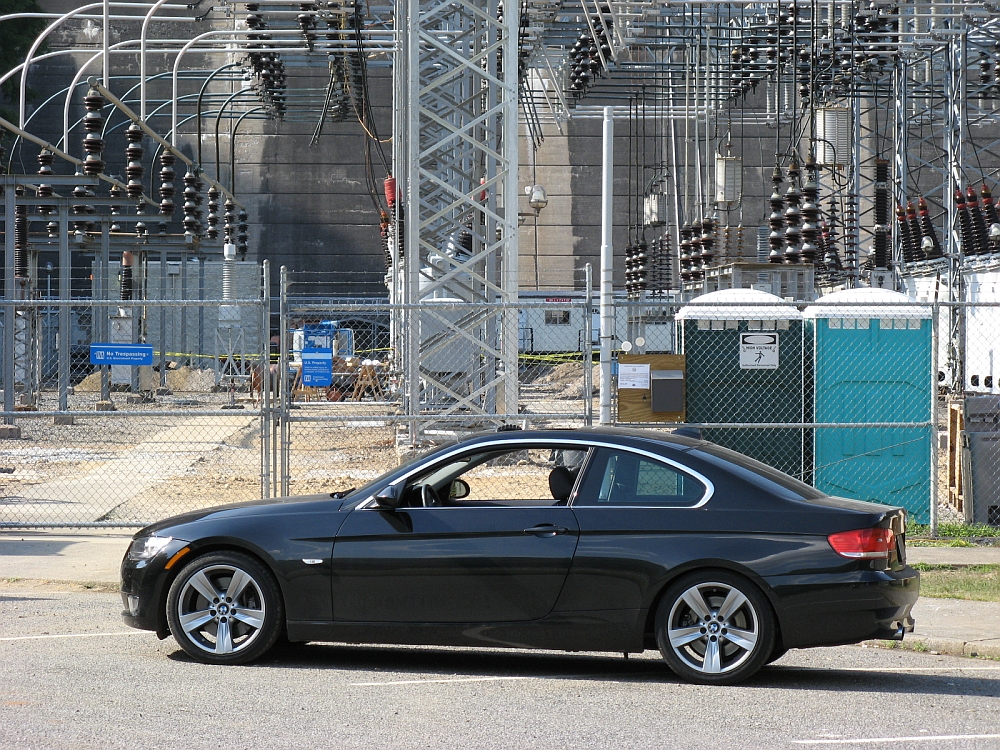
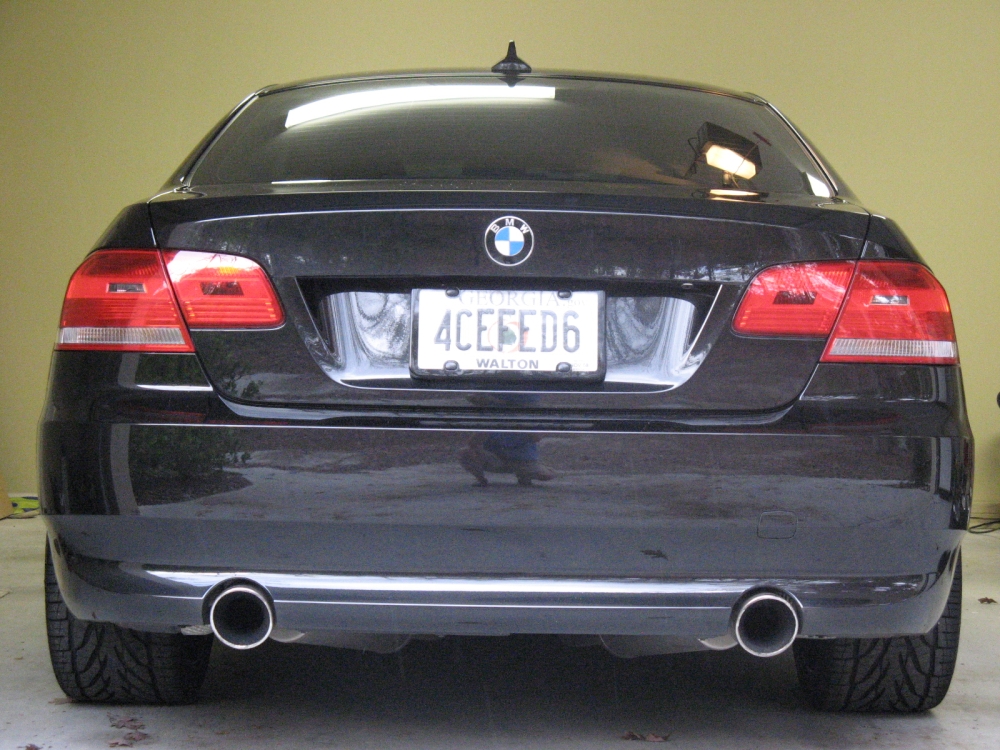
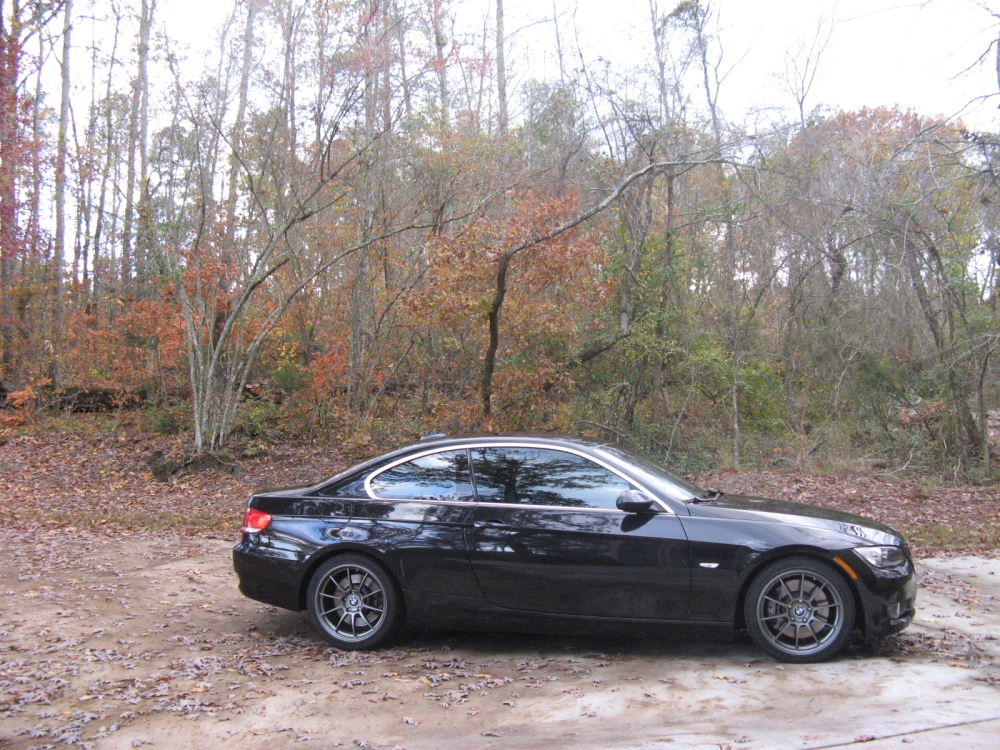
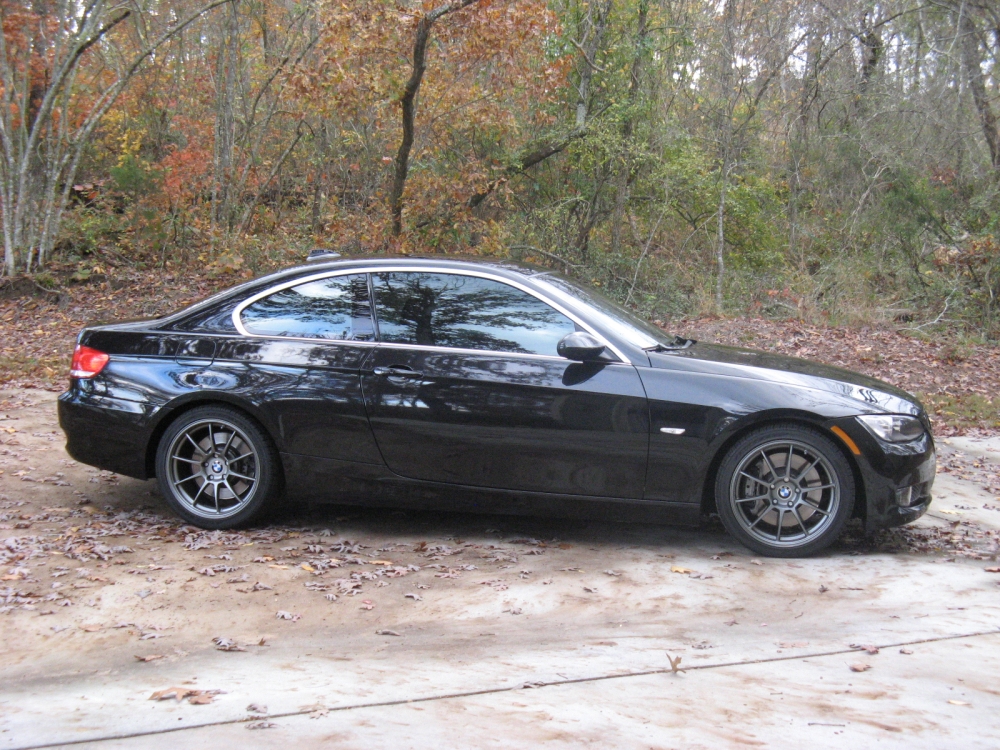
This was a 2007 BMW 335i equipped with the Premium and Sport Packages (adds oil cooler among other things) that was practically new (OK, just broken in),
and we decided to trade my wife's VW Touareg in for this. This BMW is the E92 Coupe body style
for the 335i line and shares the same twin turbo 3.0 liter motor (N54).
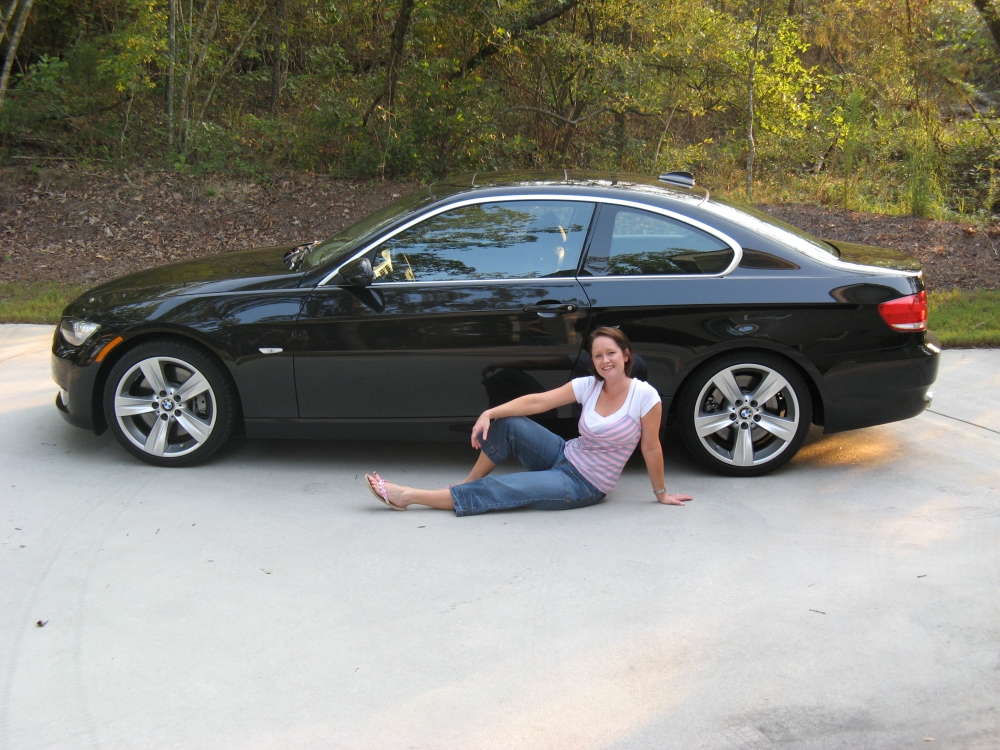
The first mod was removing the 335i from the trunk (dental floss doubled up to remove the letters, WD40 to remove adhesive) and then a wash/wax with
TurtleWax Platinum. Since it's my wife's car she felt the need to be included in some of the pics:
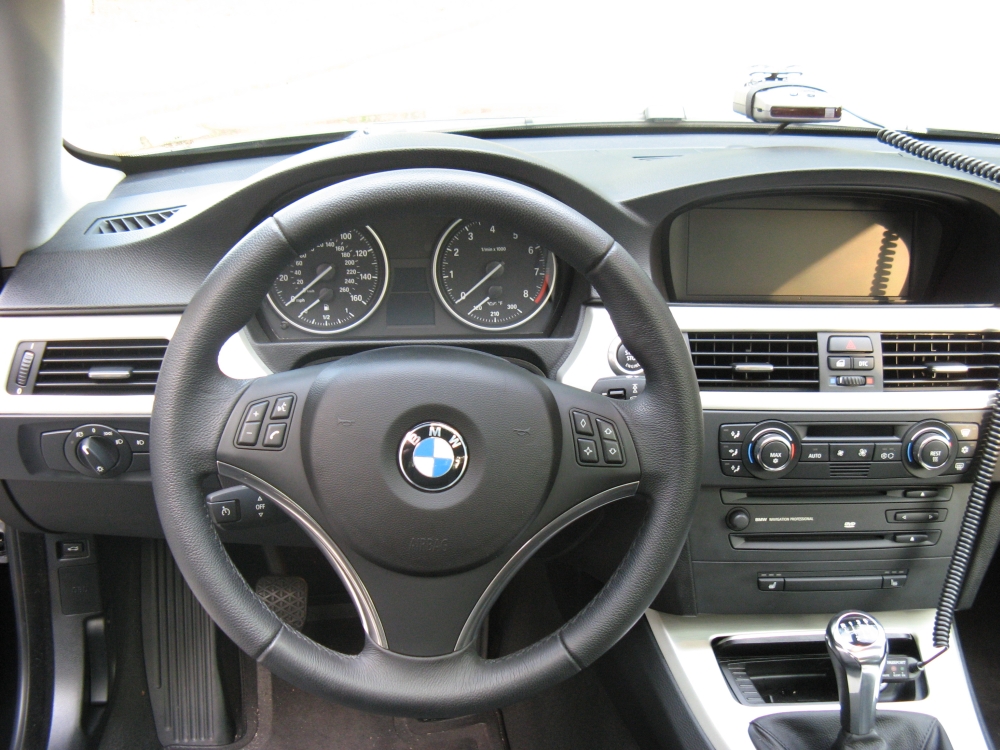
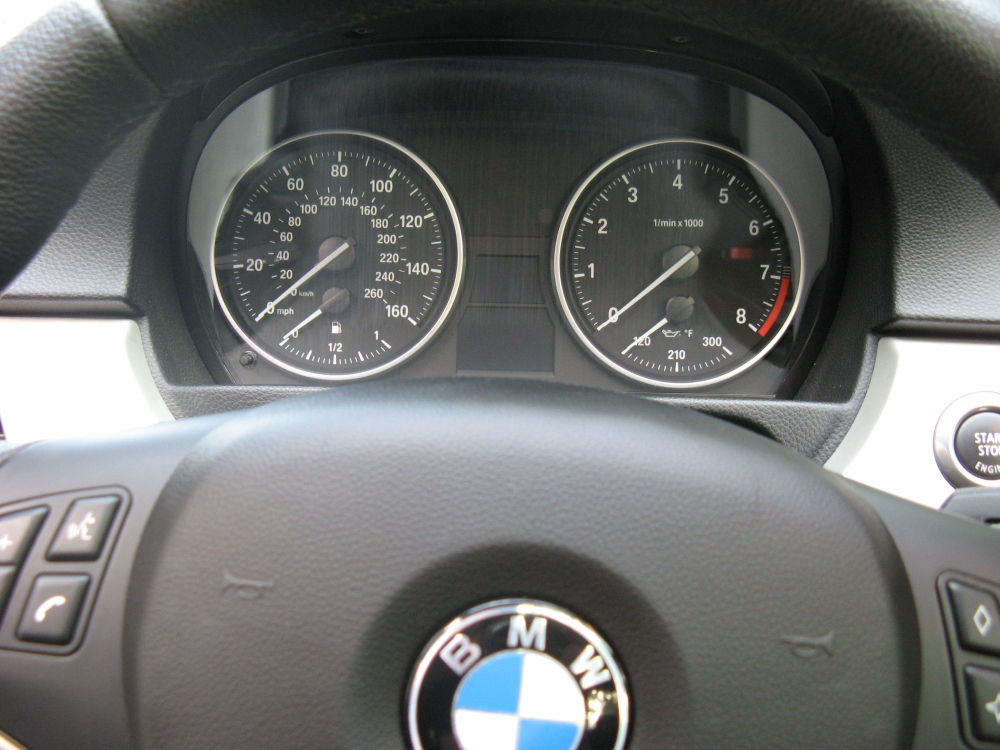
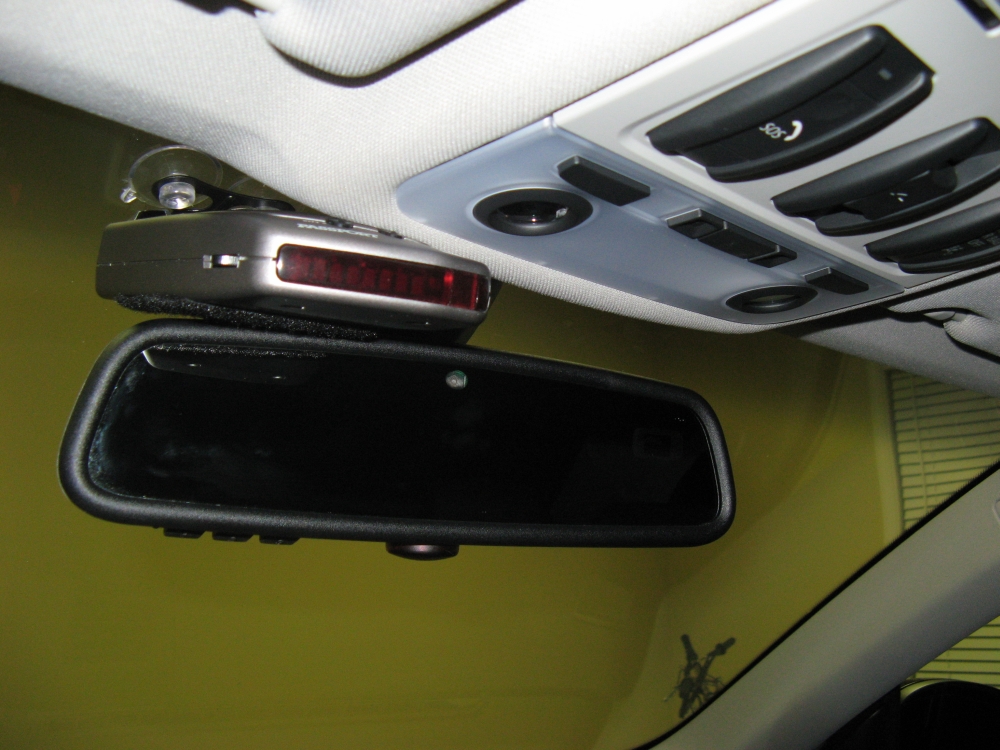
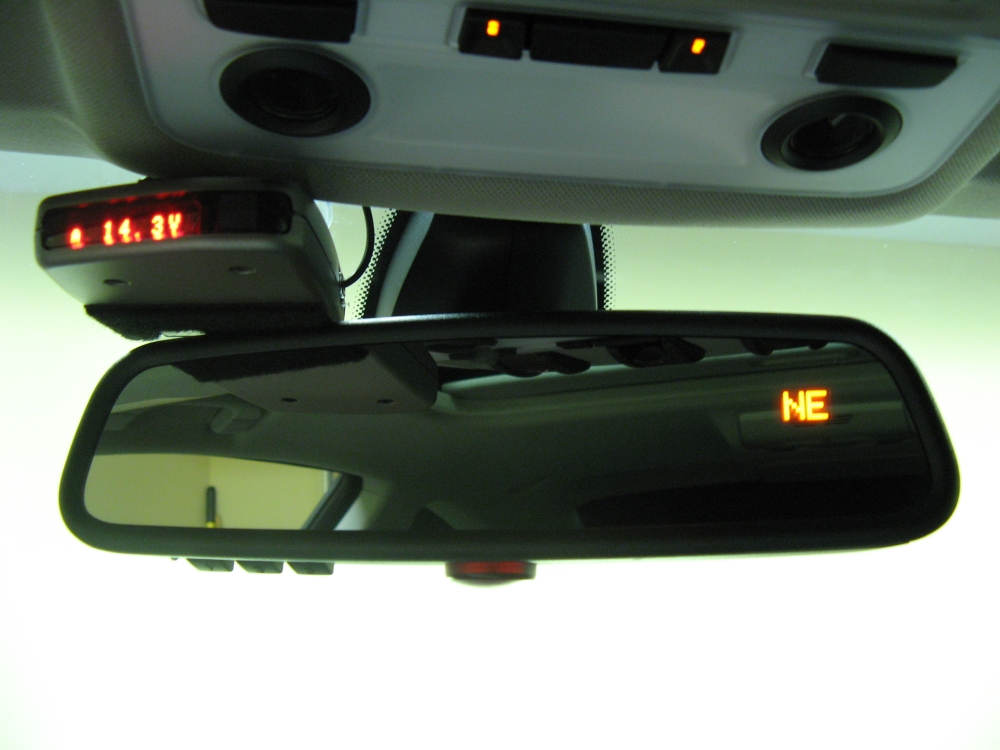
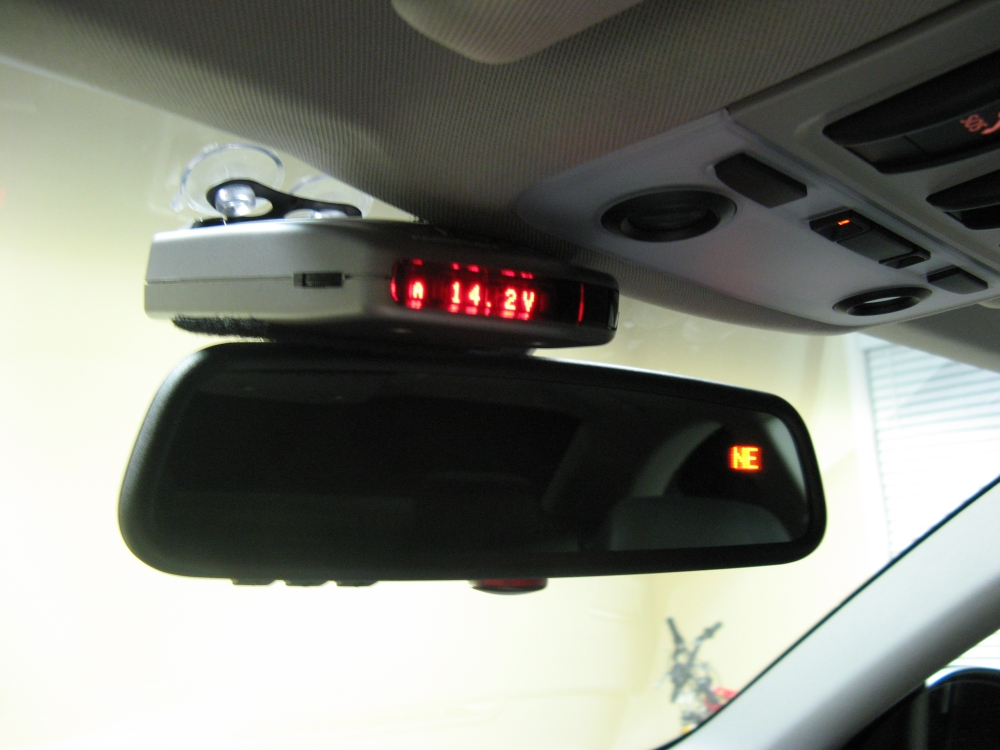
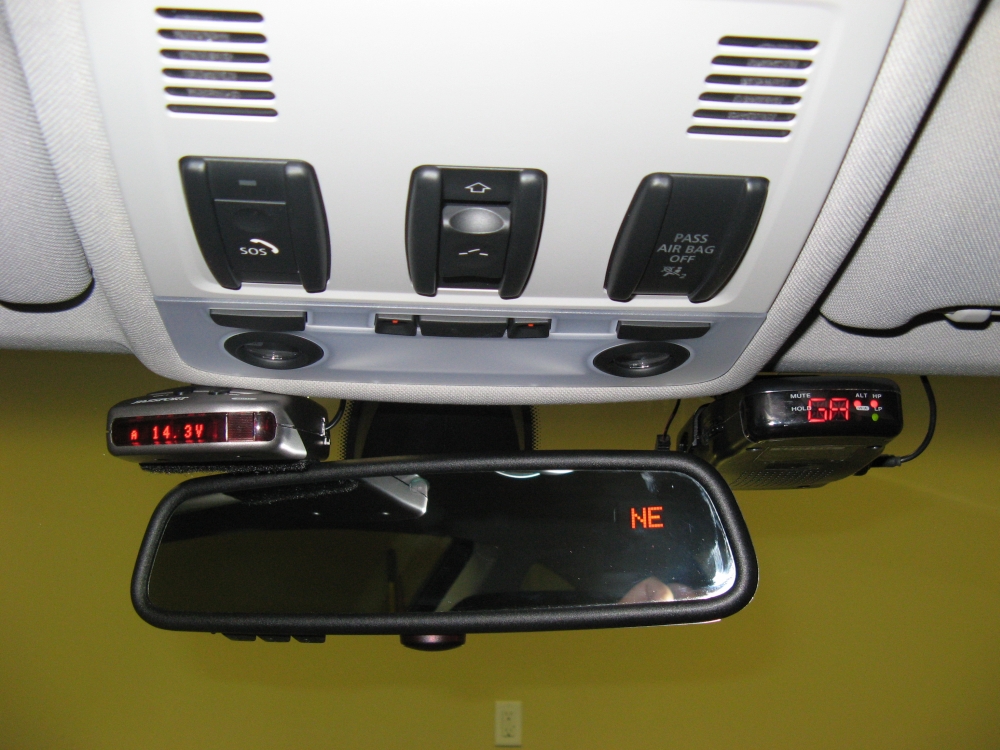
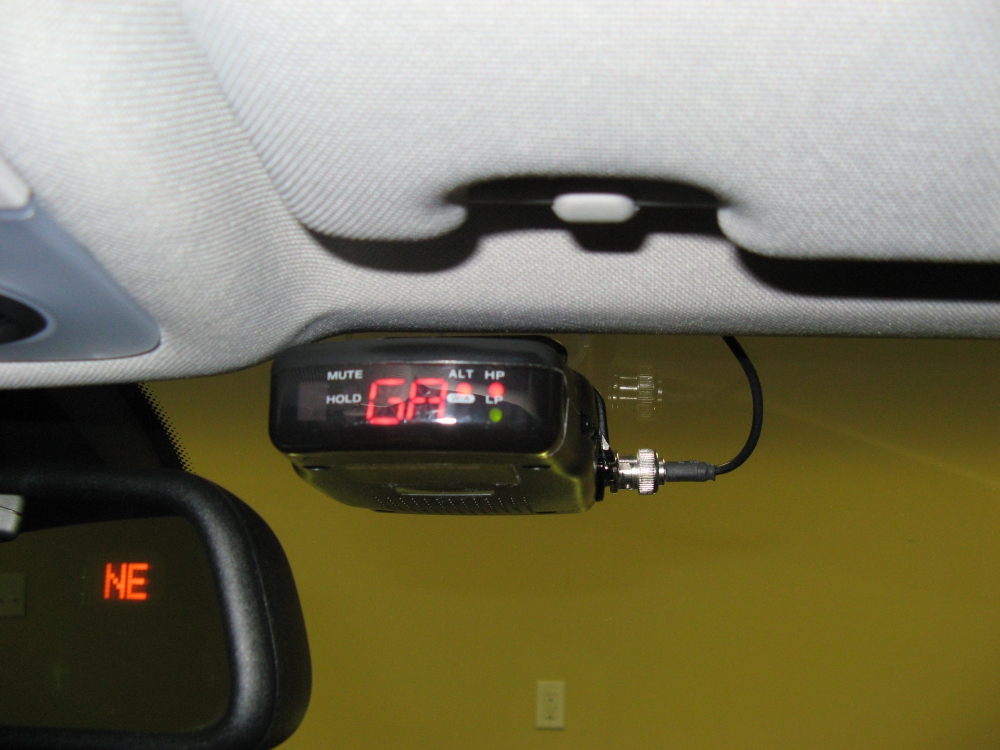
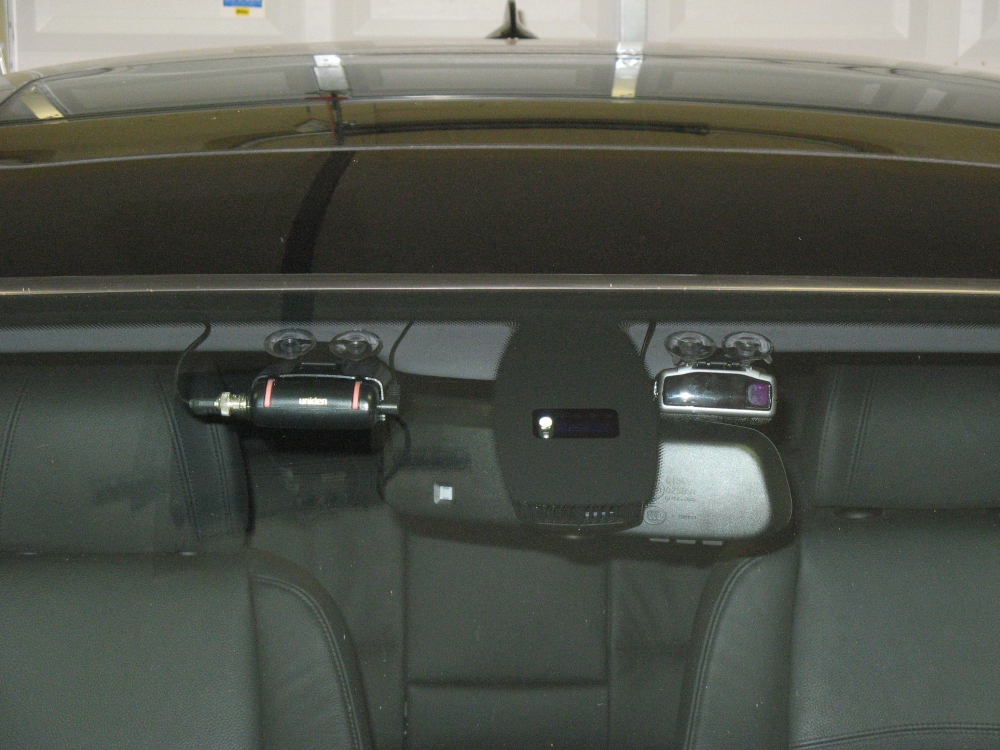
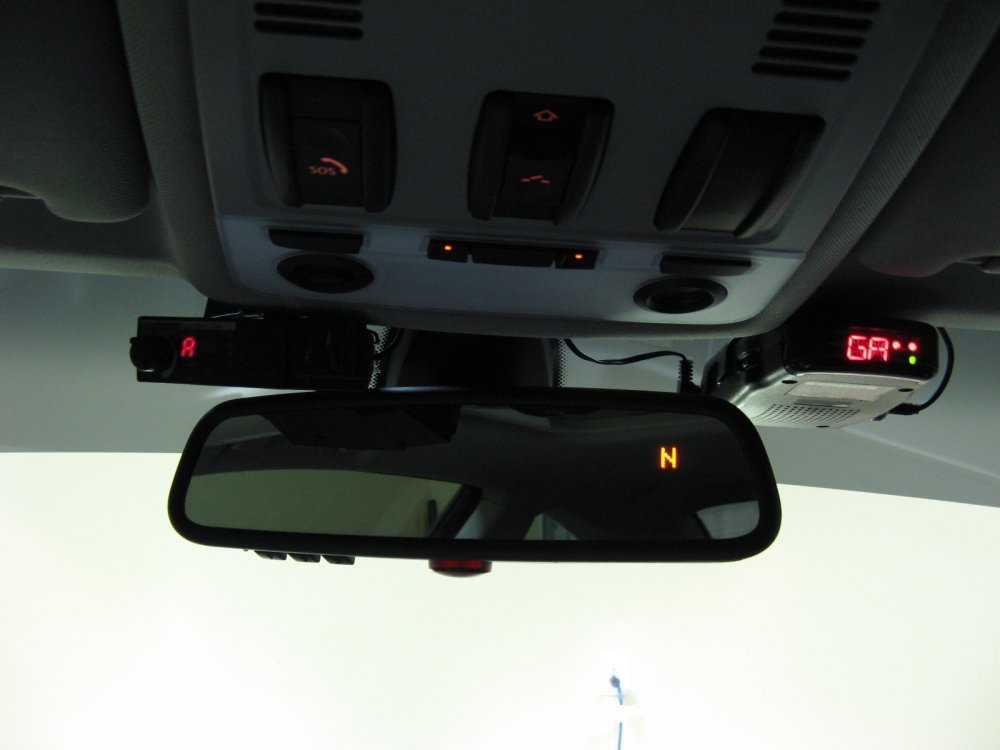
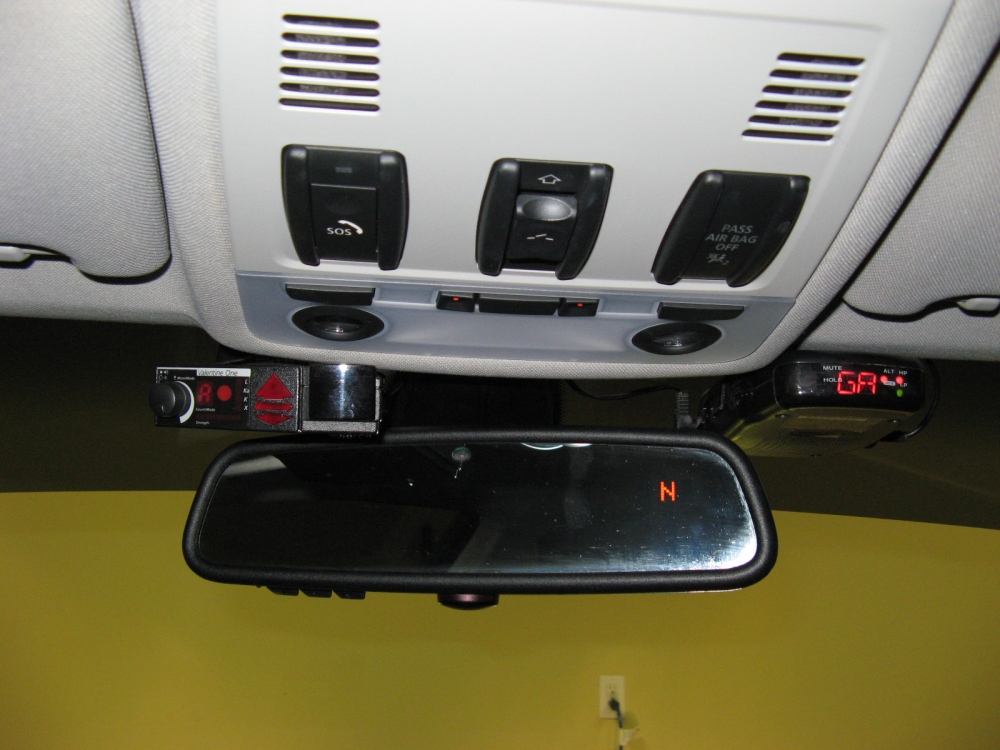
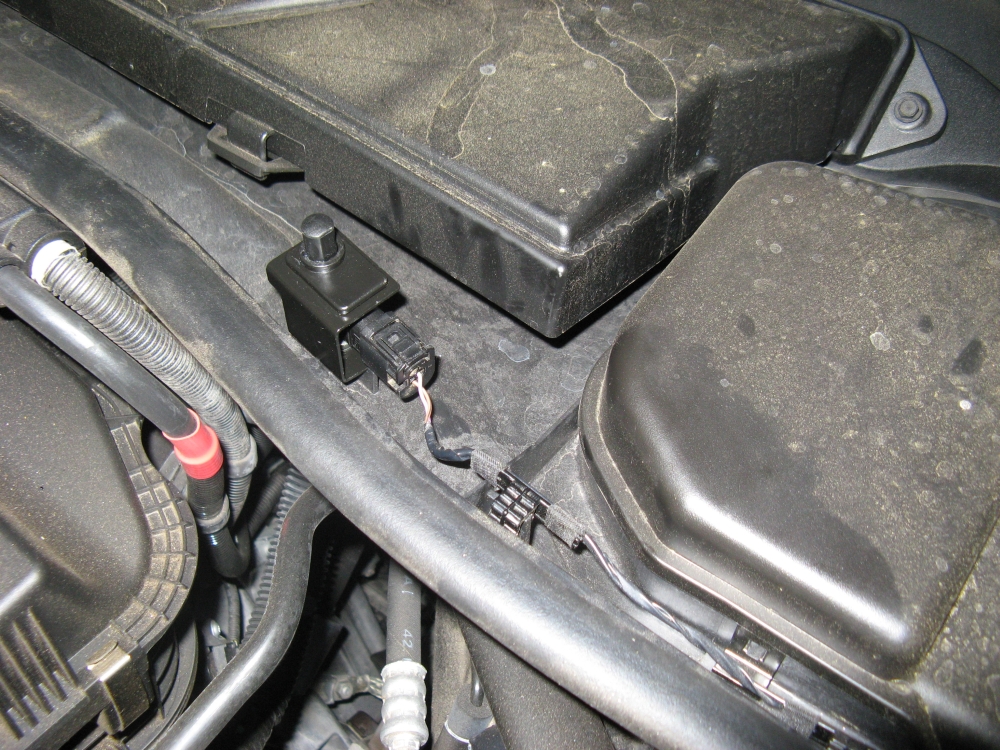
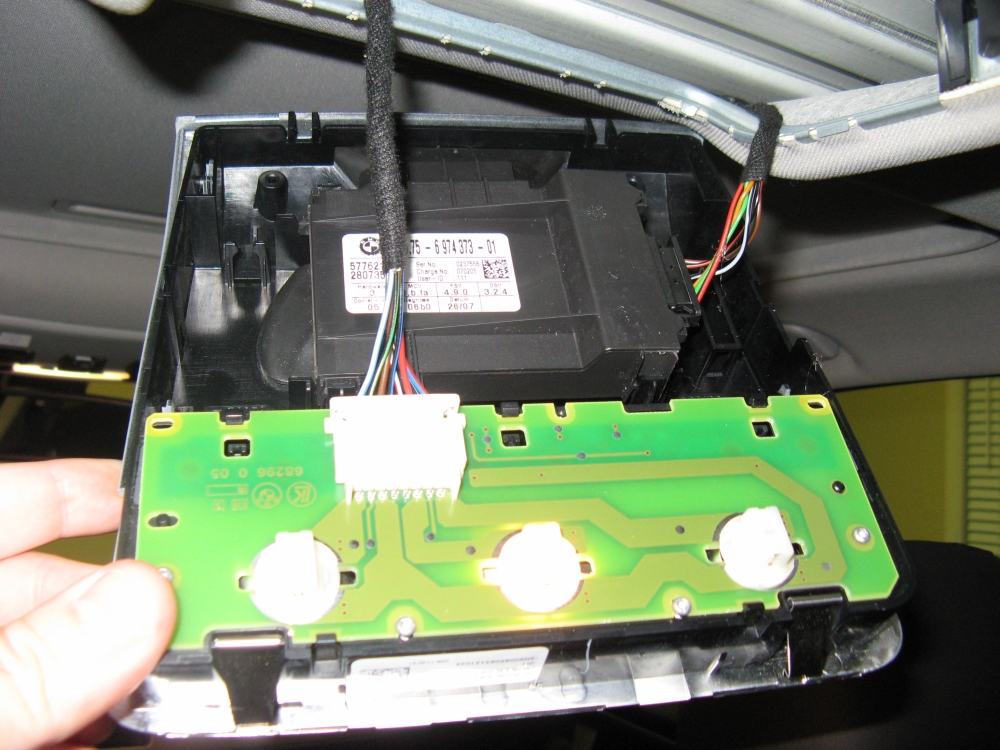
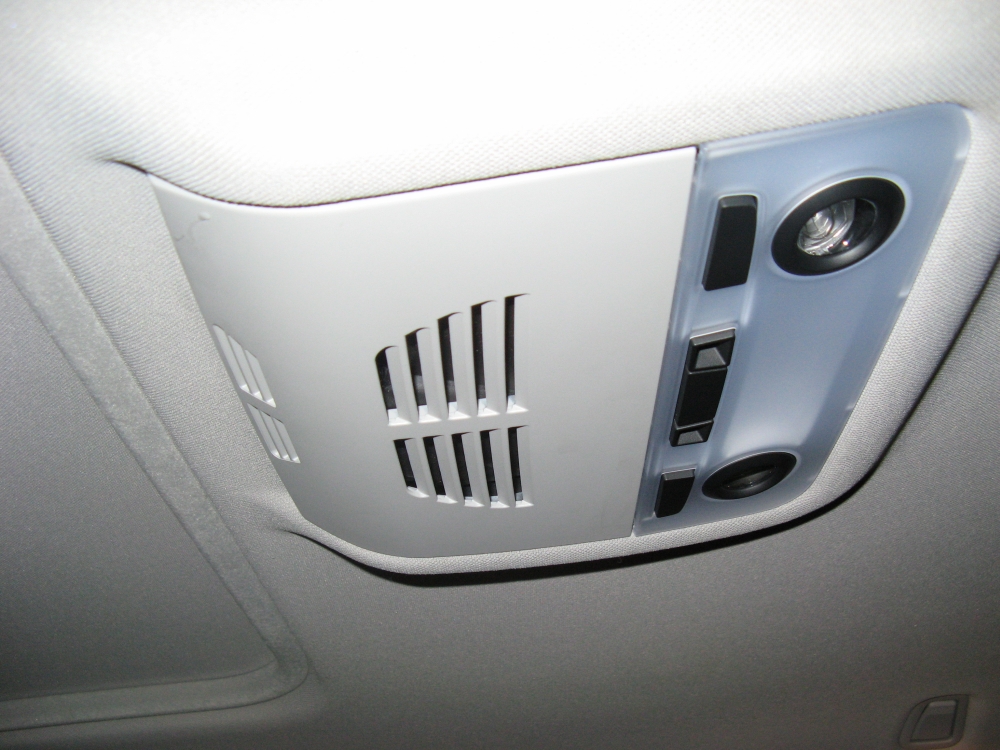
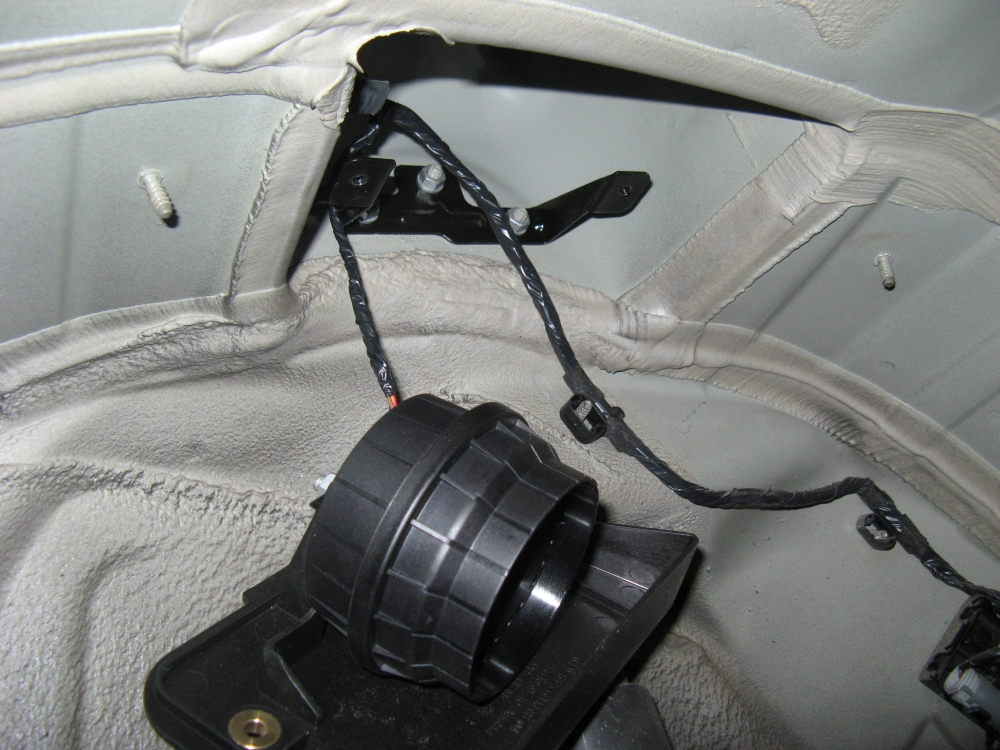
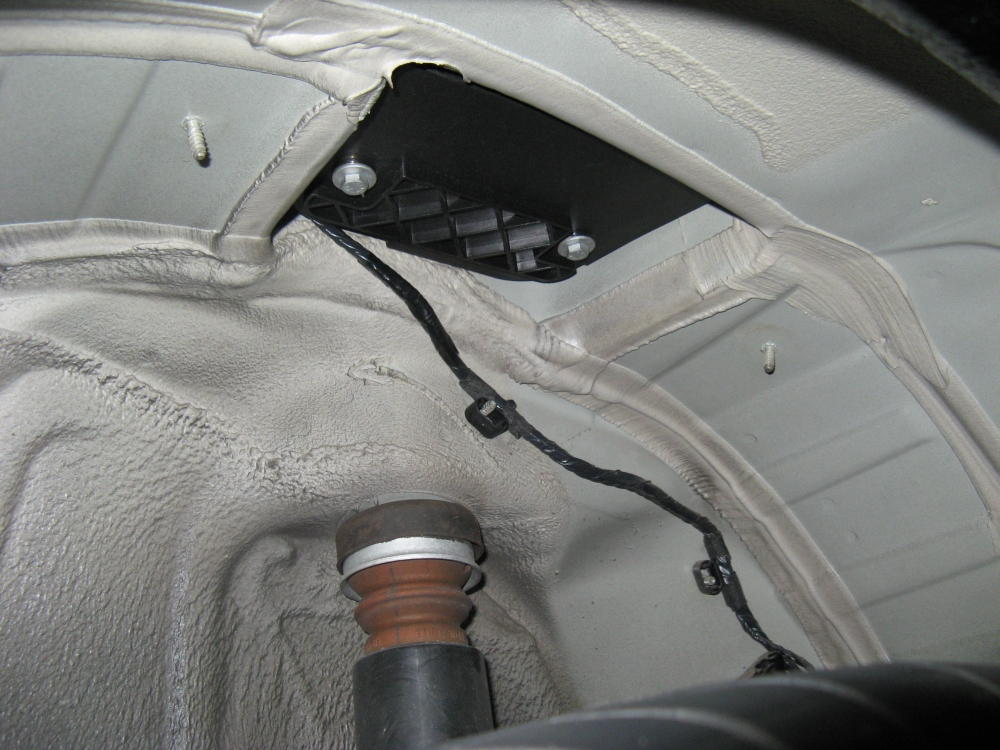
Passport
8500 X50 hard wired, functions as voltage guage between alerts, not easily noticed looking in from outside (manual
here). Uniden Beartracker BCT-12 scanner (manual here) also hard wired,
allows you to listen to police bands and alerts for transponder signals within 3-mile radius- acts as a pre-radar detector and programmable by state. There are two approaches to hard wiring the detectors: one is to use the
Homelink power wire in the upper front console as detailed HERE or to run a wire to
the fuse box and use a tap as detailed HERE. I decided to use the Homelink
power wire to avoid running wire under the a-pillar airbag. I mounted the detector above the rearview mirror, using soft Velcro on the bottom to prevent rattles
from contact. It is nice to have the power cord from the lighter and around the mirror gone
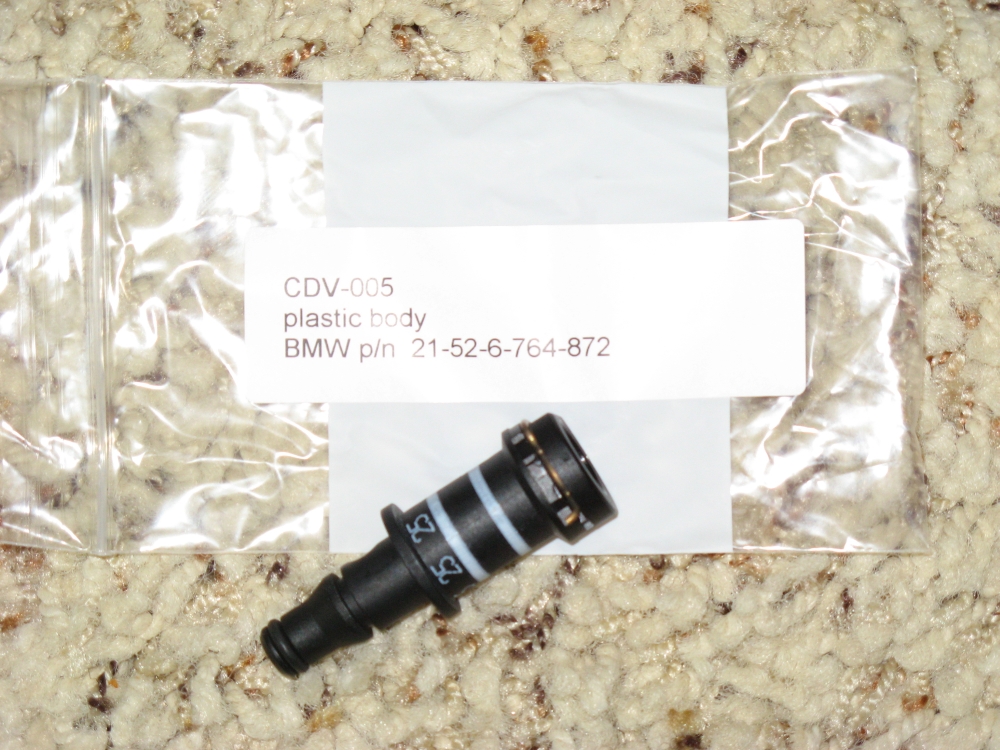
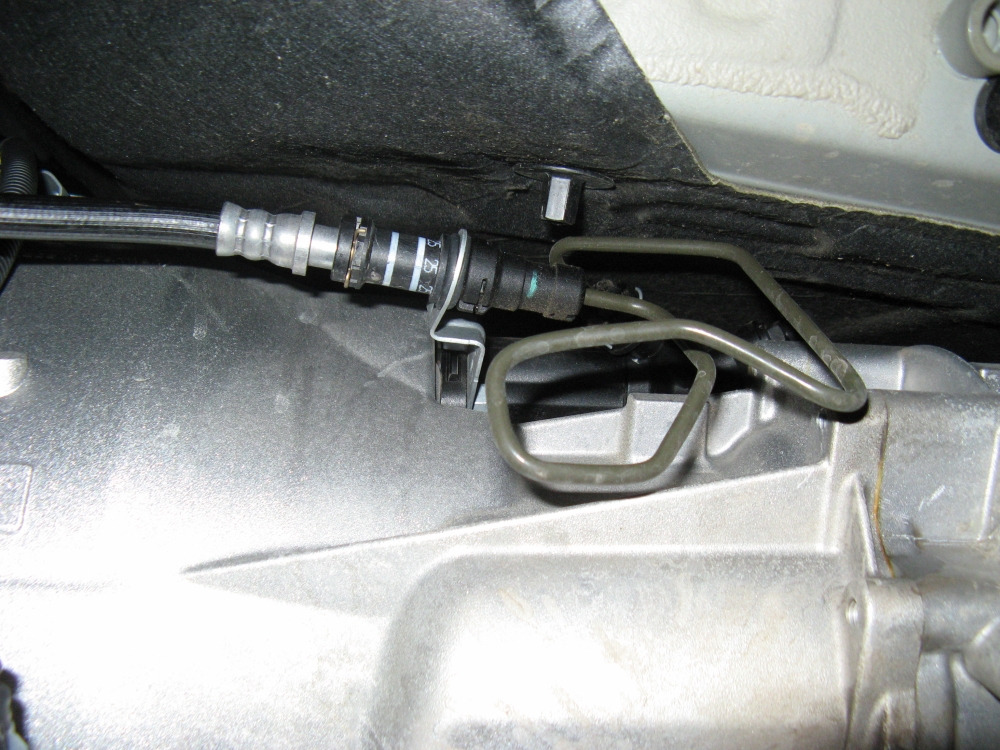
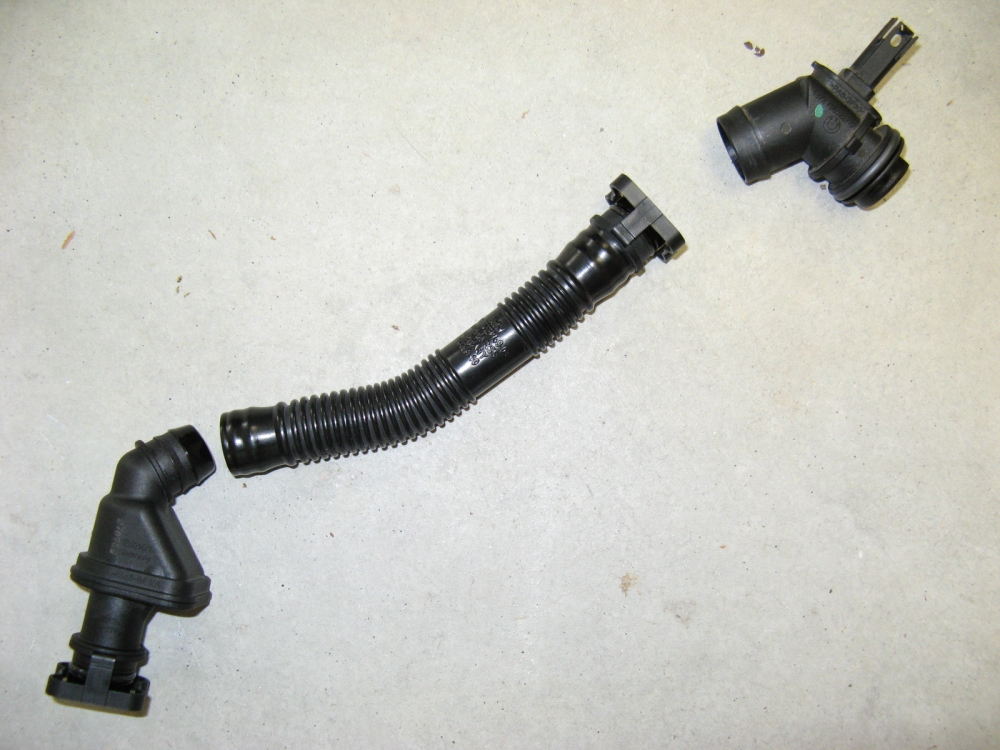
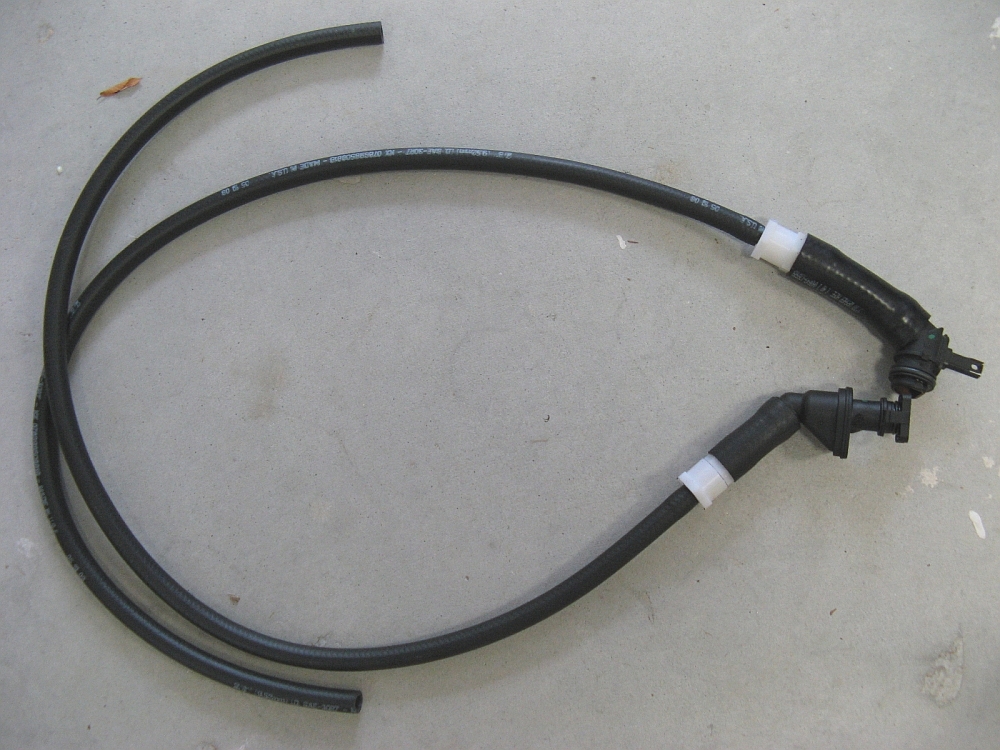
Modified CDV (Clutch Delay Valve) installed from Zeckhausen Racing.
The OEM CDV delays clutch engagement and could accelerate clutch wear and cause jerky shifts due to this delayed clutch engagement. Zeckhausen has corrected this
with their modified CDV that removes the restrictor and allows the clutch to engage as it should. I assembled a DIY guide
HERE to help others perform this mod (at their own risk
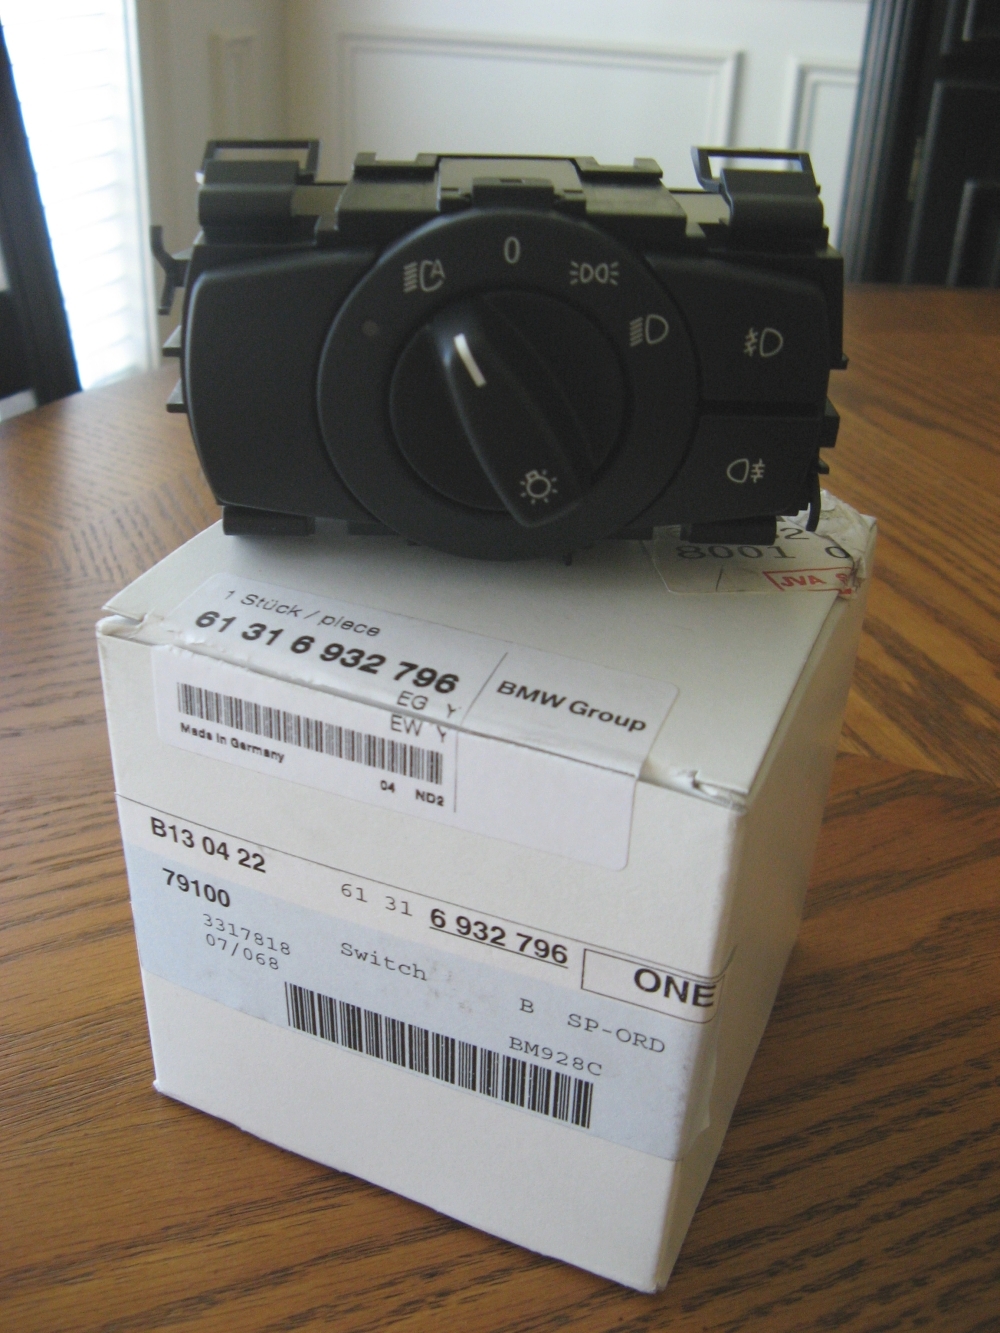
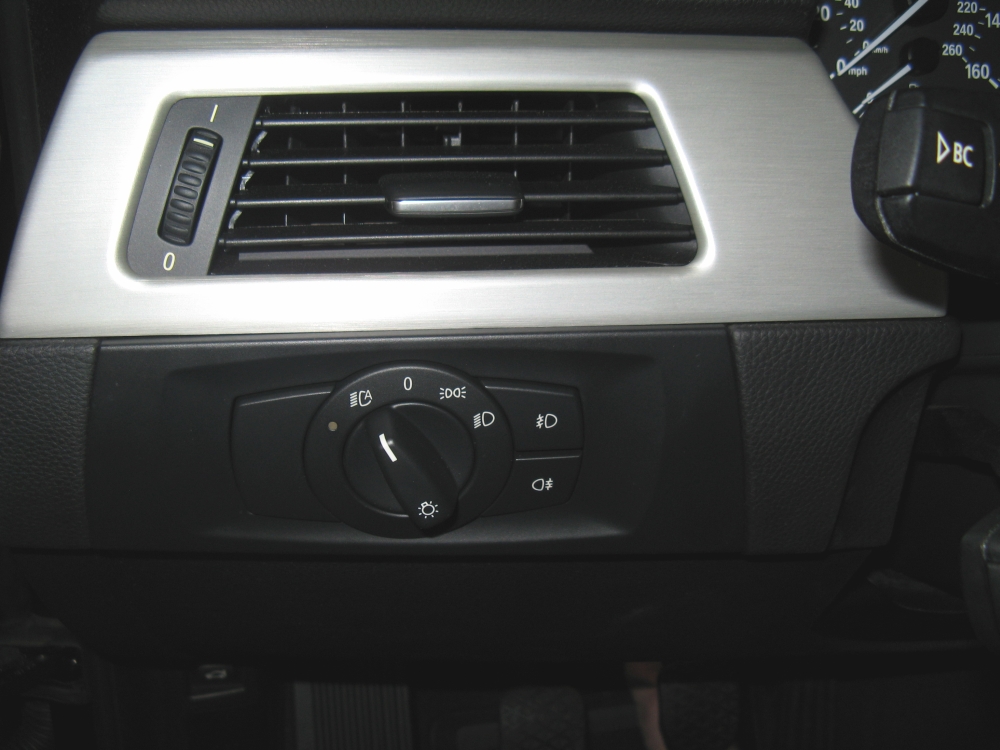
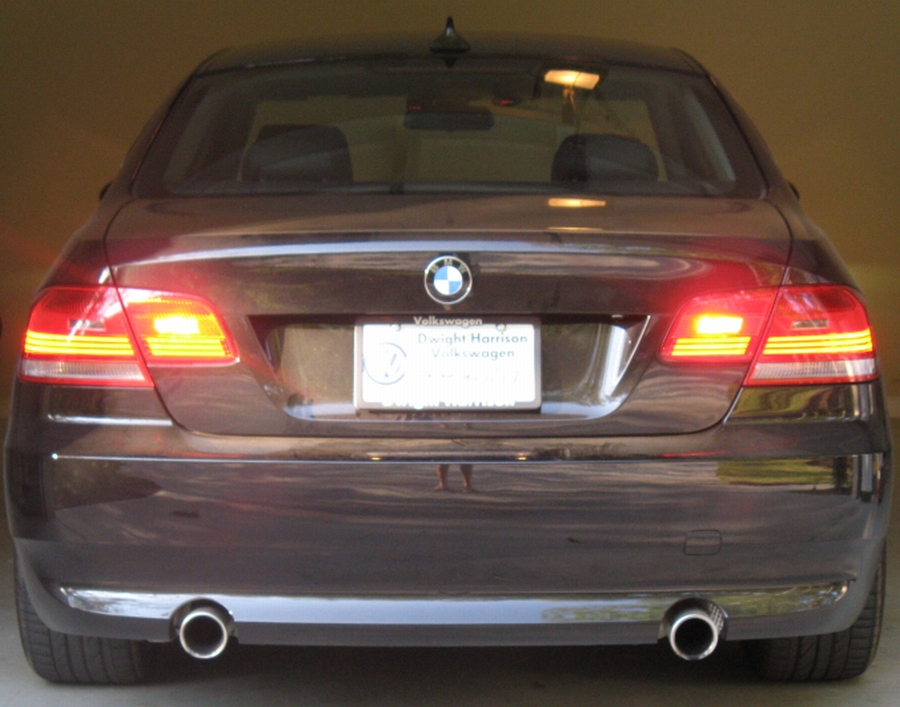
European light switch (P/N 61316932796) from Tischer BMW Parts installed.
This switch is all that was required to activate rear fog lights. These lights are BRIGHT and should only be used in reduced visibility conditions. I assembled a DIY guide
HERE:
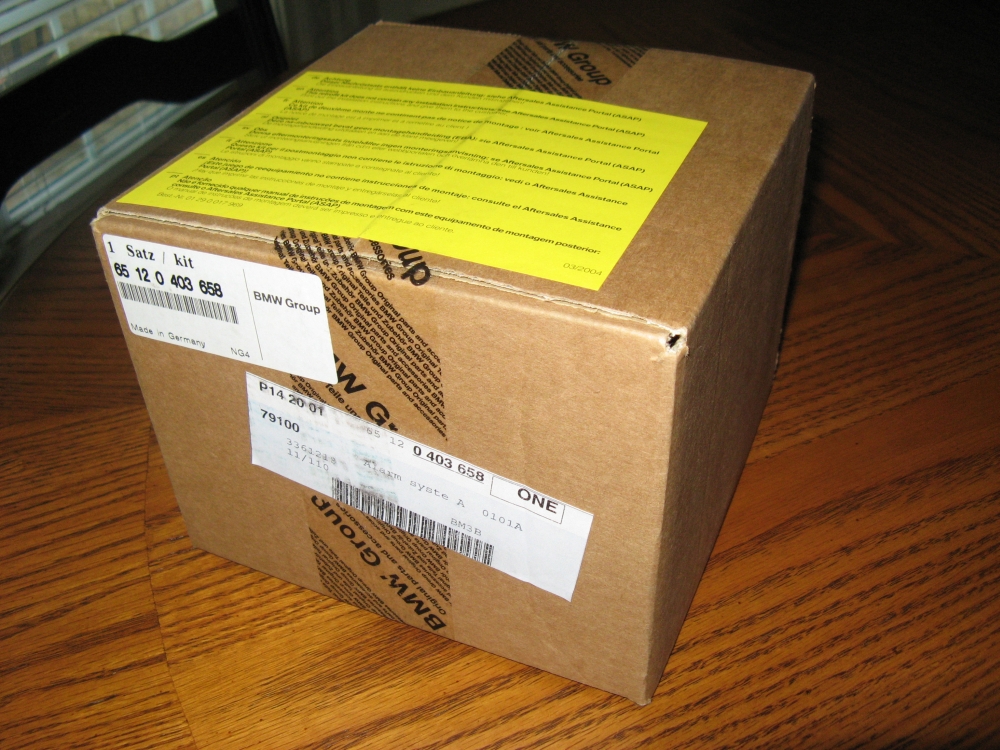
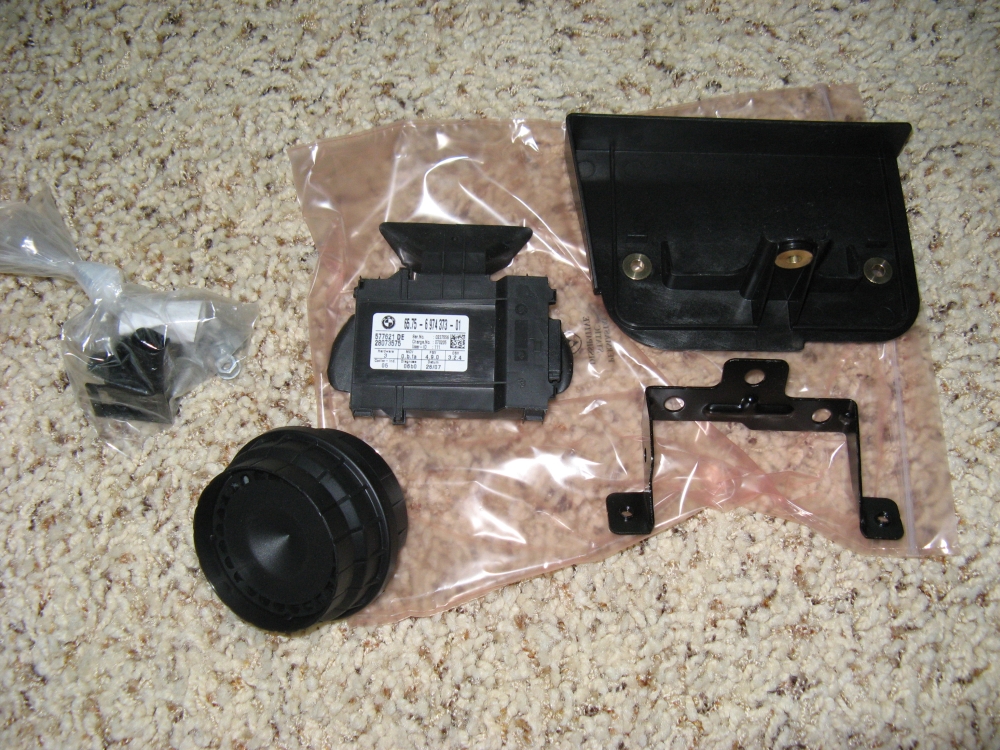
OEM BMW Alarm System (P/N 65120403658) from Tischer BMW Parts installed.
The E90/92 comes pre-wired from the factory for the alarm which consists of a hood switch, an interior ultrasonic intrusion sensor, and a LOUD siren (I installed in that order as well). I used the DIY guide
HERE to install this and the BMW instructions HERE. The alarm
may require activation by your BMW dealer to fully function. Mikey335i filmed this video of how the alarm sounds HERE :
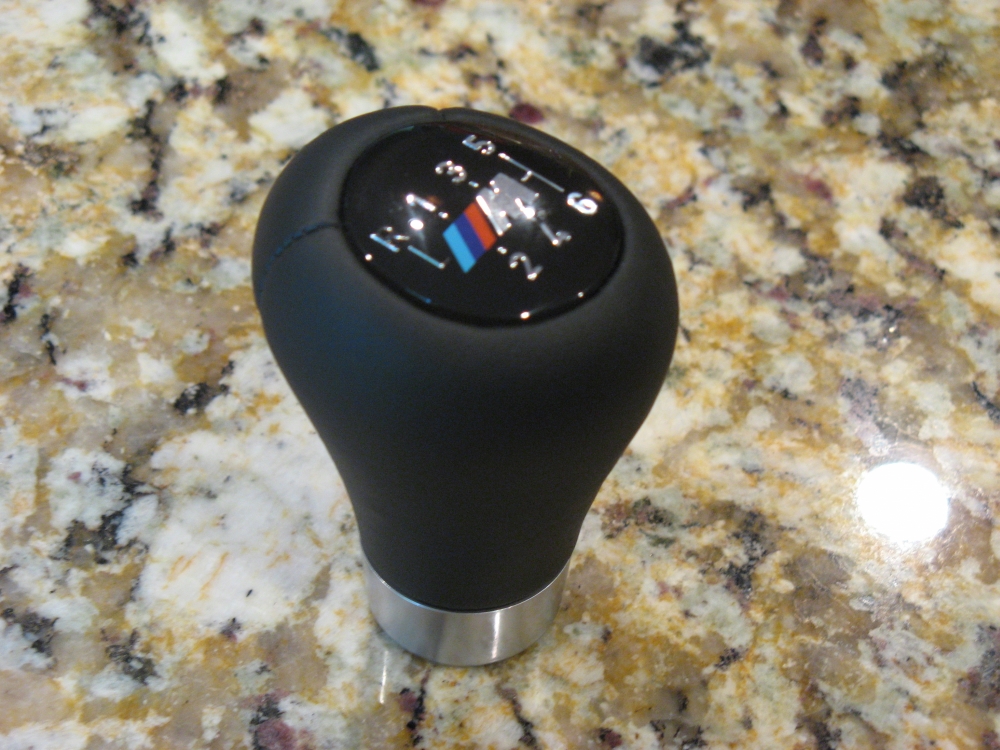
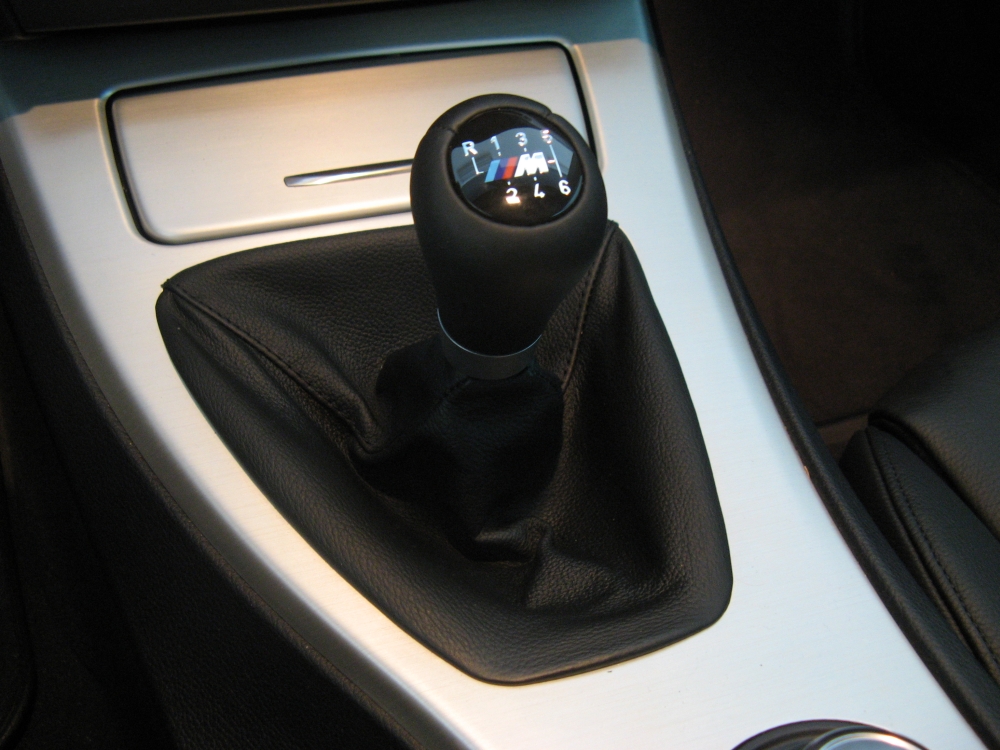
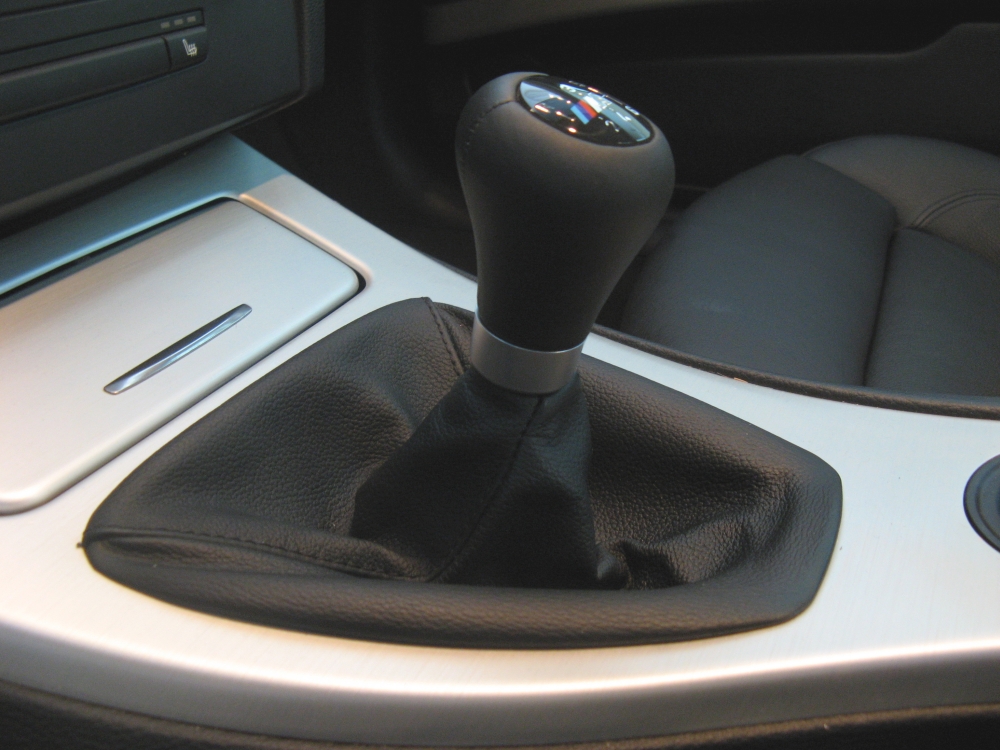
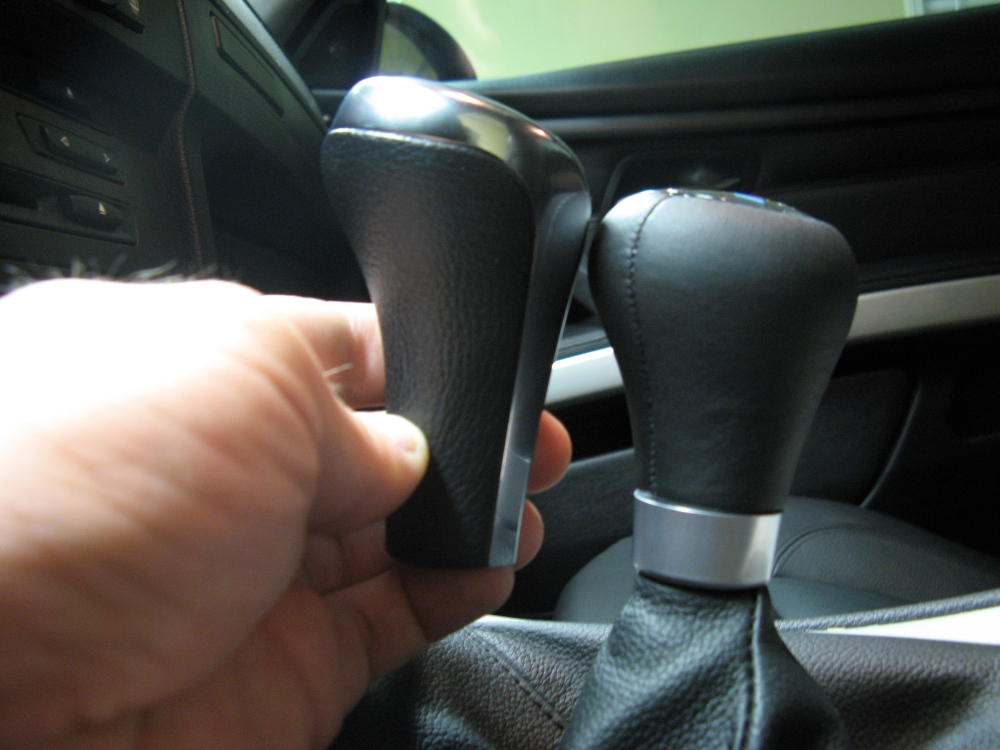
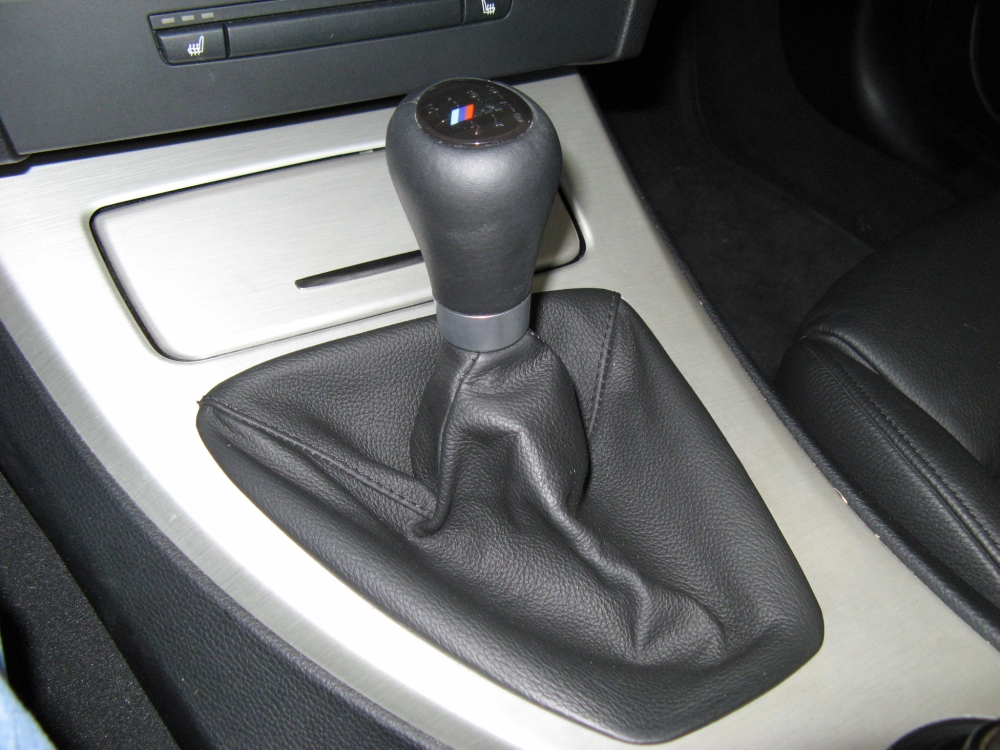
OE BMW ZHP short shift knob (P/N 25117896886) from Tischer BMW Parts installed.
This knob is weighted (5.5 oz vs OE 3 oz) and offers a shift feel superior to the OE knob, the shifter seems to put itself into gear. It is a little shorter than the OE knob too and provides a better shifting position
in my opinion. To remove the OE knob you just have to jerk it up HARD and it comes right off, make sure your head/face is not positioned above the knob while doing this (others have
found this to not work so well). Be sure to align the shift knob with the notch in the shift rod before pressing it on:
Windows Tinted 35% by Mr. Tint (aka Barry Wood, H:(770)963-7924 C:(404)392-8007) :
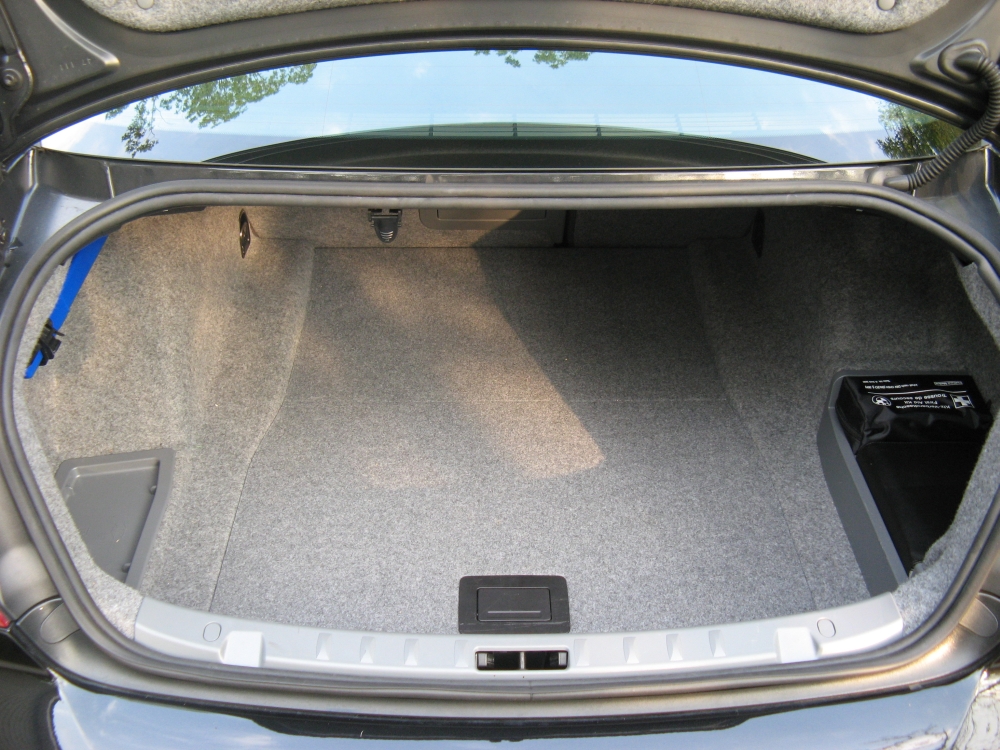
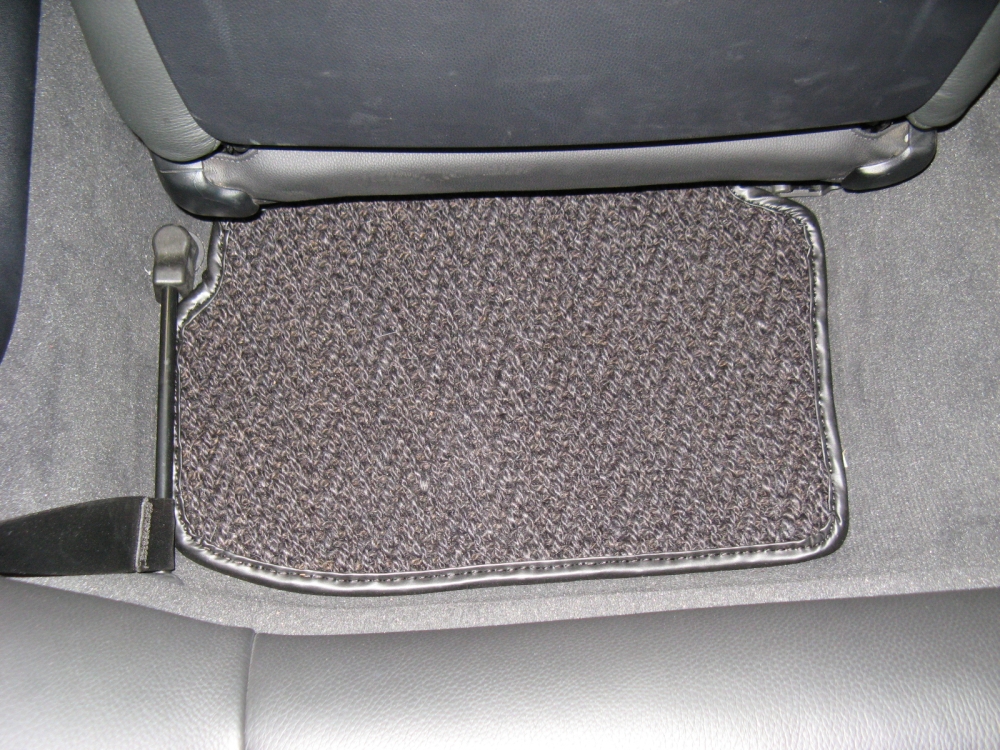
BMW All Weather Cargo Liner (P/N 82110399159)- purchased from e90post.com classifieds, protects trunk carpet and
acts as non-slip mat:
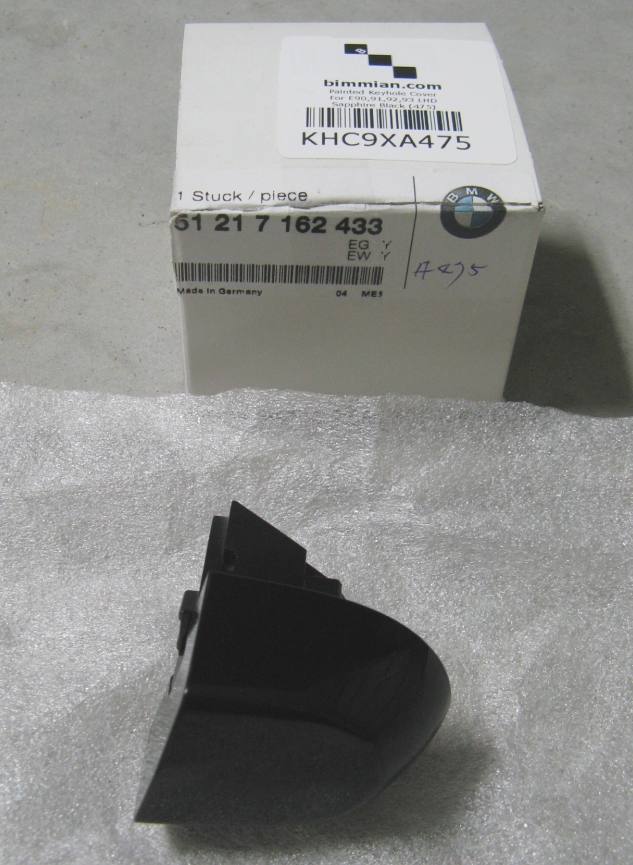
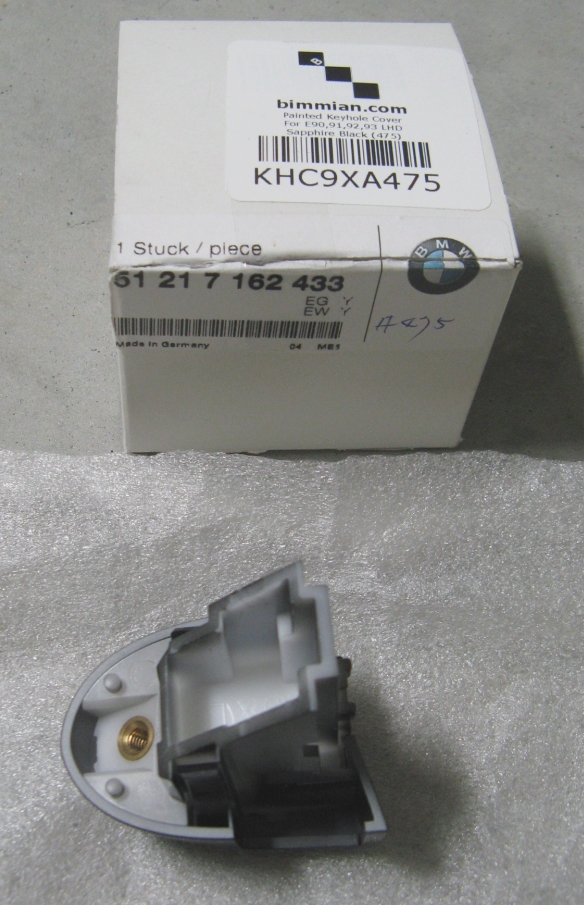
Bimmian
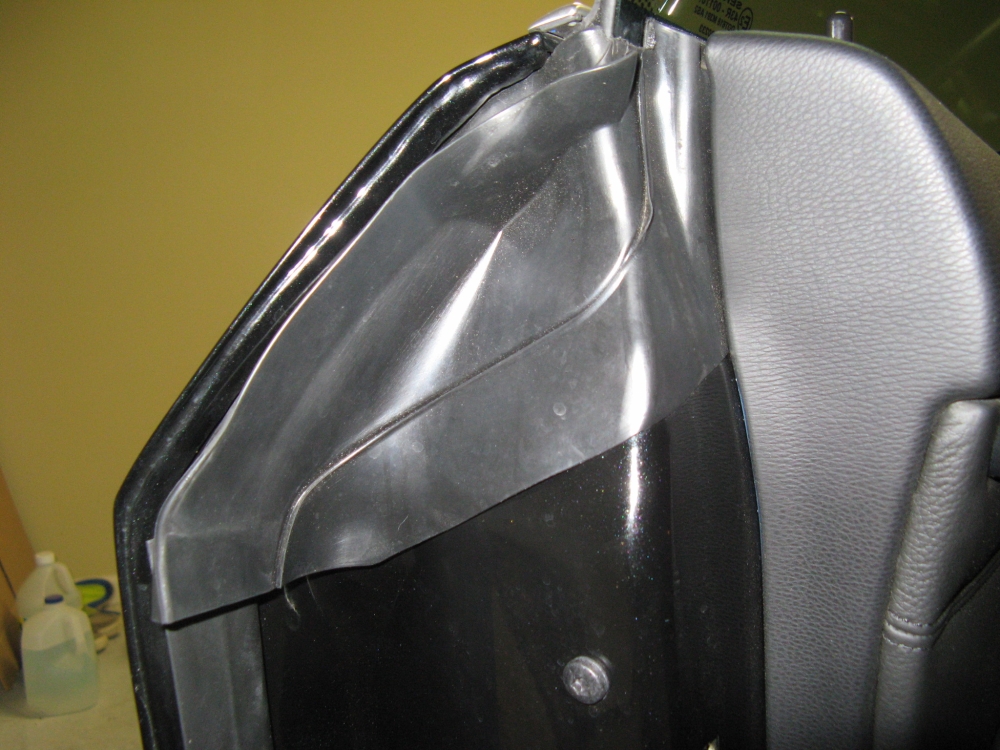
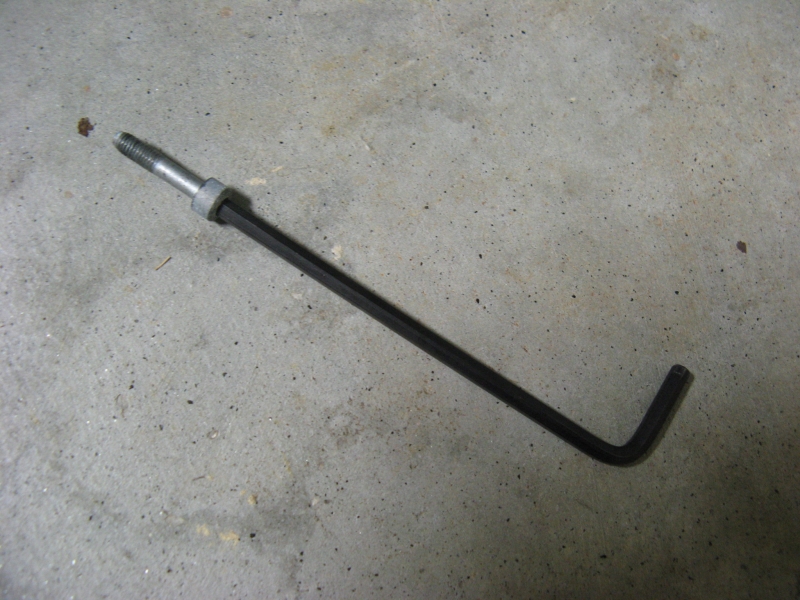
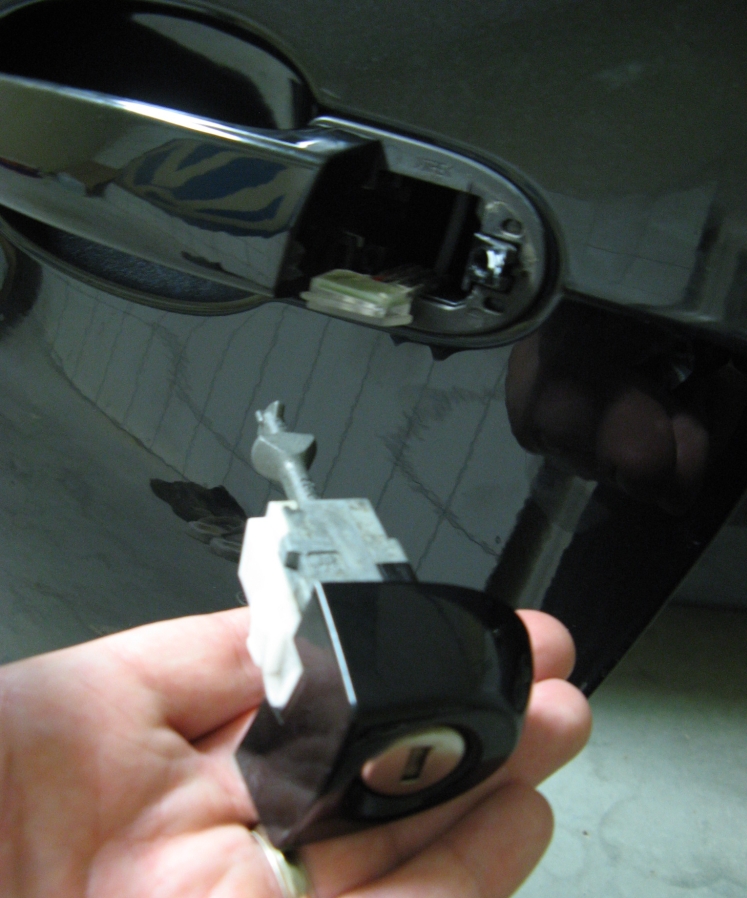
Keyhole cover purchased from Mod Bargains- added security and enhanced aesthetics.
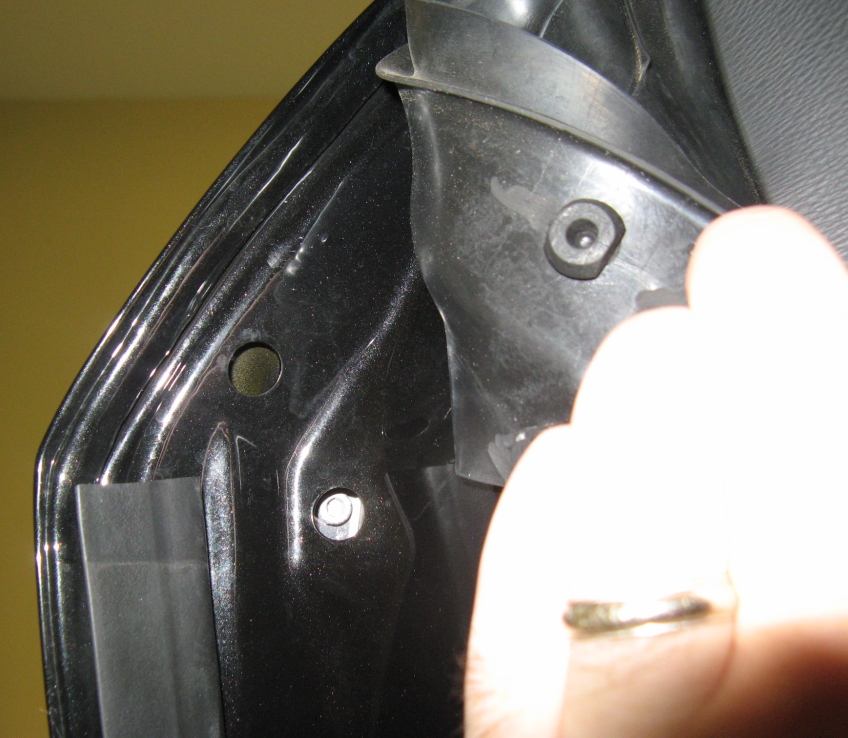
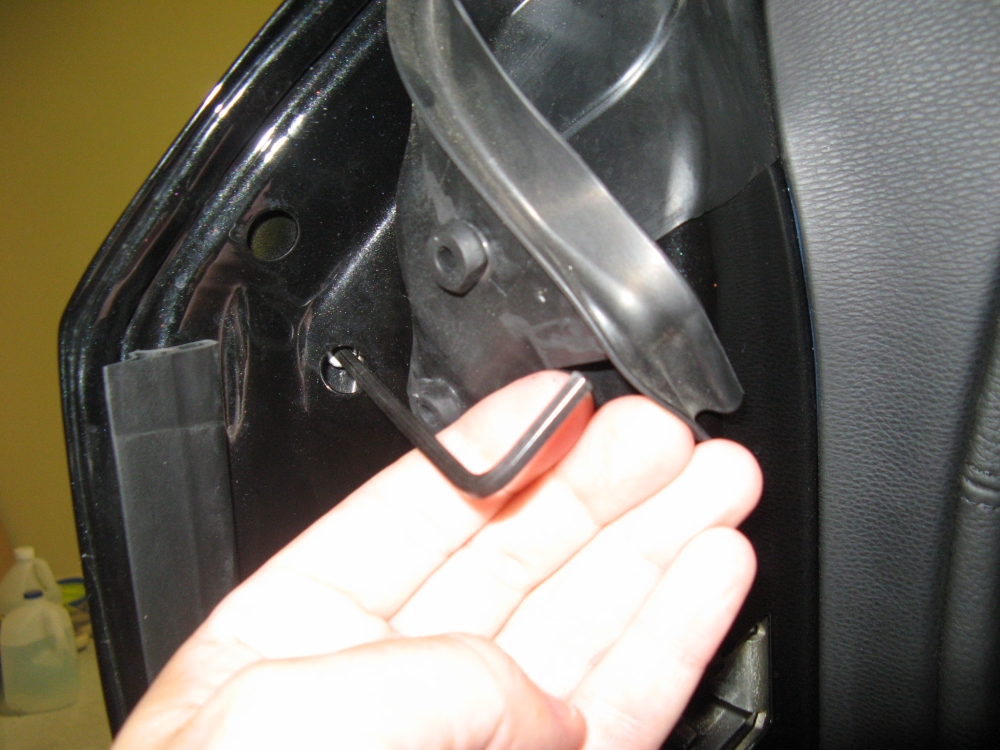
The keyhole cover comes painted to match your paint code. To remove the lock cylinder, the rubber seal at the corner of the door has two rubber nubs that are press fit, can be removed by carefully pulling out until the bolt hole for the
lock cylinder is accessible. A 4mm HEX wrench is used to loosen/remove the HEX bolt and the lock cylinder can be pulled out. Installation is reverse of removal.
The BS paint is a pretty close match. Generic Bimmian installation instructions HERE in pdf
format.
New Tag: Force Fed 6 Cylinder
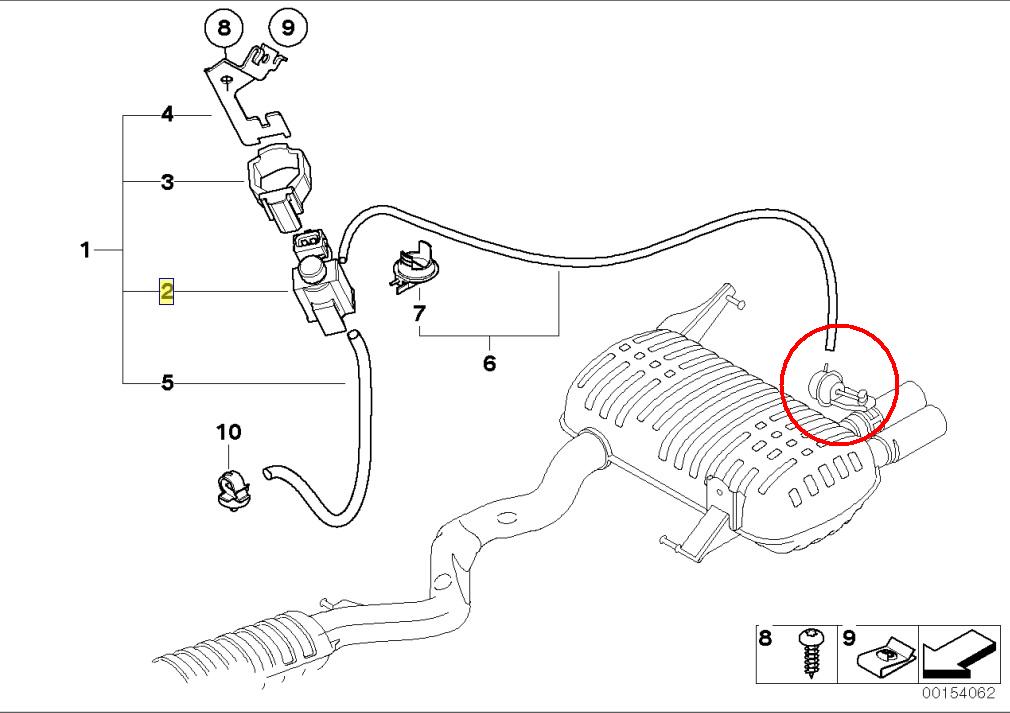
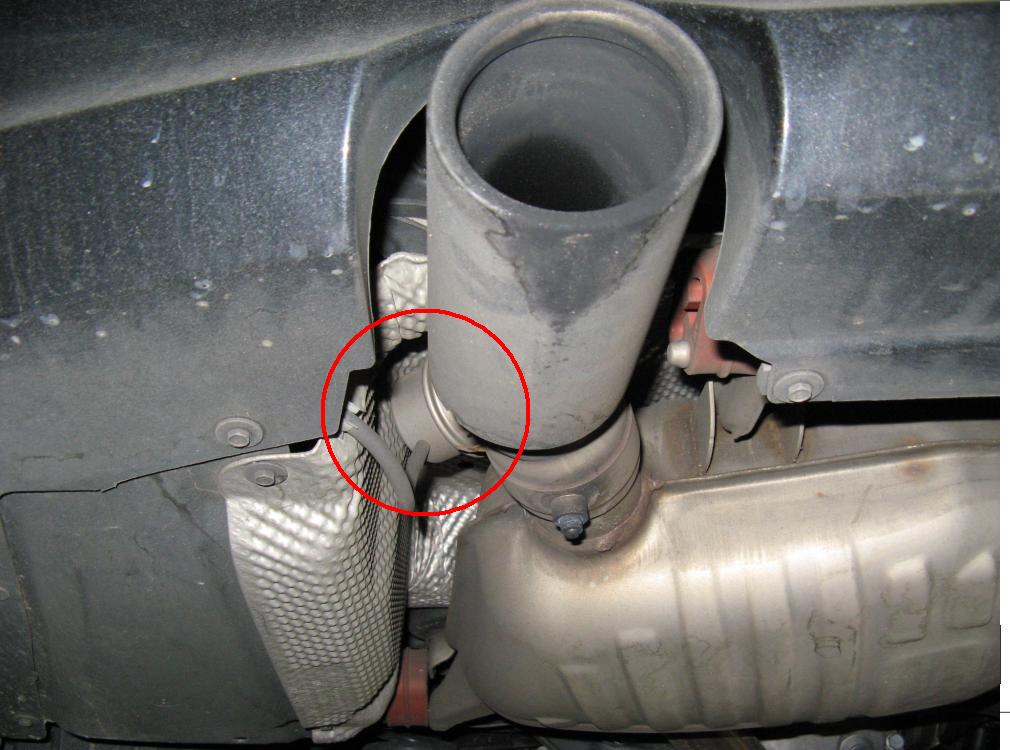
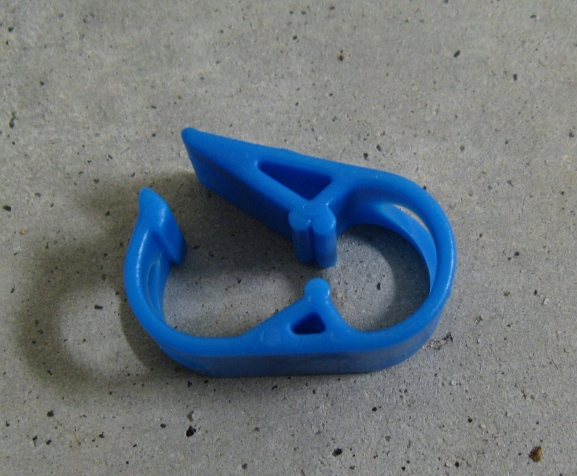
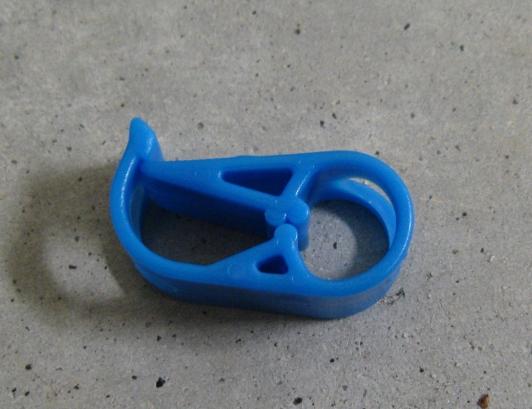
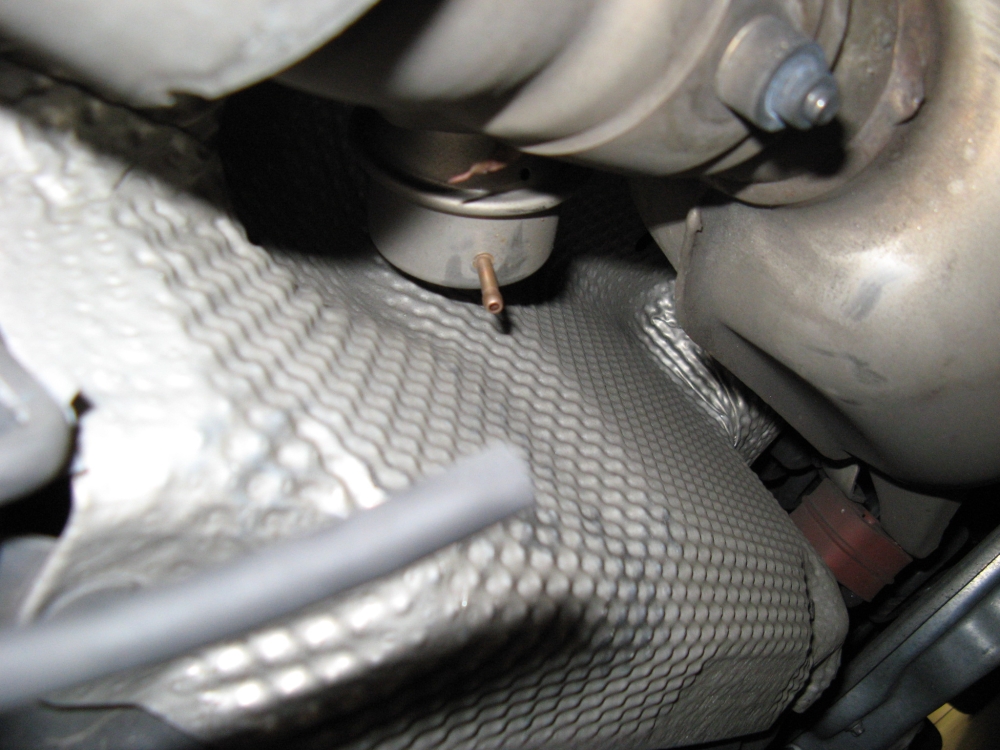
Exhaust Valve Mod- the 335 is equipped with a muffler that has a vacuum
controlled valve which controls the sound. By removing the vacuum source from the vacuum motor, it is a little louder all the time. Some have done this by
unplugging the electronic control but this will cause error codes (but no CEL). An alternative is to use medical tubing clamps (Google 'medical pinch clamp') that can be easily opened or
closed (on/off). The vacuum line is removed from the vacuum motor and the clamp is slid over the vacuum line, the vacuum line is reinstalled on the vacuum motor.
By having the clamp open the exhaust valve will work as it always has, closing it will cause it to be louder:
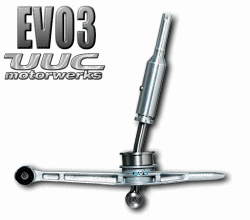
UUC Motorwerks
Evo3 short shifter (P/N USSE335). This shifter has shorter throws than OE,
but maintains the OE shifter physical height, and is SO much more precise, definitely a worthwhile mod.
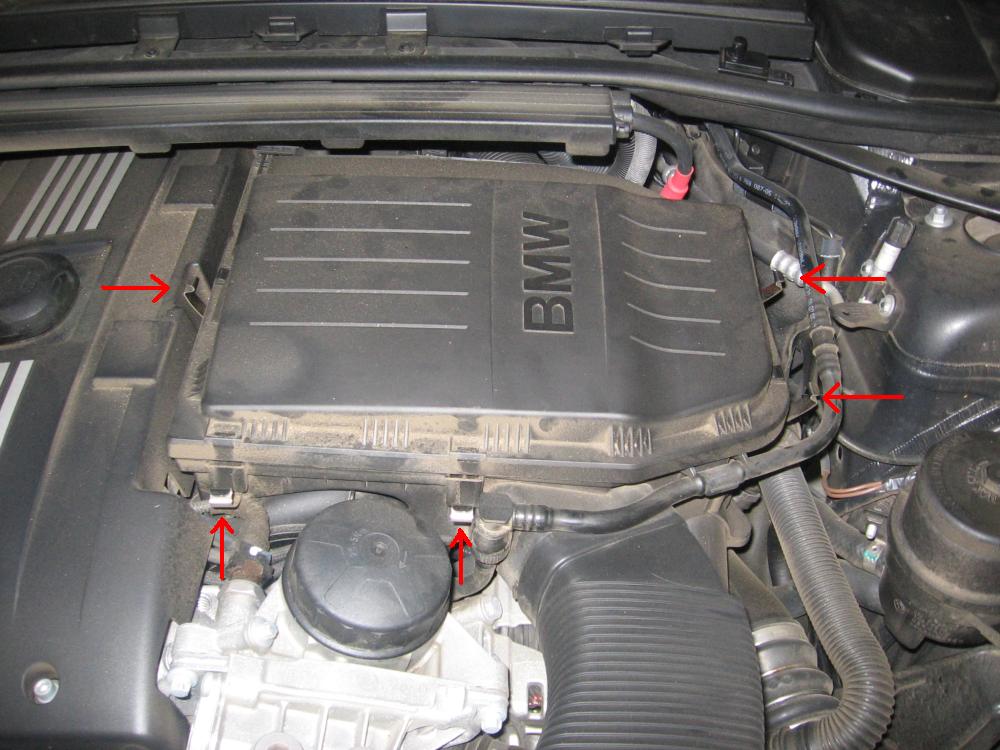
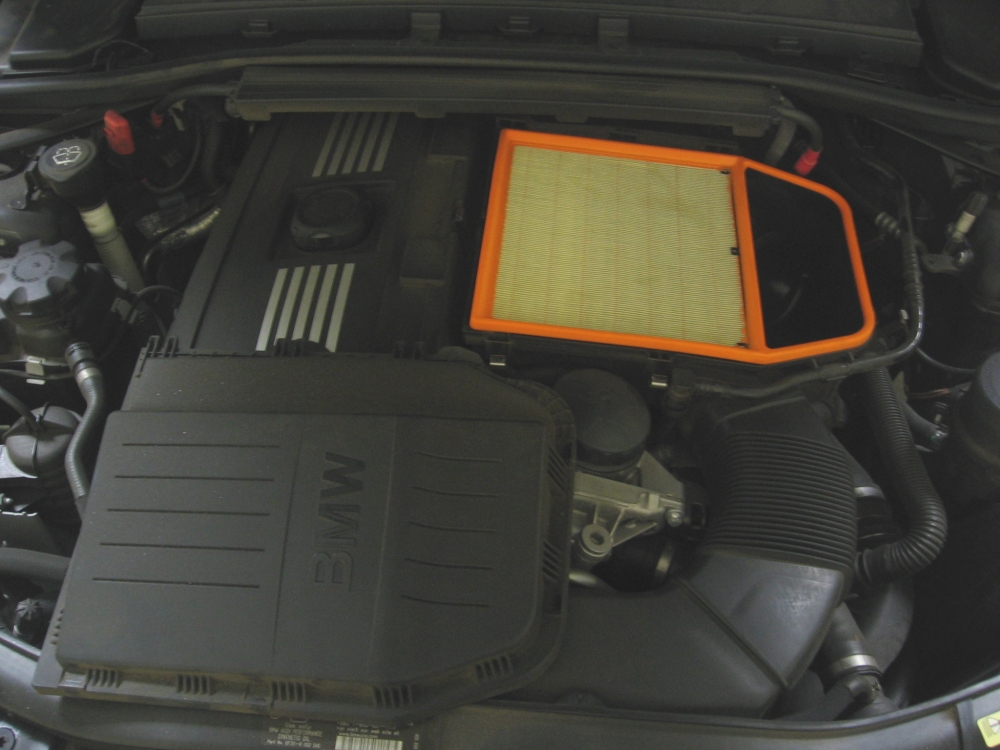
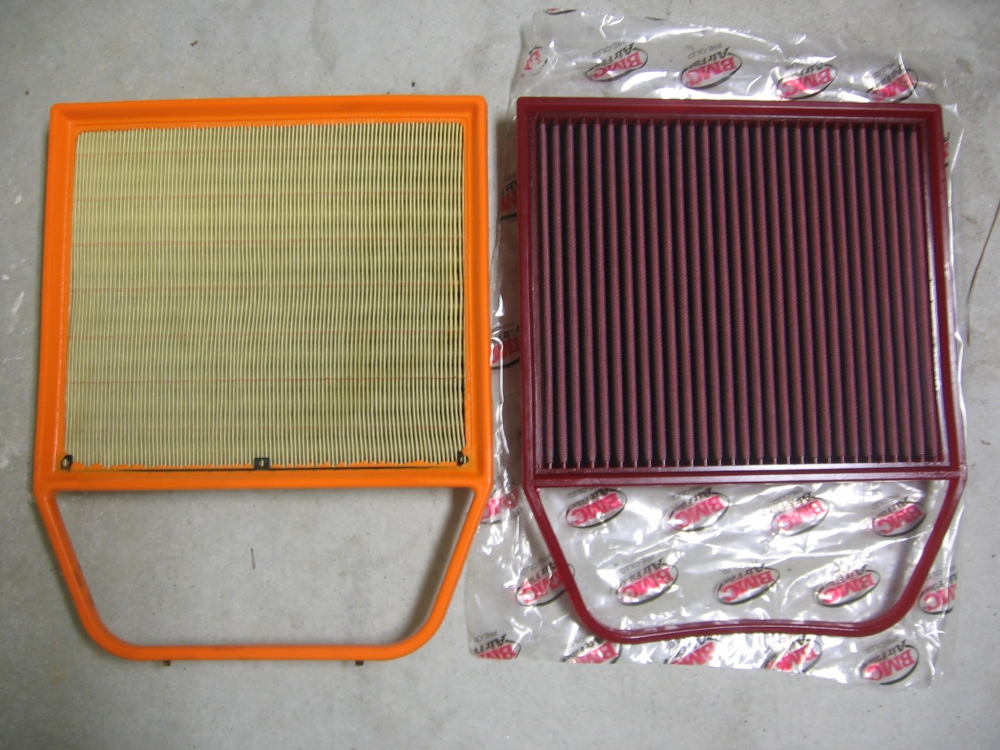
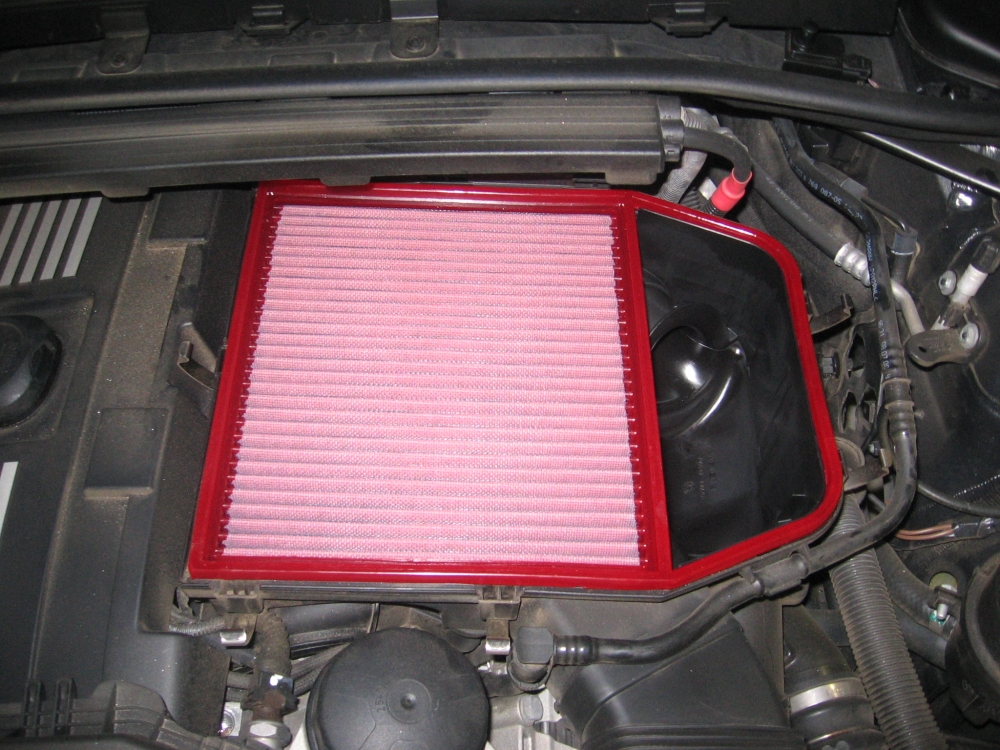
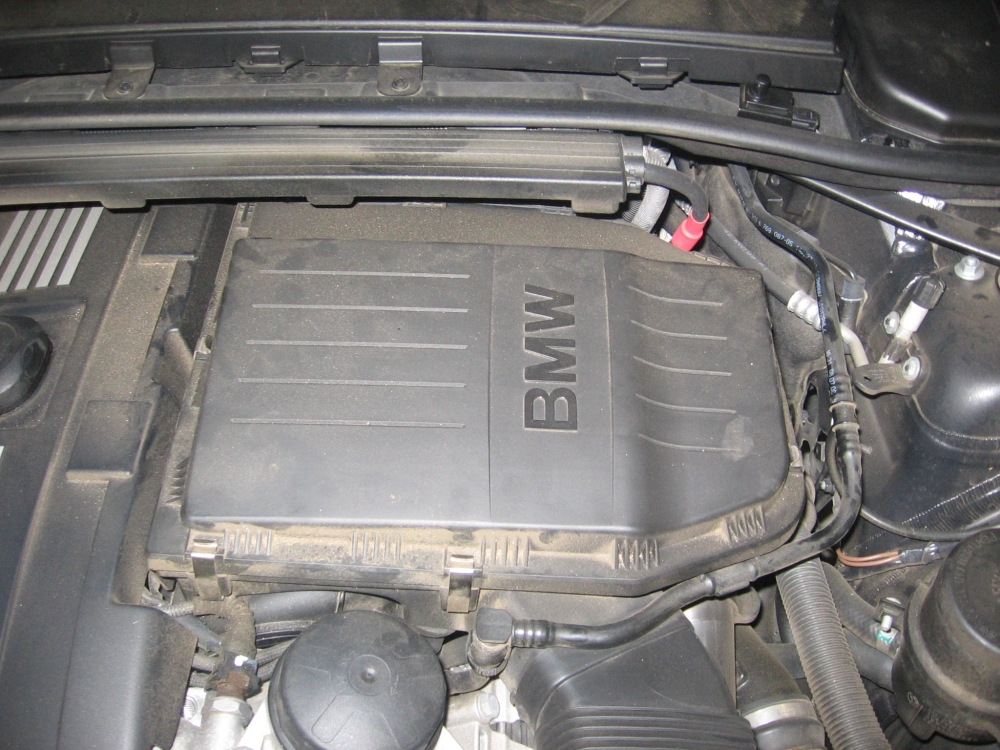
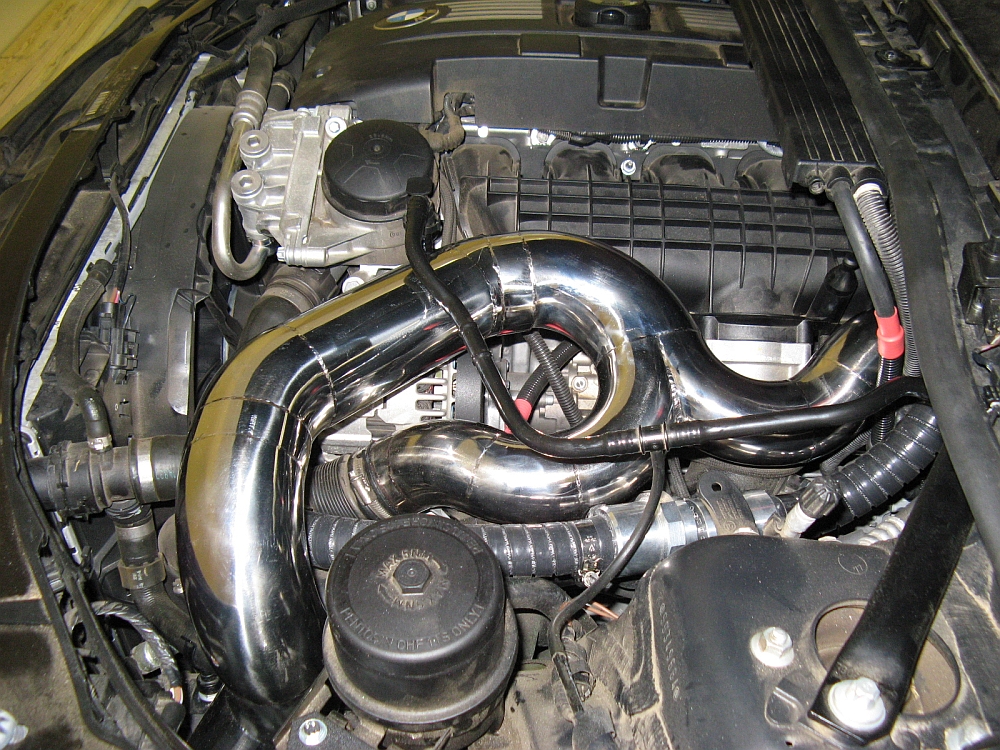
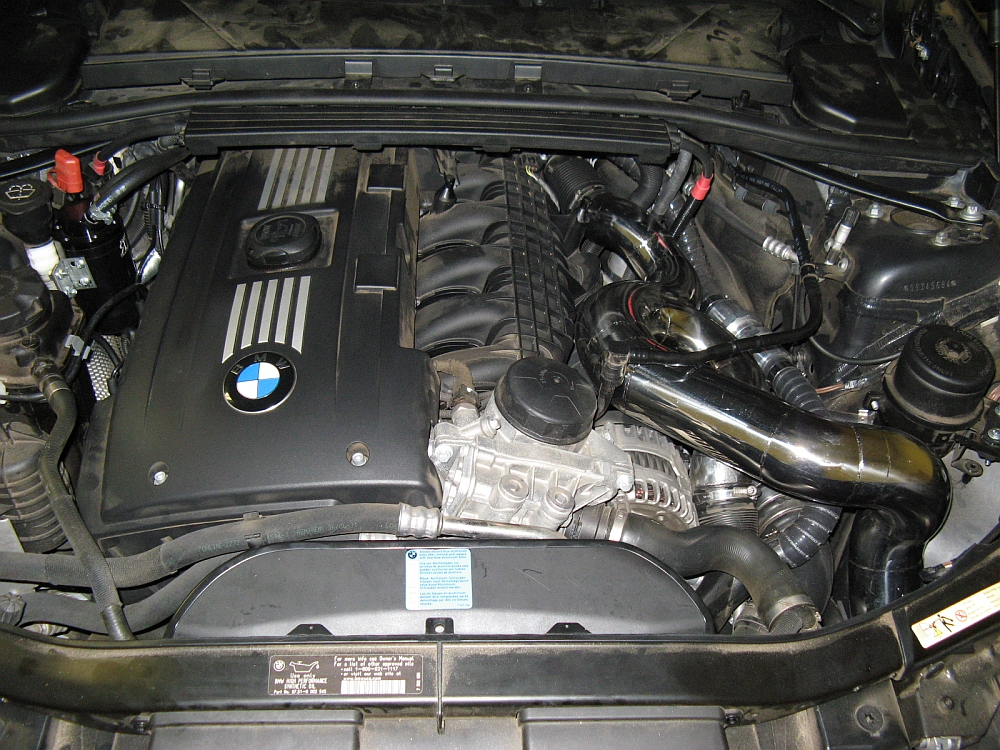
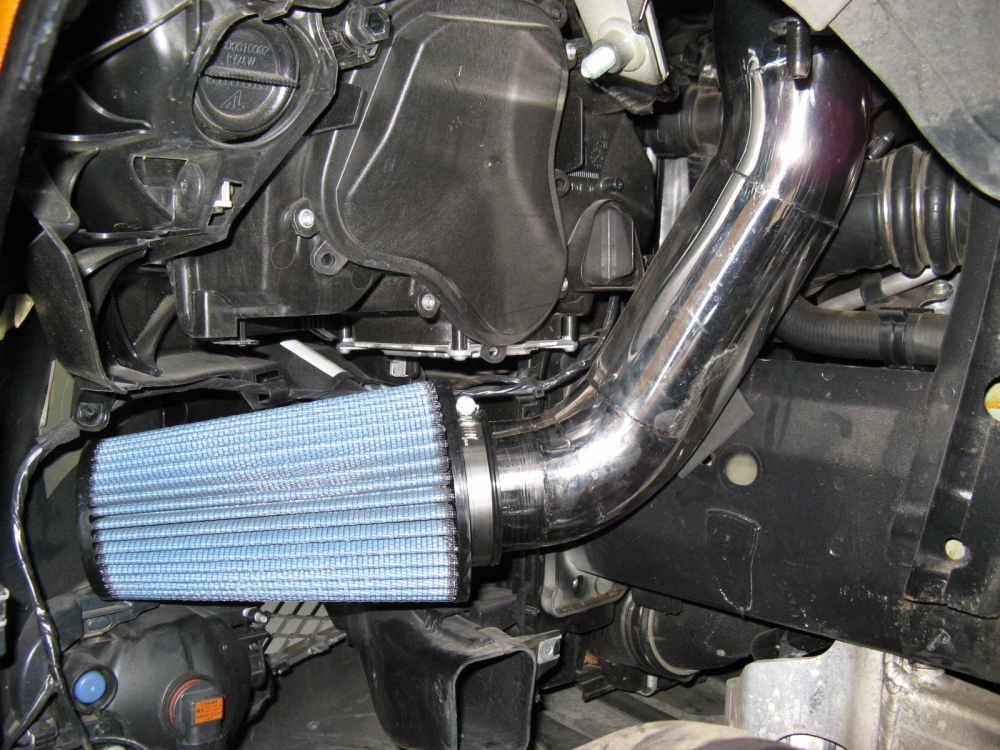
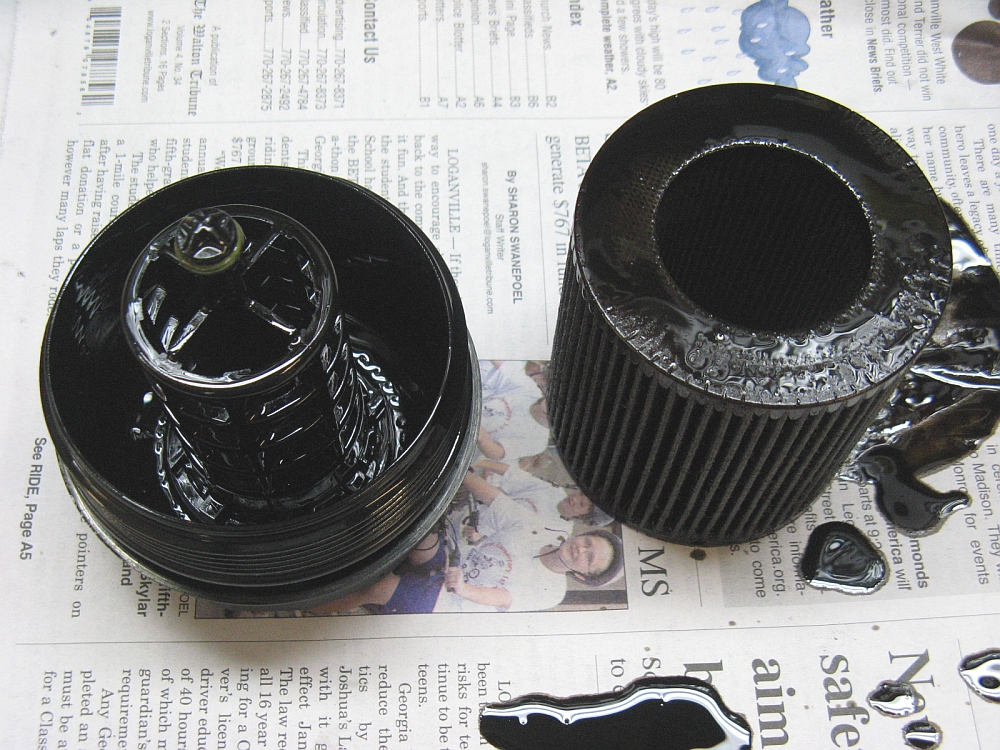
BMC Air Filter
purchased from Race Precision and installed. Five metal spring clips are released and cover can
be pulled forward to remove from air box. OE air filter removed and replaced with BMC, airbox lid reinstalled and clipped. The BMC air filter looks to be
constructed better than similar type filters, and it's easy to see how it could flow better than OE:
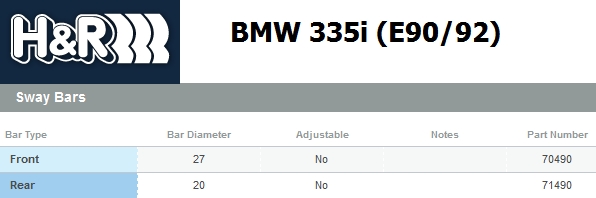
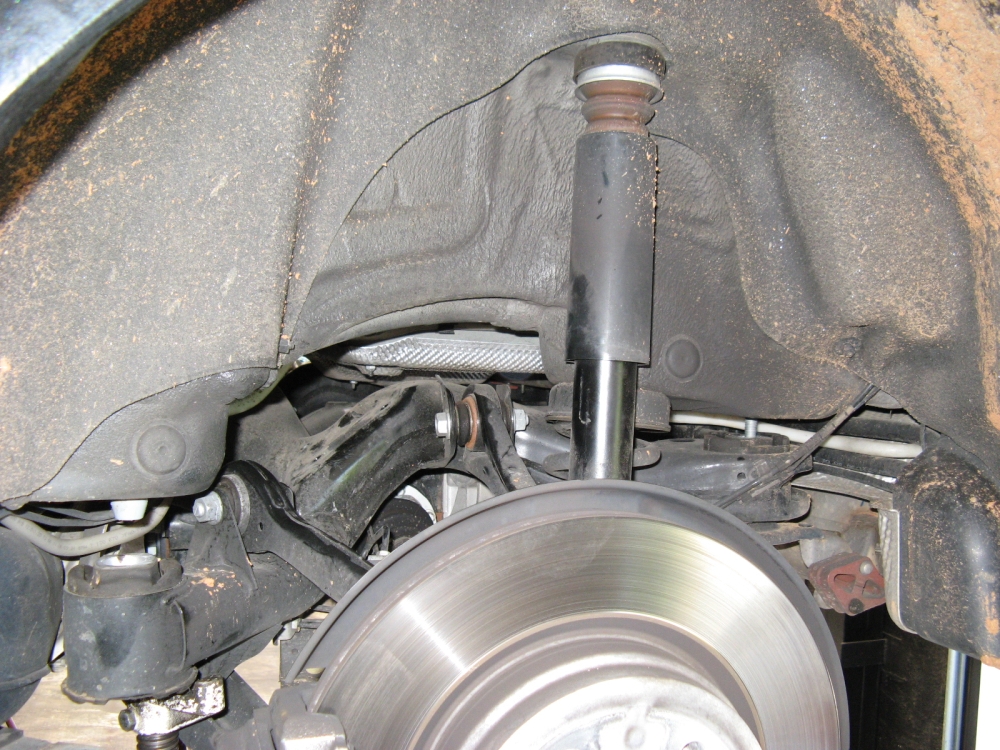
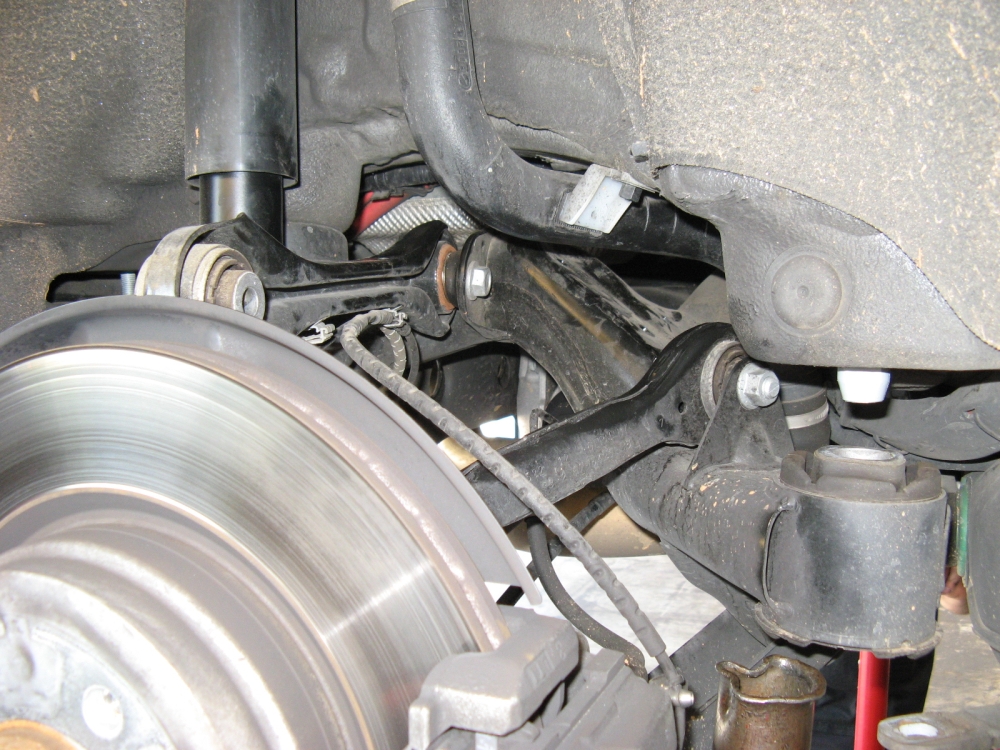
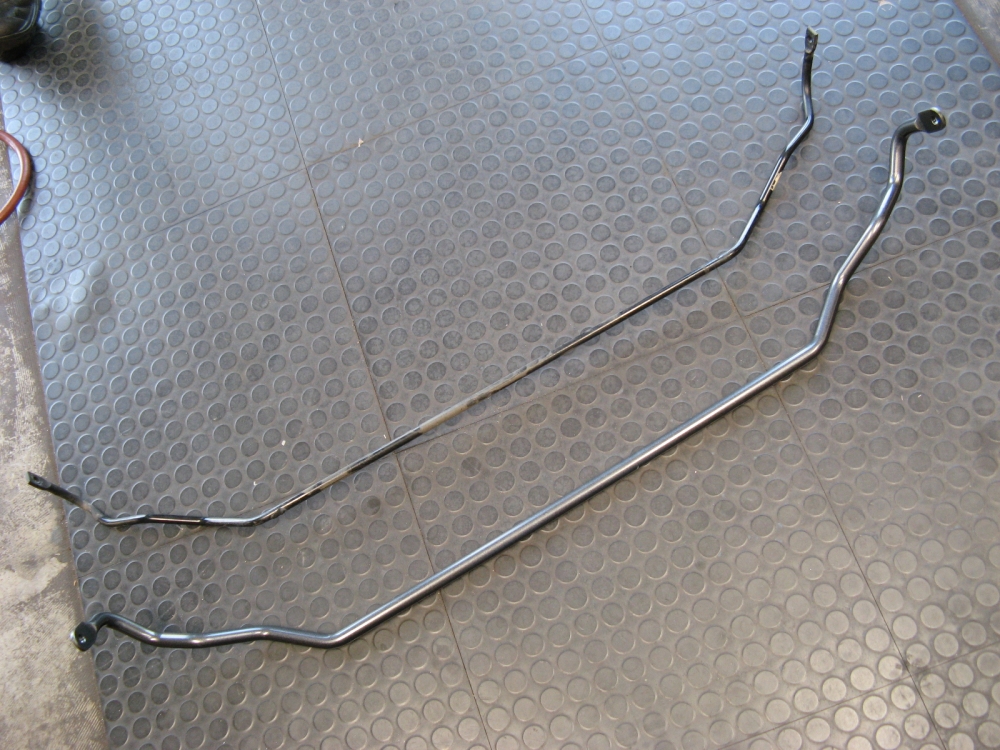
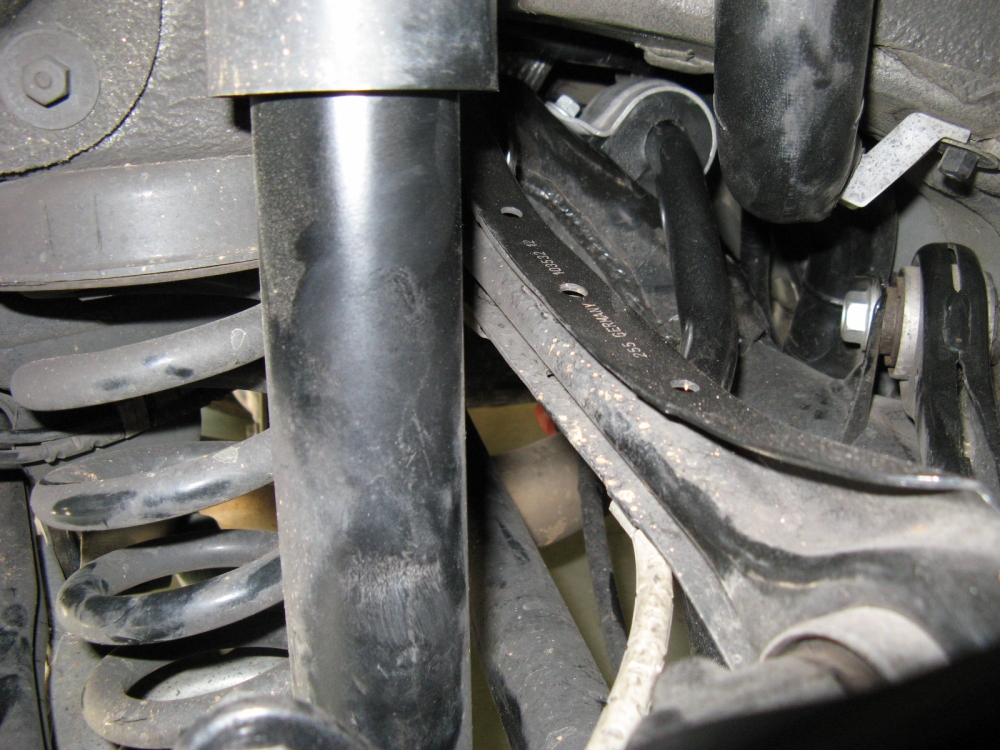
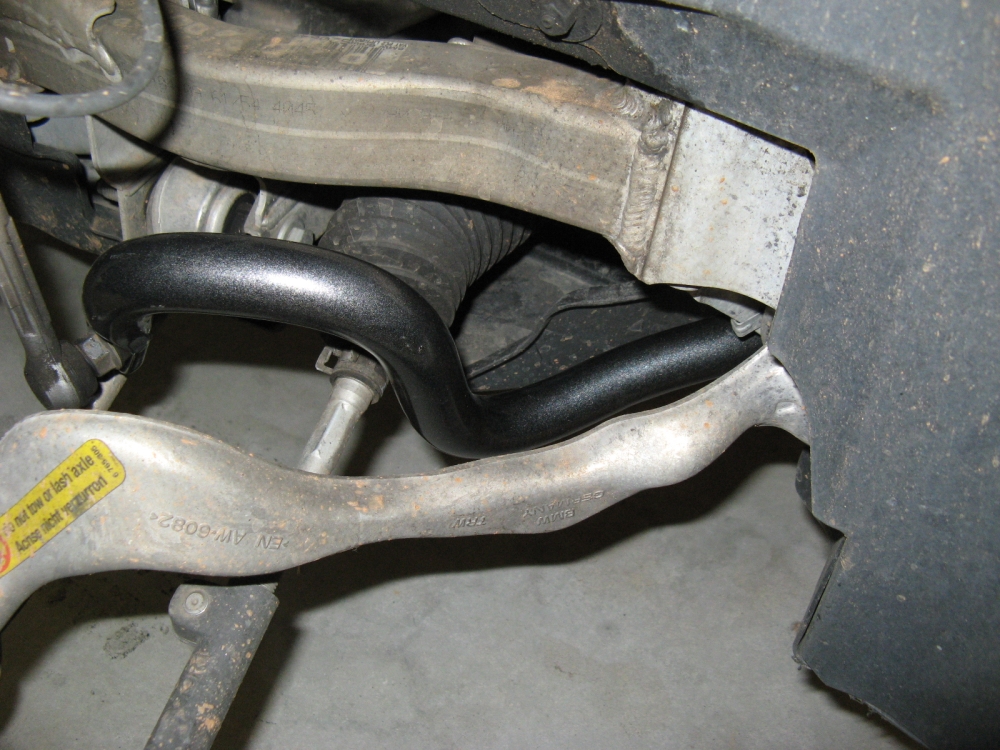
H&R
swaybars purchased from and installed by Butler Tire in Alpharetta (Thanks to Matt for working with me
on pricing and sourcing the bars when everyone else was on backorder and to Jeff for the blood/sweat lost during the installation). The rear bar installation
required the subframe to be dropped and the installation cost at Butler was pretty competitive so I let them do the installation. Since the subframe drop
will throw the alignment off, the car was also realigned after everything was reassembled. The OE
335i sport package swaybars are 26.5mm (F) and 13mm (R). The H&R bars are 27mm (F) and 20mm (R) and help to dial out the understeer. This is the FIRST thing
any 335 owner should do for their car, it handles like it should have from the factory now, HUGE improvement. Pics below
illustrate the subframe drop (pics taken after OE bar removed), the significant difference in rear bar size, and H&R bars post installation:
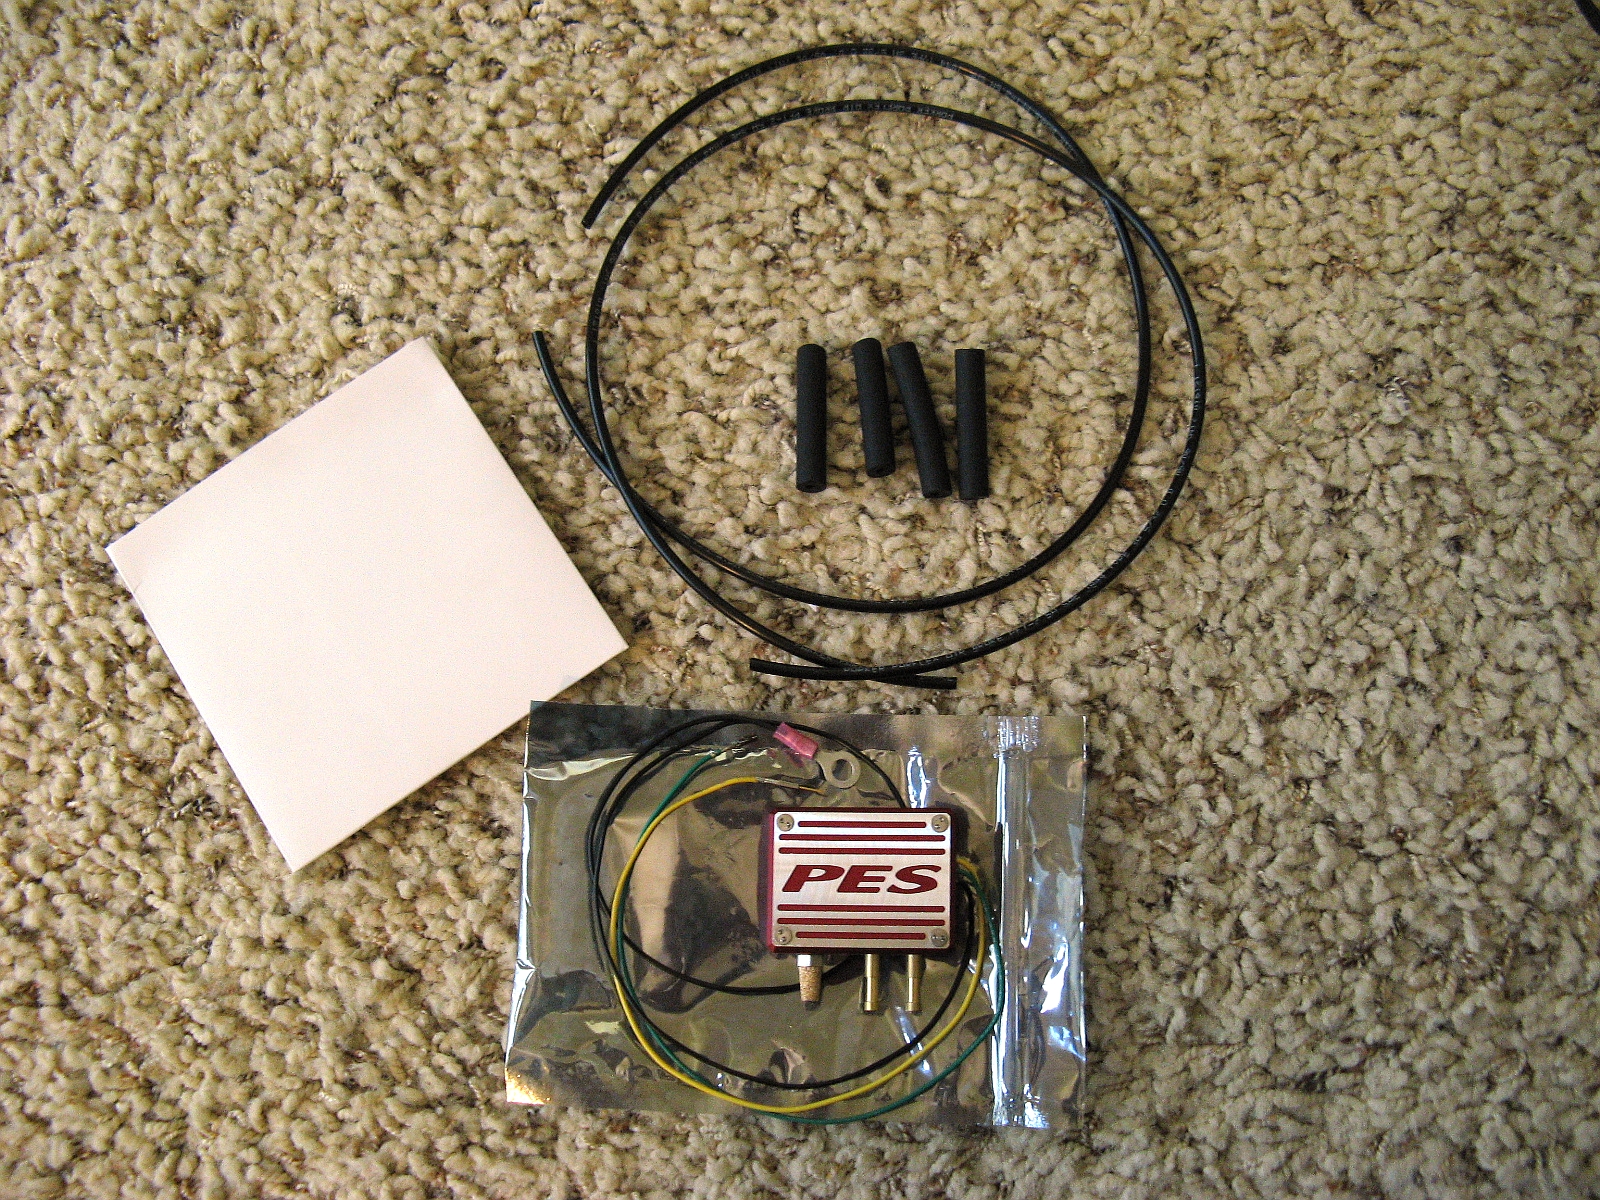
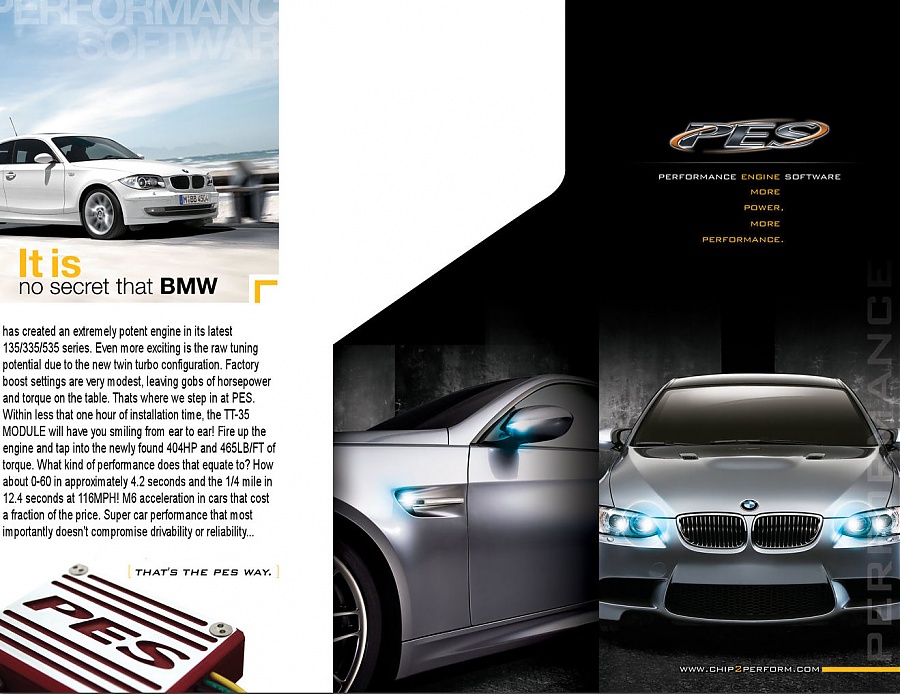
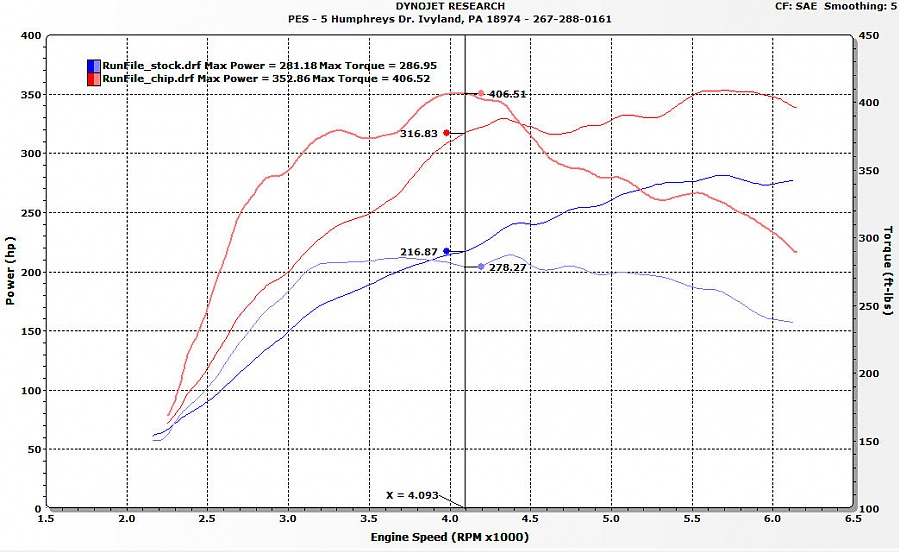
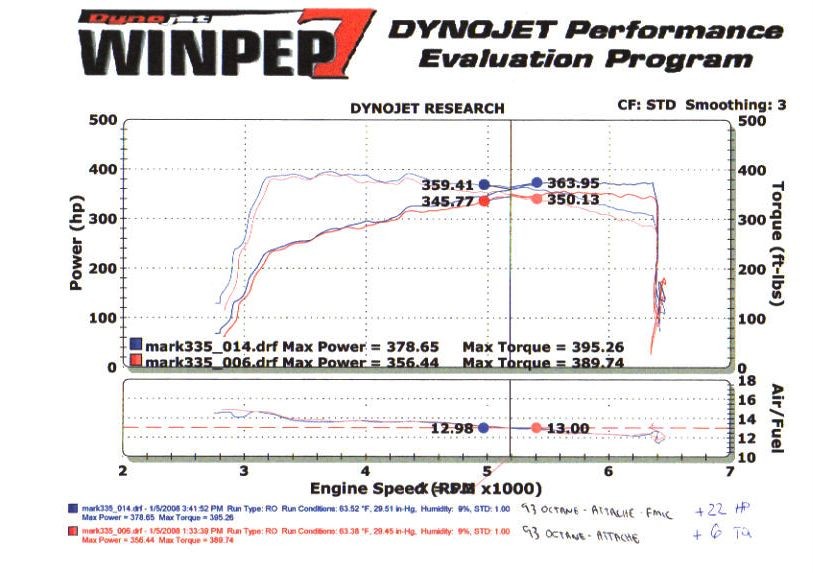
PES
TT-35 Module installed, installation instructions HERE, information HERE,
dyno video HERE.
Noticeably more power, as smooth as stock from idle to redline (which comes up much faster now). Thanks to Tony and PES for bringing this to market
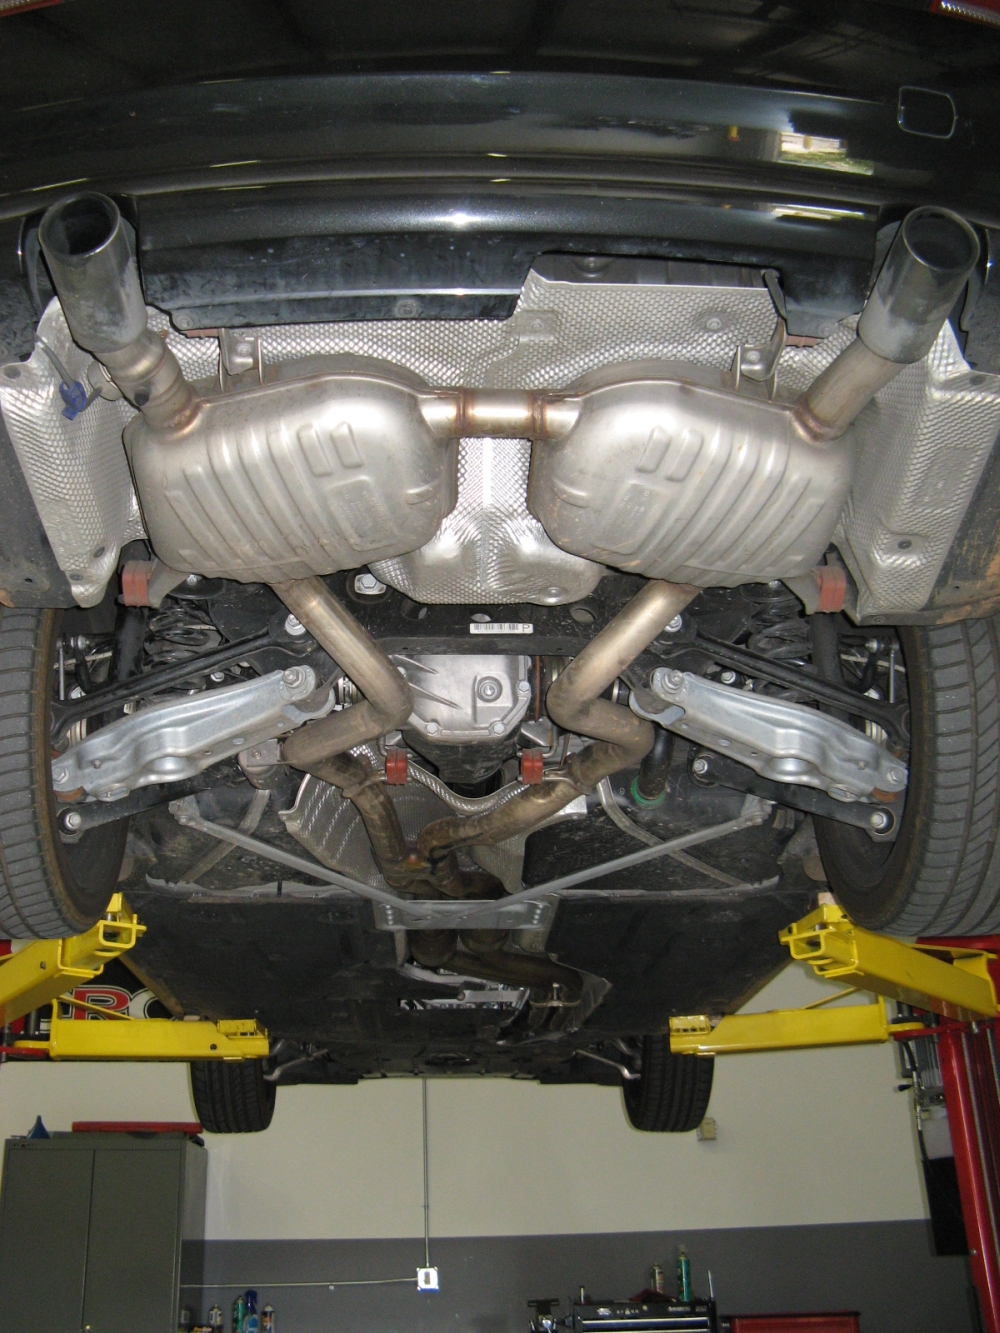
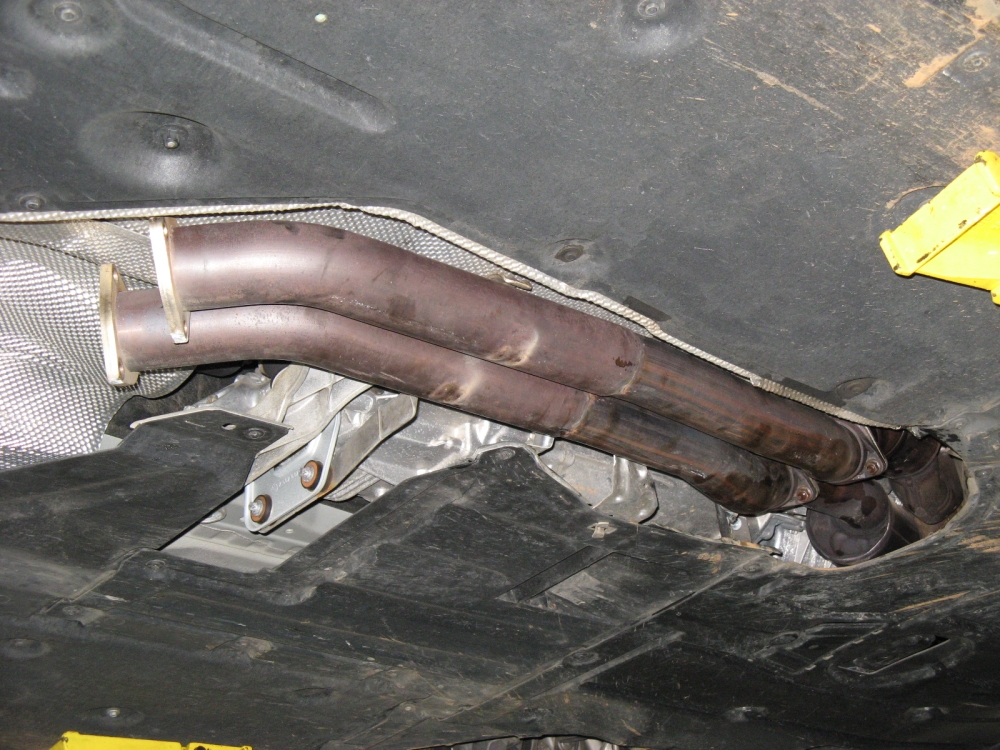
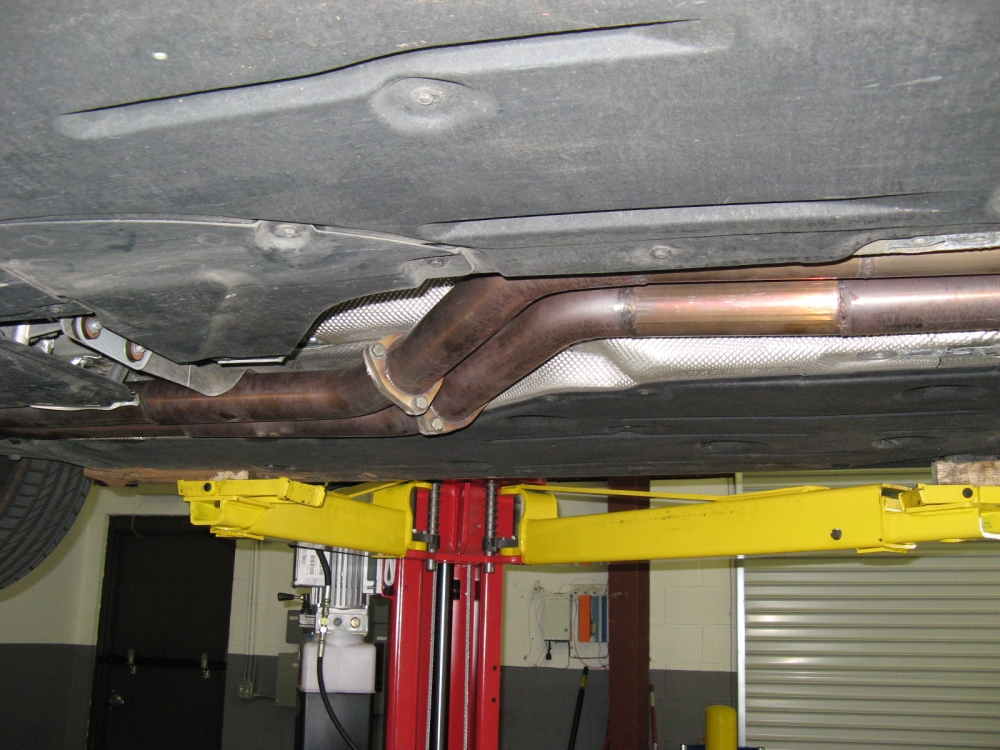
I decided the factory exhaust was too quiet and restrictive and decided on a Magnaflow cat-back system. After I received the exhaust, but
before I had the chance to install it, someone local contacted me about swapping my OE cat back exhaust for their custom Magnaflow system with
secondary cat delete- He
wanted to get the car certified as he was purchasing it from a friend. This custom exhaust was well made by a local shop using stainless pipe and Magnaflow
components and was completely divorced dual pipes, the bonus over the system I had ordered was secondary cat deletes. An additional benefit was a weight savings
of 25-30 pounds over the OE system.
I went to the shop the car was at (Orton Performance, (678)947-1437 ) in Cumming, GA and
Neil Orton swapped
the exhausts out. Great deal/fit/sound/feel, but I later ended up deciding to install the system I had ordered and gave someone a deal on this system:
Headlight film (P/N H2114A) for headlights/fog lights from
Bavarian Autosport finally installed- I ordered almost a year ago and finally got motivated to install it
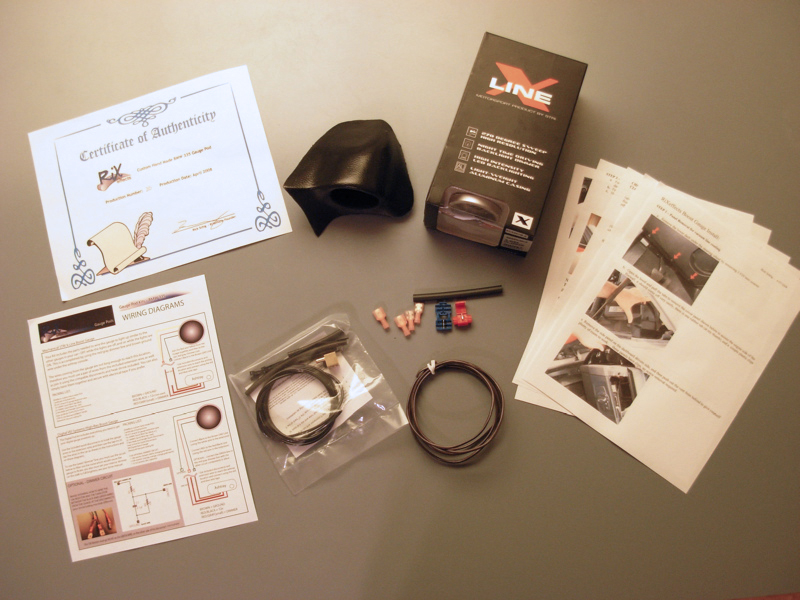
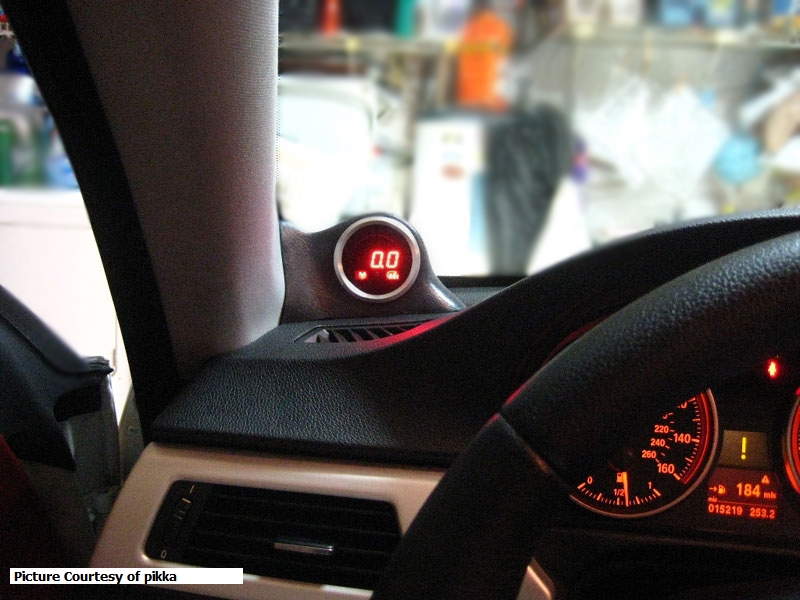
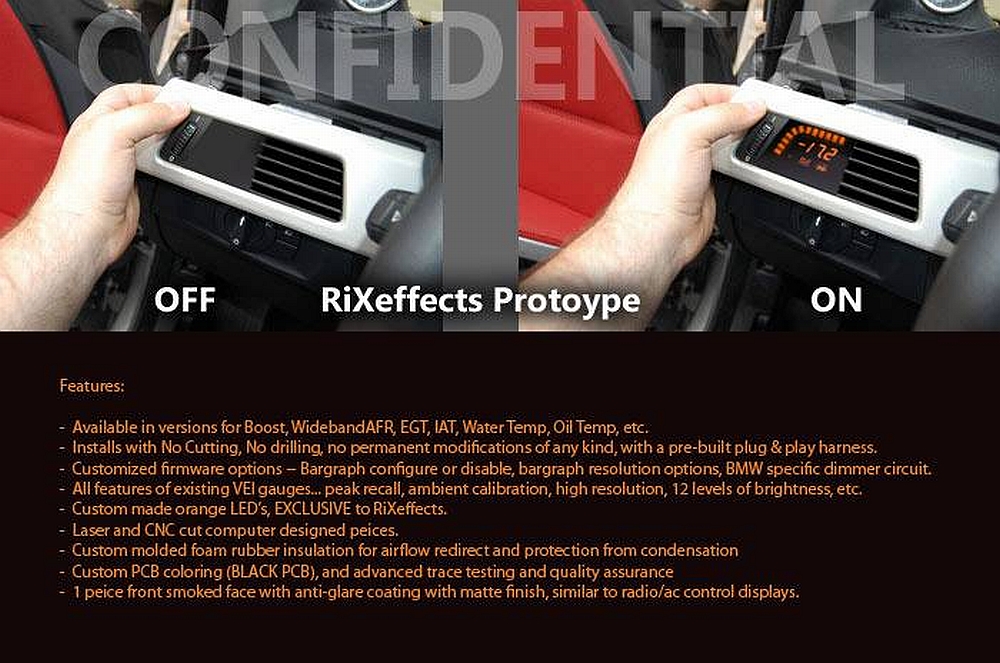
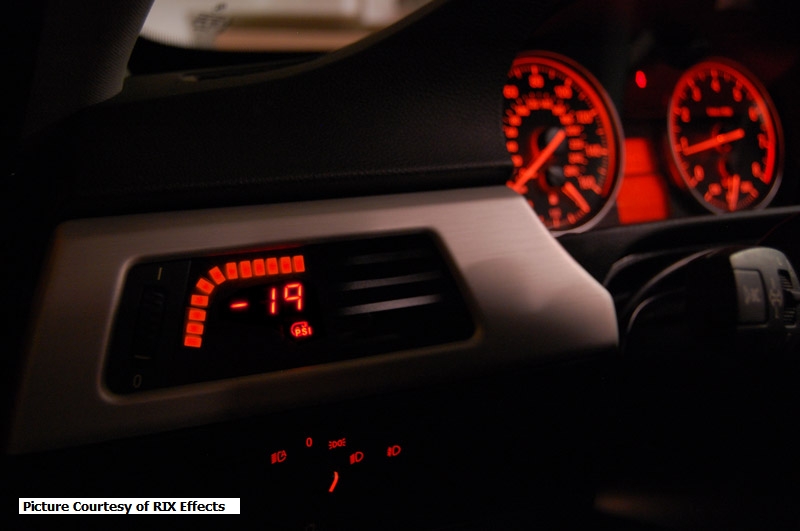
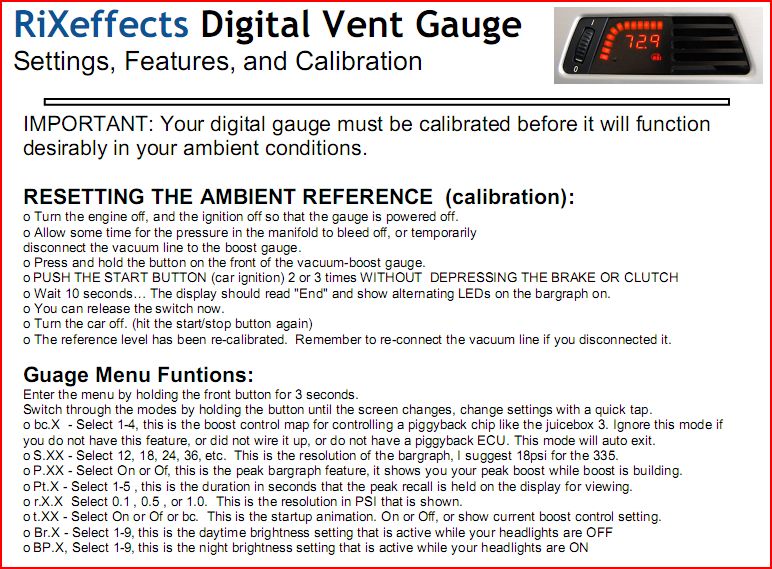
Boost Guage and Pod from
RIX Effects ordered, purchased during E90Post.com group buy
HERE. After it arrived I decided to return it and wait for something better
and Rick obliged by releasing a more integrated solution that uses perfect match LEDs. Pikka's video of the original solution is
HERE, example of menu options video is HERE,
and some pics I took/thoughts I had during my installation are HERE.
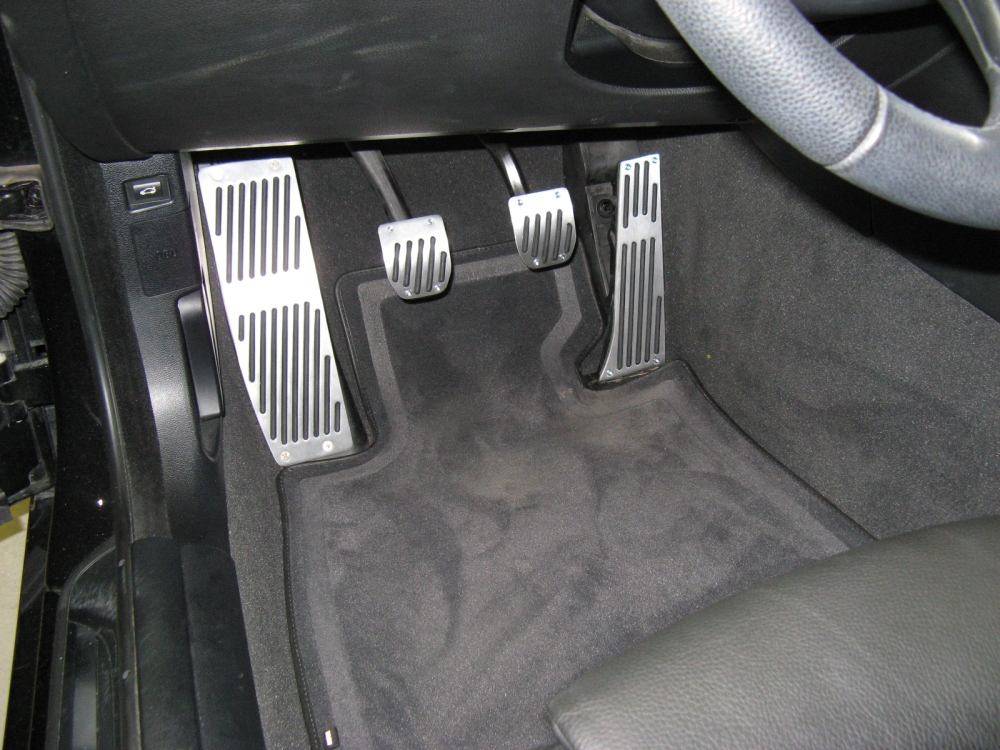
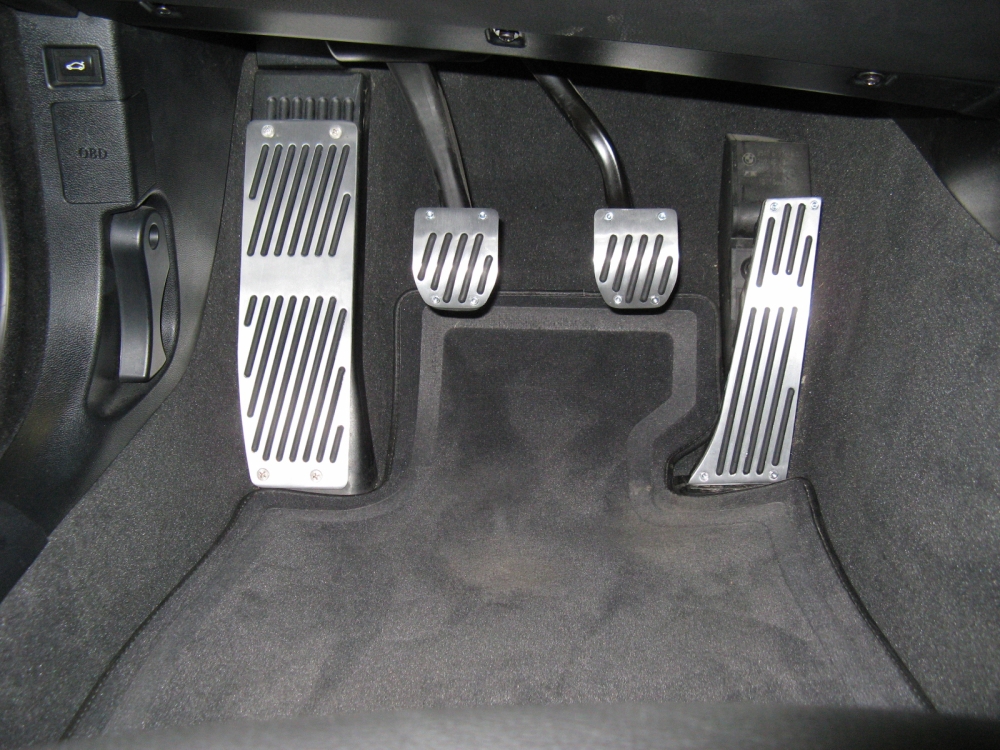
Aluminum Pedals with Rubber Inserts from
Bimmian installed. These pedals offer an aesthetic improvement and a firmer pedal feel.
The installation instructions are HERE,
installation video is HERE.
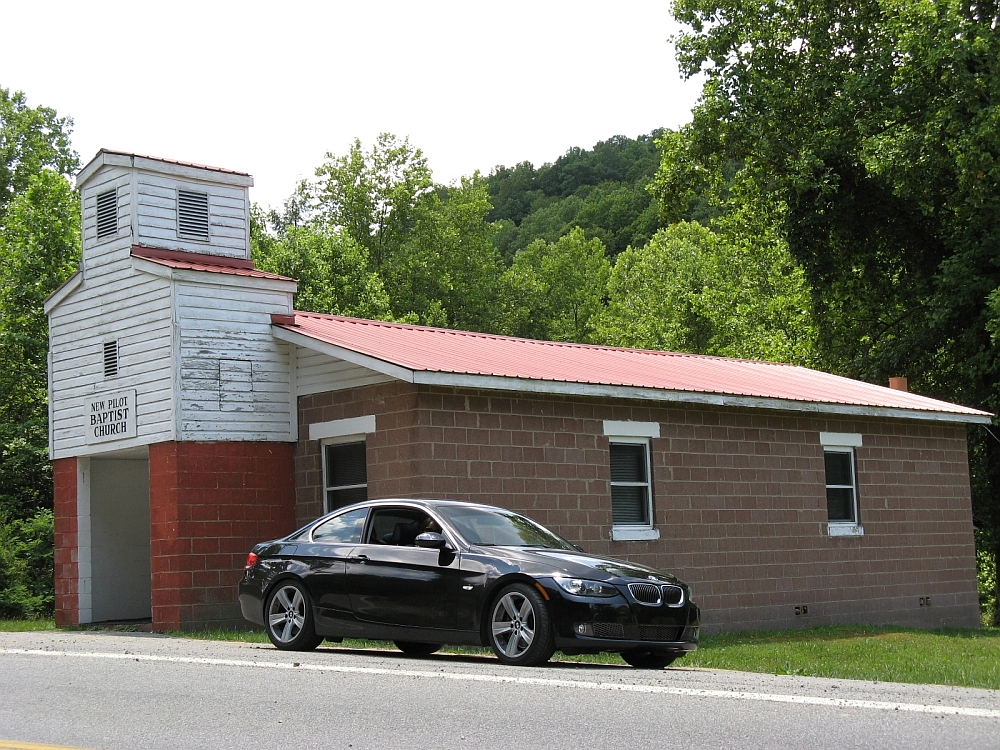
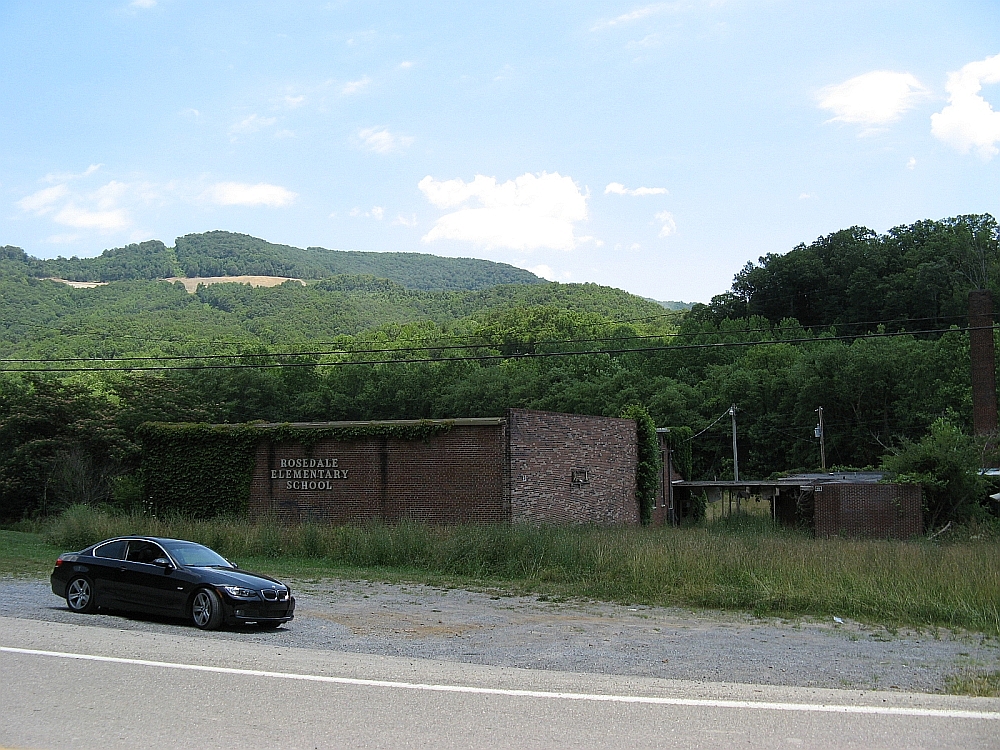
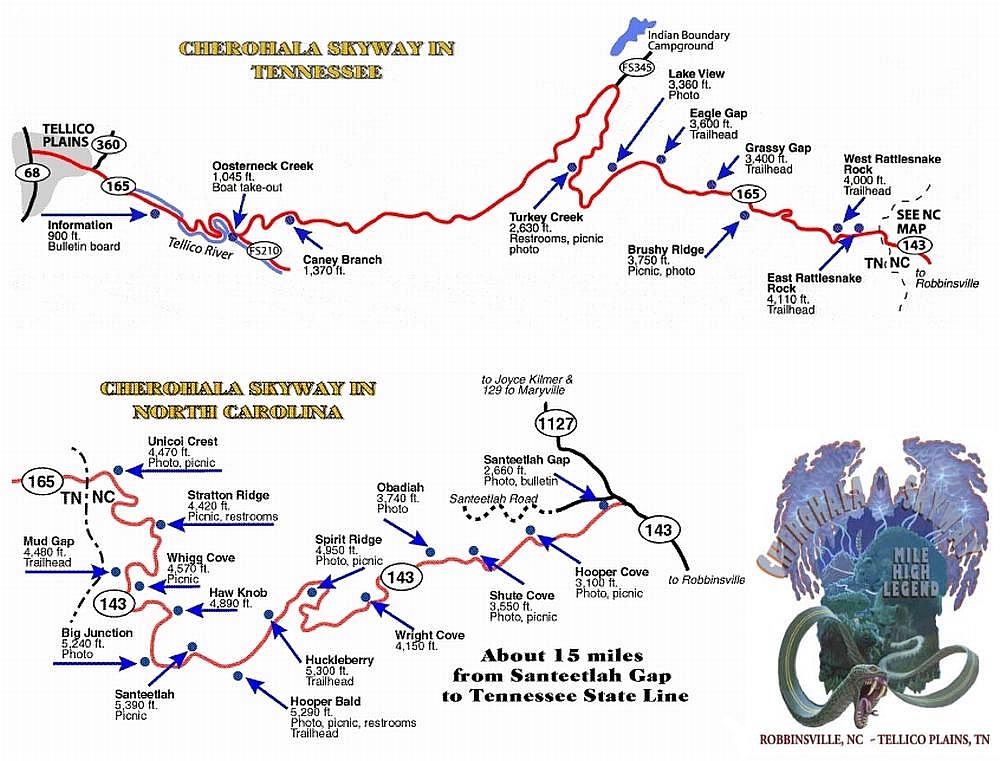
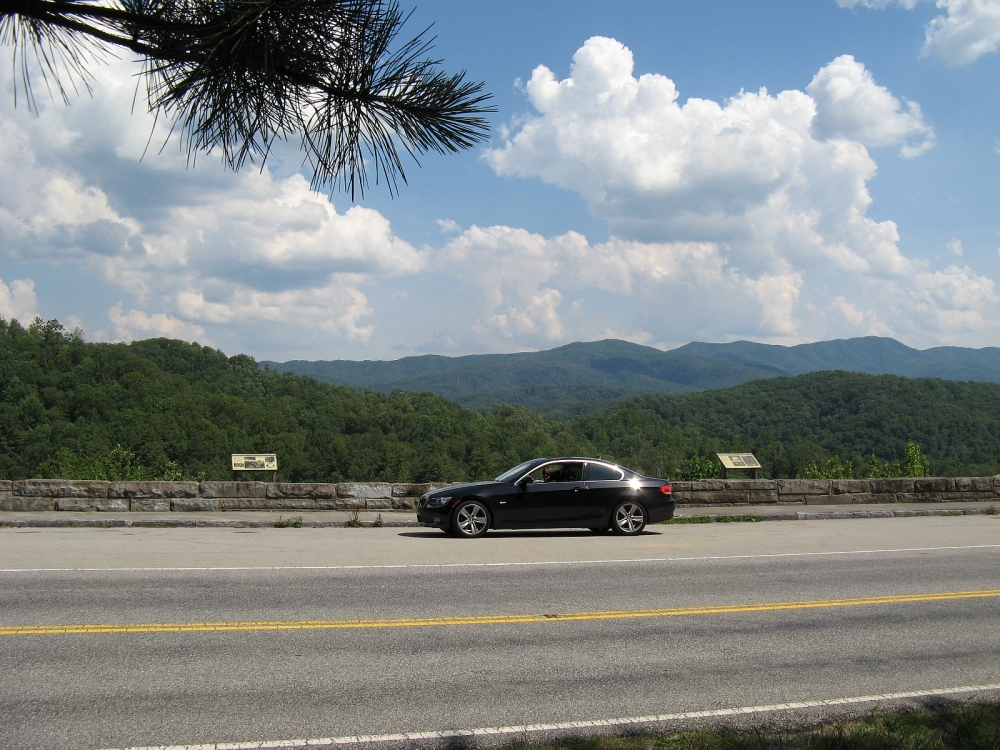
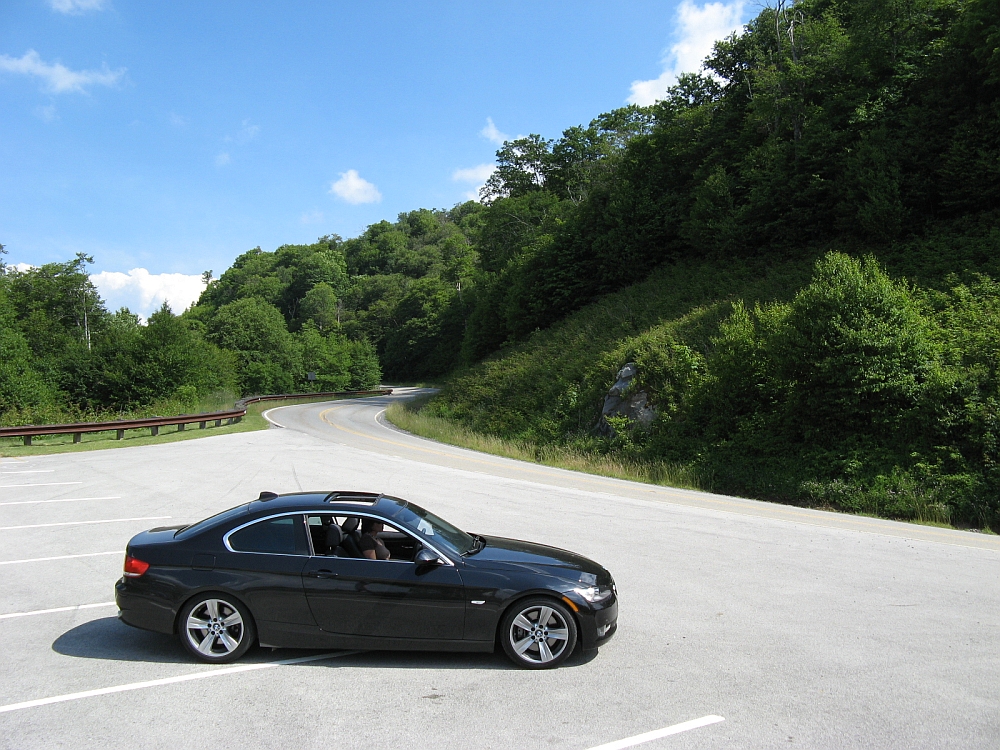
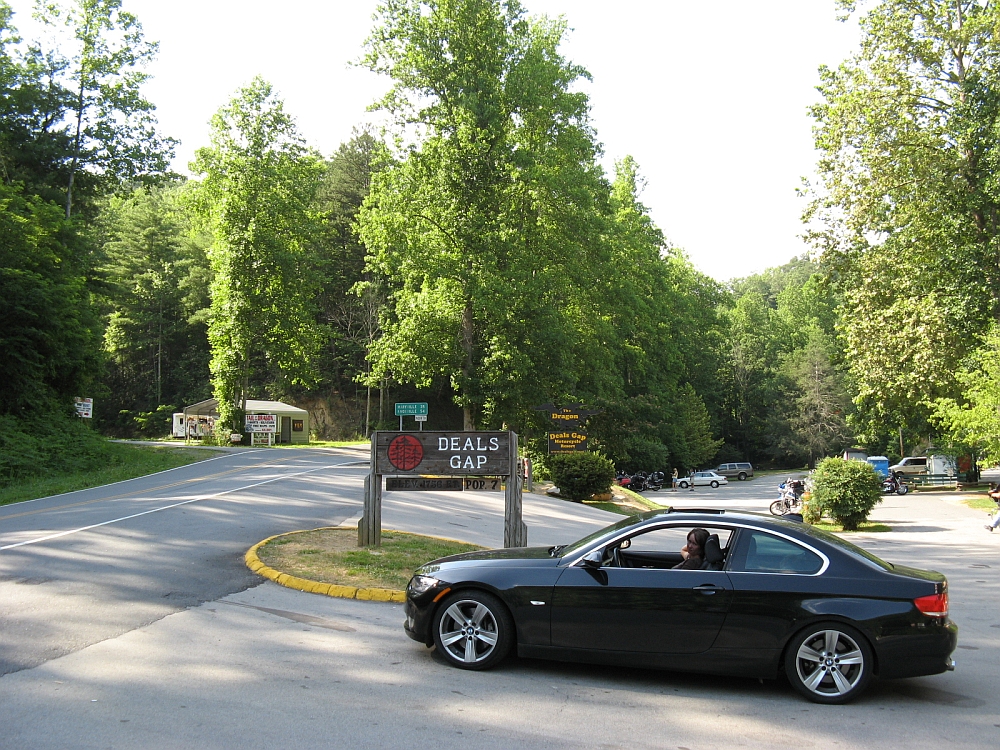
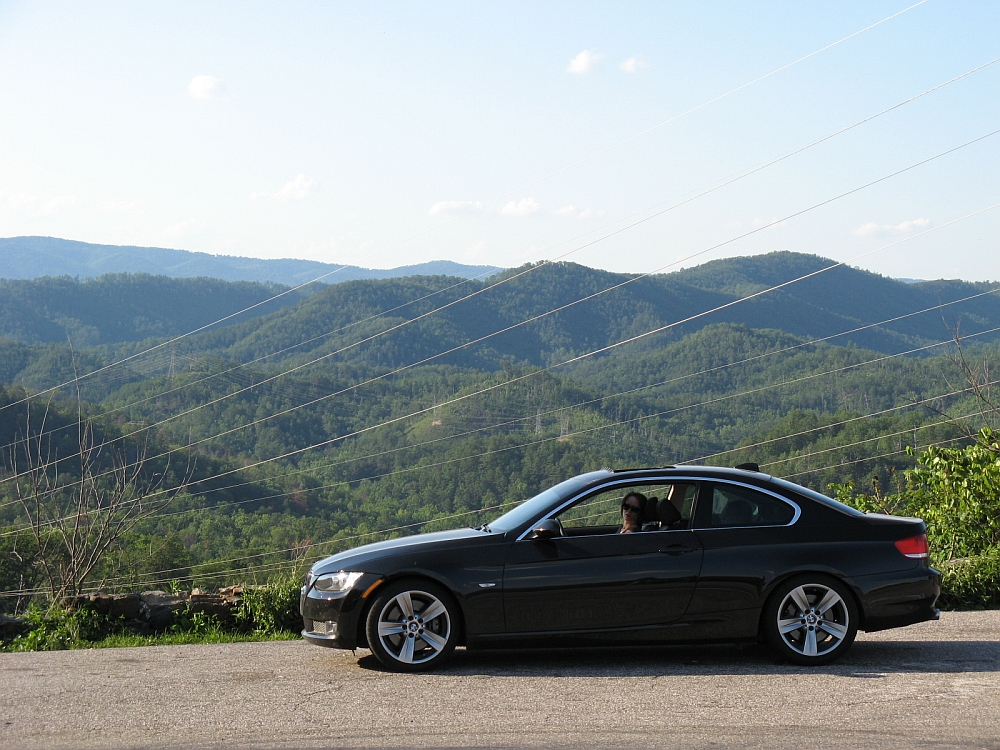
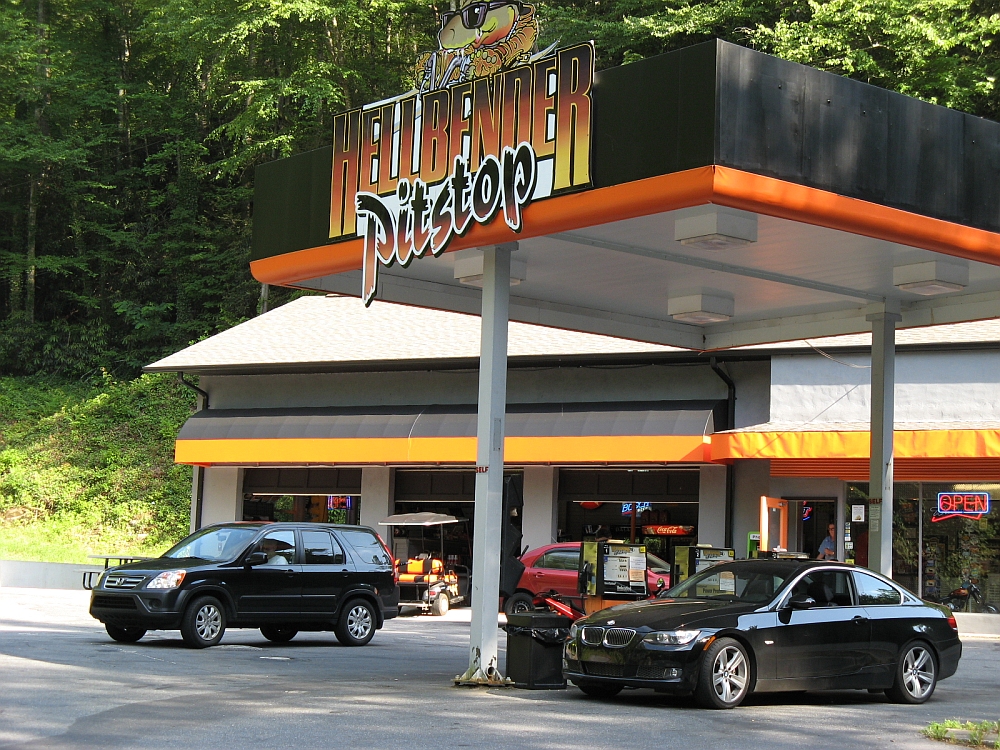
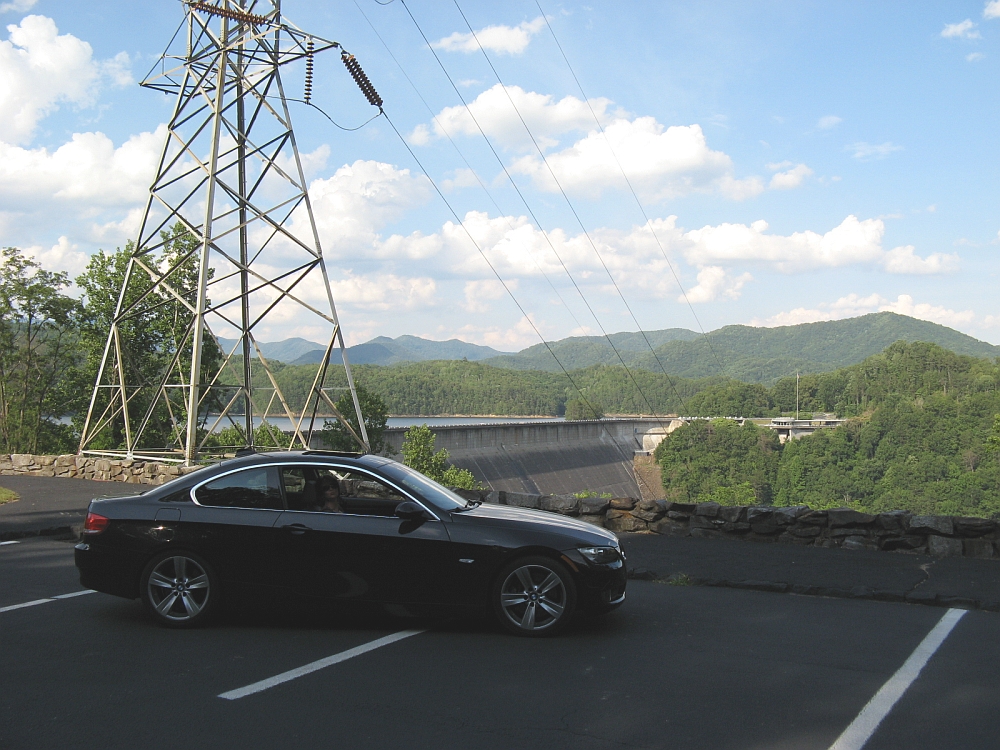
Decided to try out the new mods on the way back from a family trip to
Gatlinburg, TN. Managed to hit all of the key driving spots in TN/NC and capture some photos: Devils Triangle, Cherohala Skyway, Tail of the Dragon, and
Hellbender/Fontana Dam:
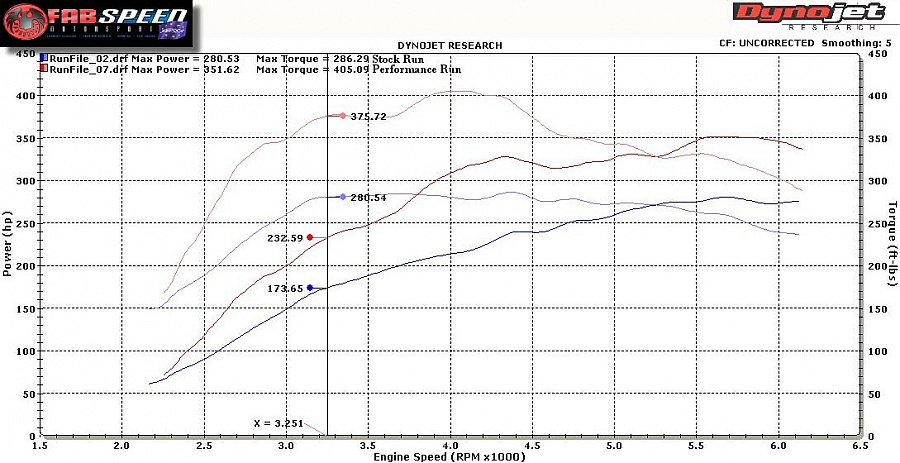
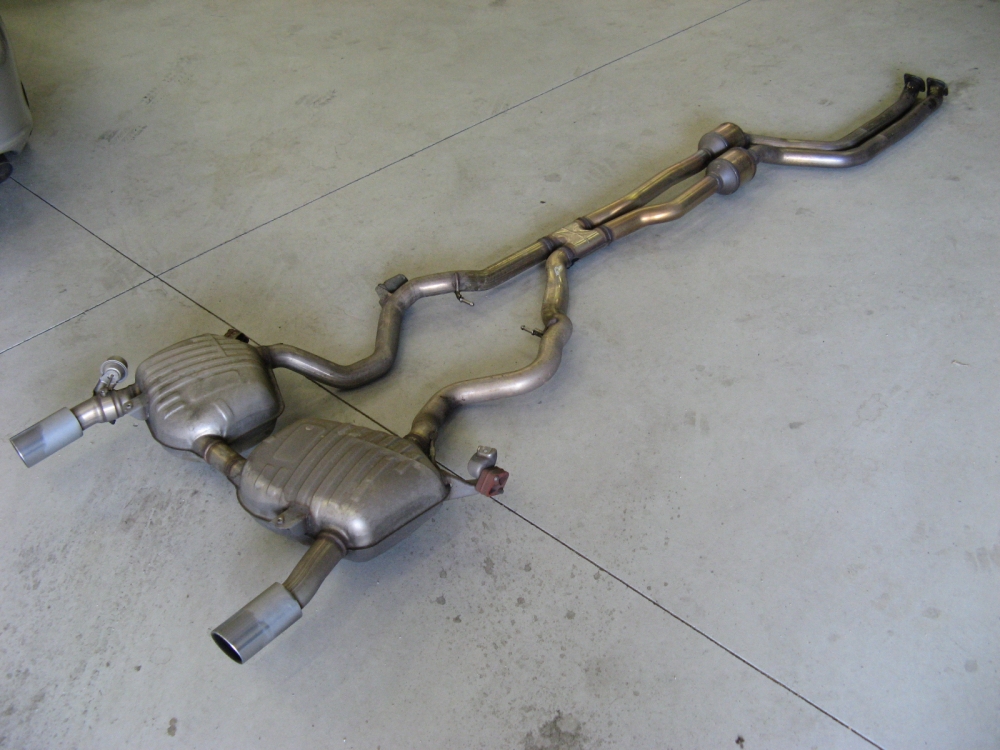
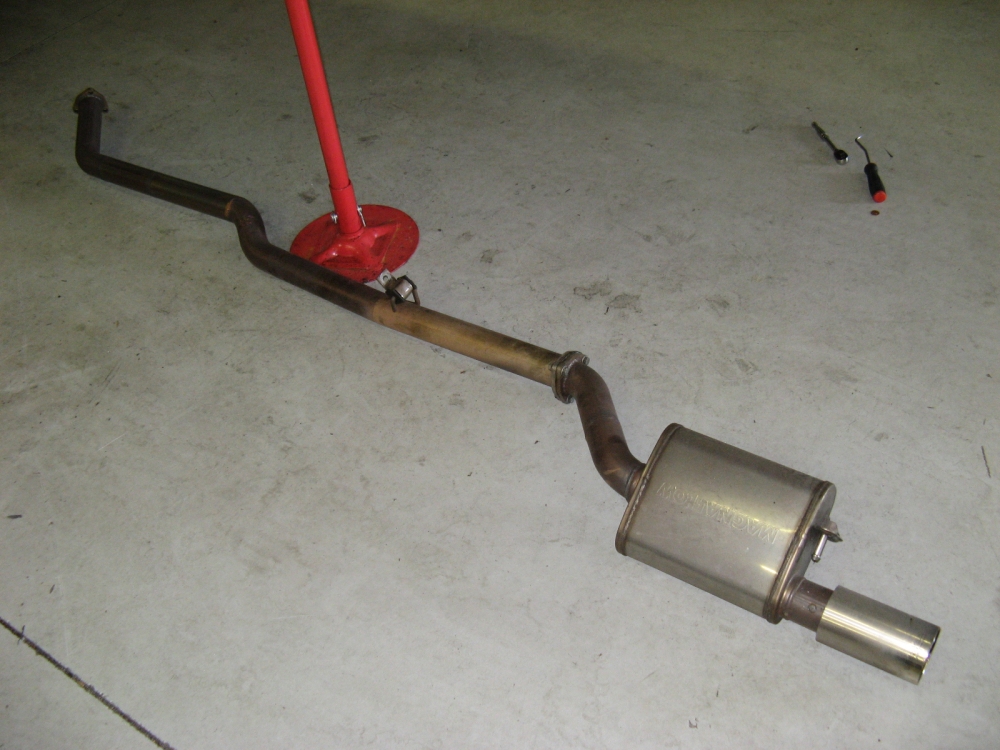
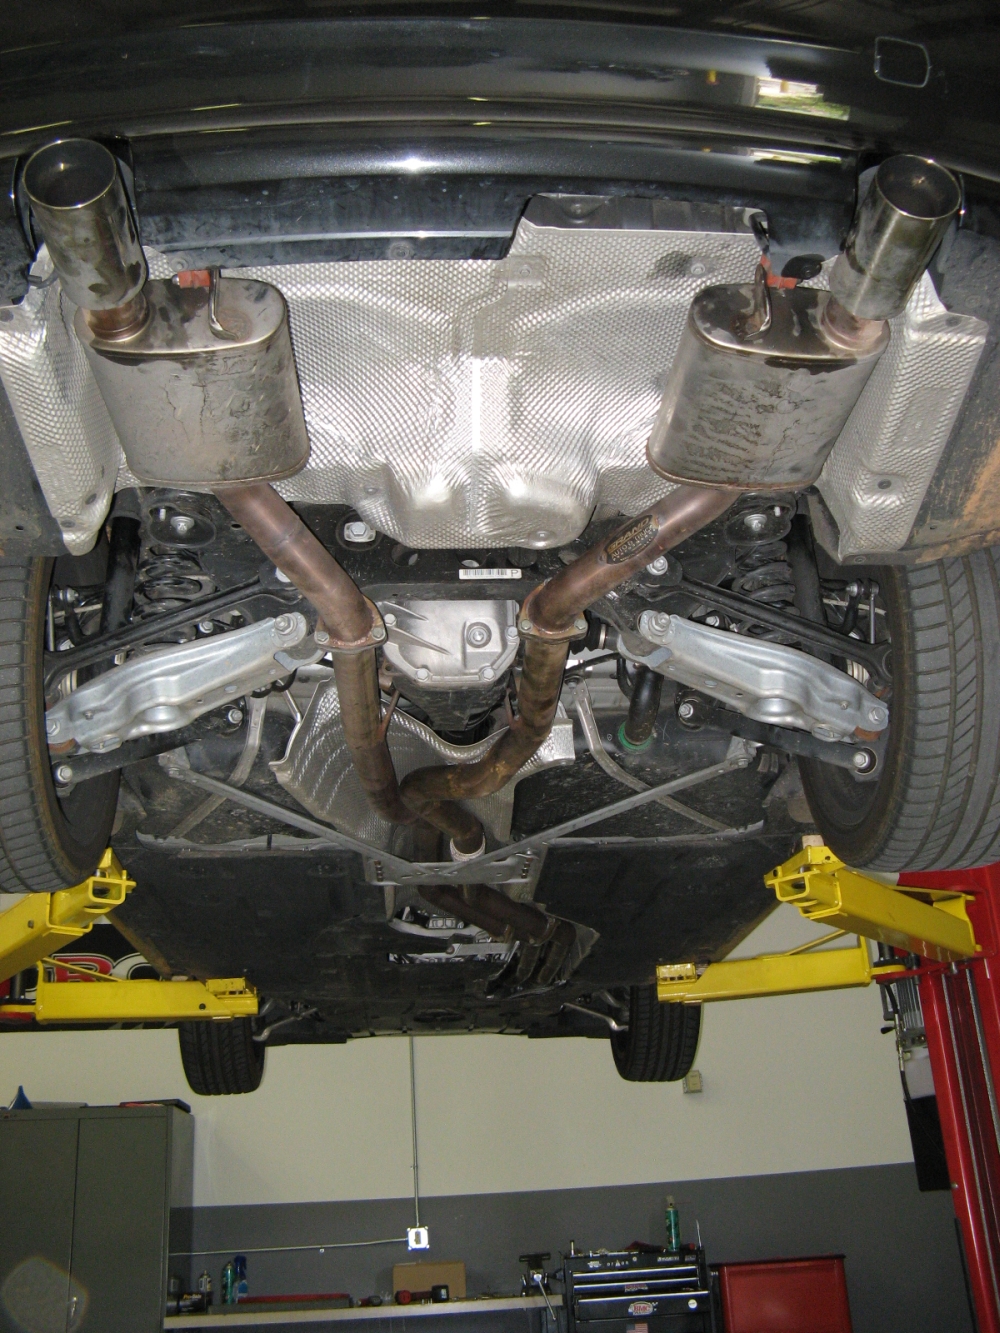
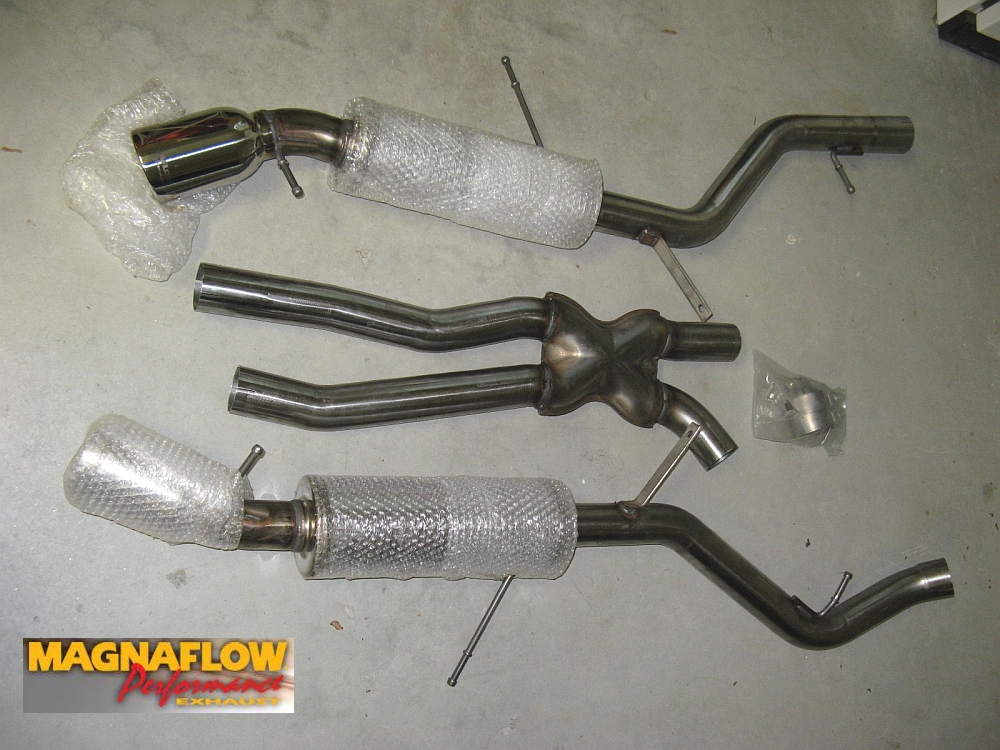
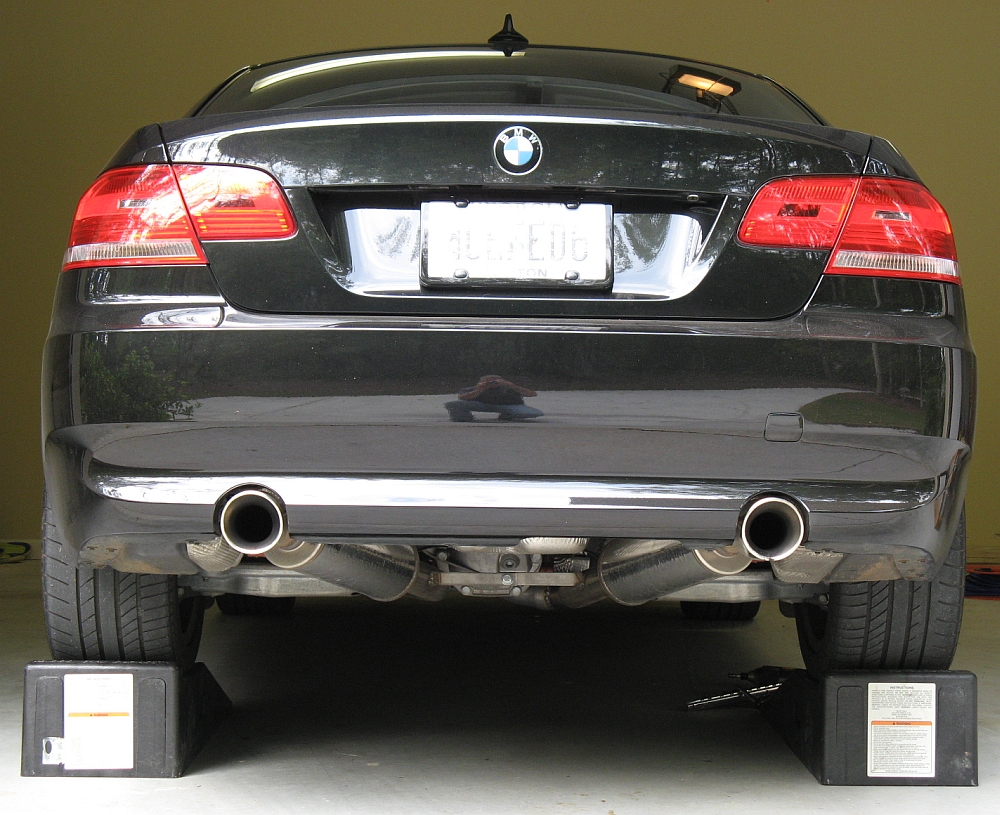
Magnaflow cat-back
exhaust (P/N 16791) installed, consisting of 5"x5"x14" dual mufflers, 2.5 in tubing, and rear exit 4" tips-Magnaflow Dyno
HERE (+ 10 HP, 15 FPTQ) and installation instructions
HERE.
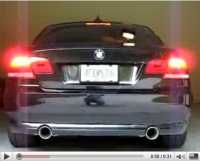
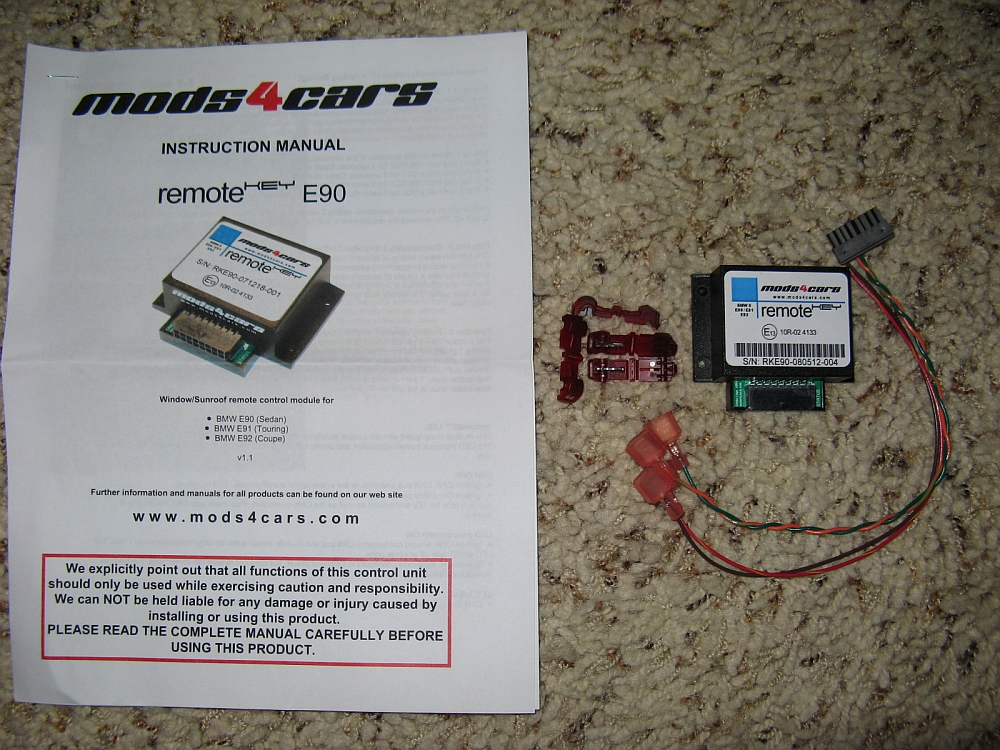
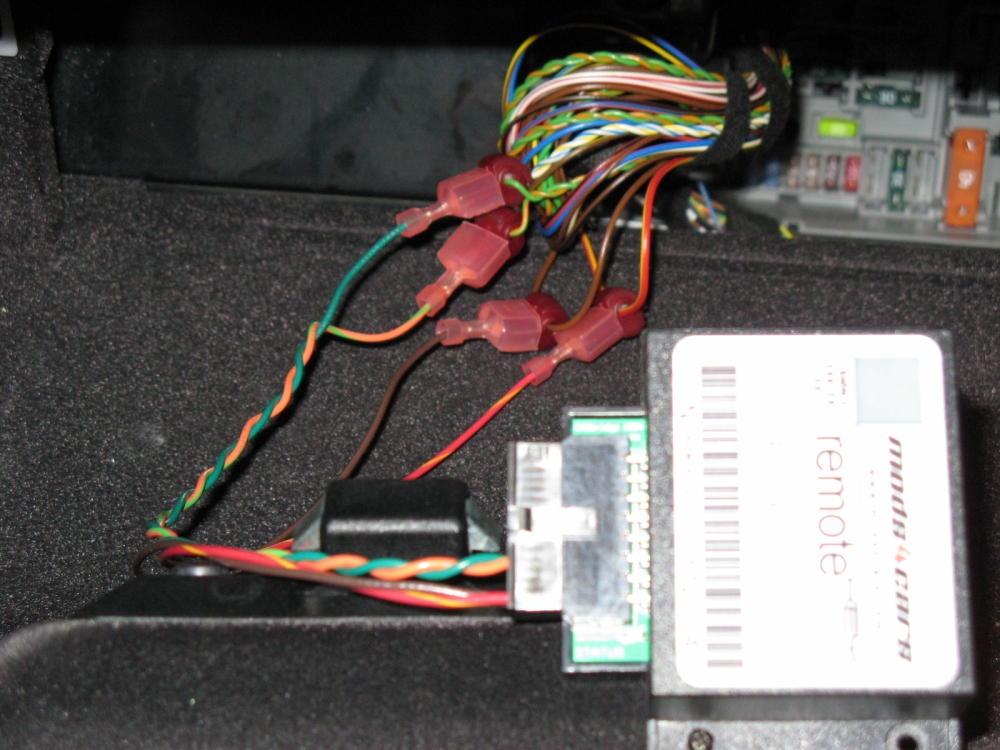
Mods4Cars
Remote Key from EAS (European Auto Source) installed- allows
remote operation of power windows/sunroof/folding mirrors using existing key fob.
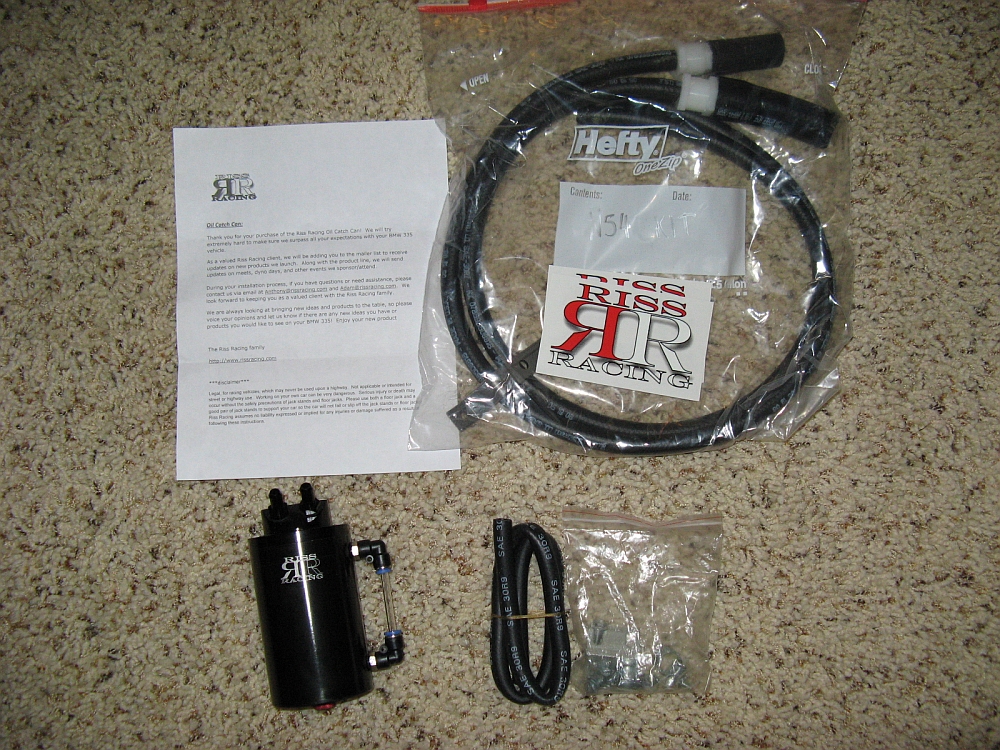
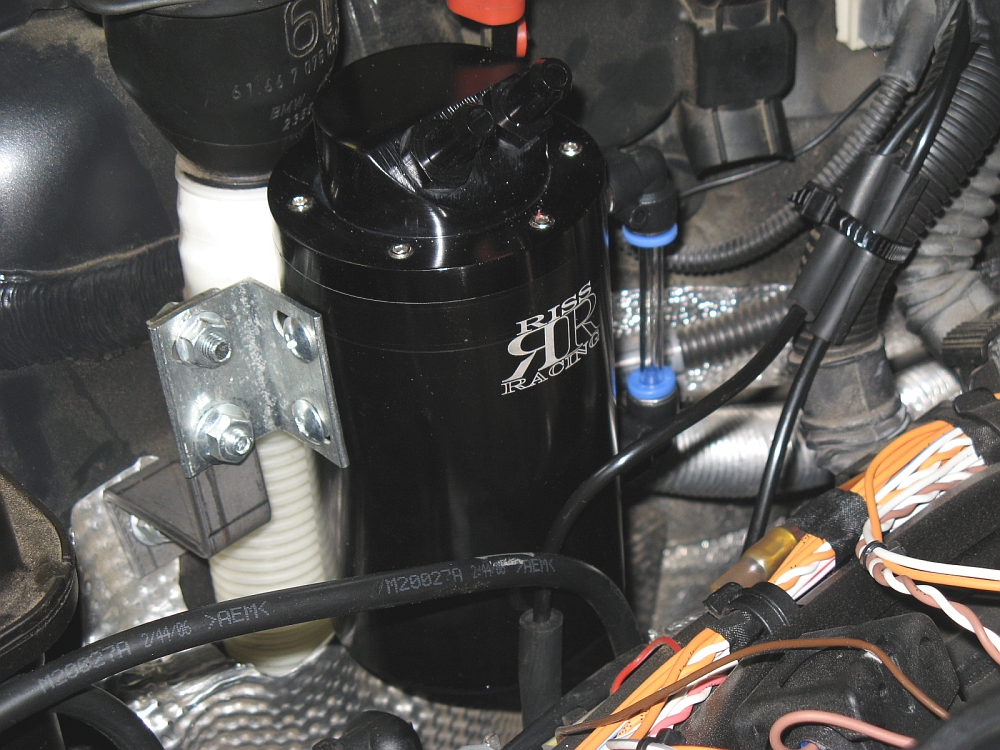
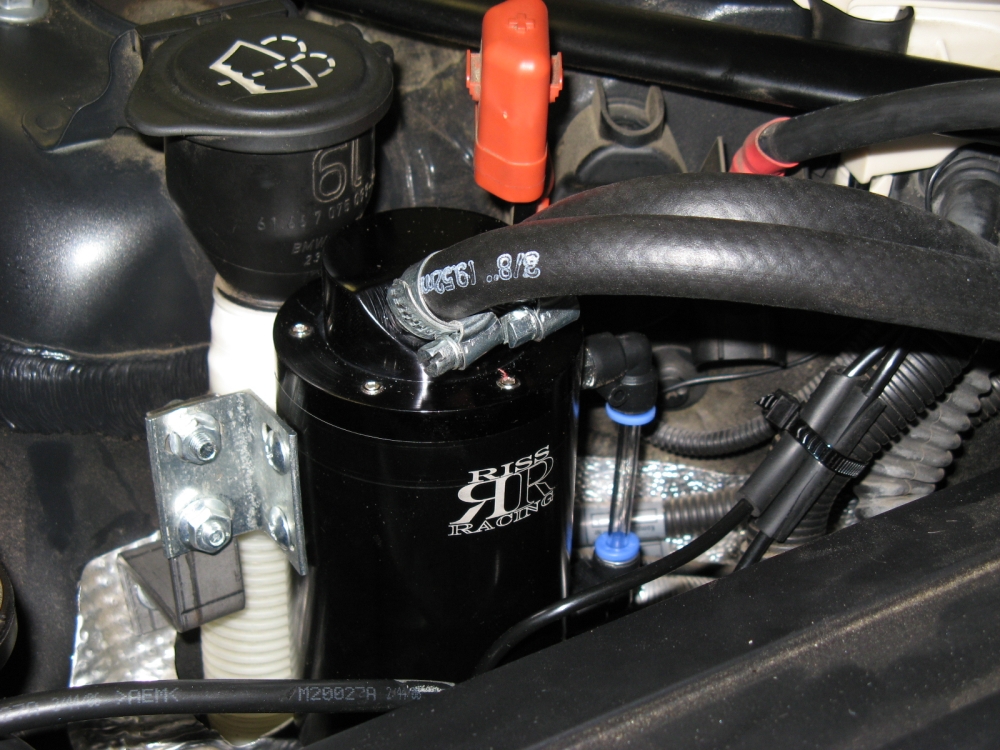
Oil Catch Can from
Riss Racing installed, removes oil and moisture from recirculated
crank case vapor/gas to keep it out of your intake, turbos, and intercooler.
The installation instructions are HERE, RR DIY video HERE.
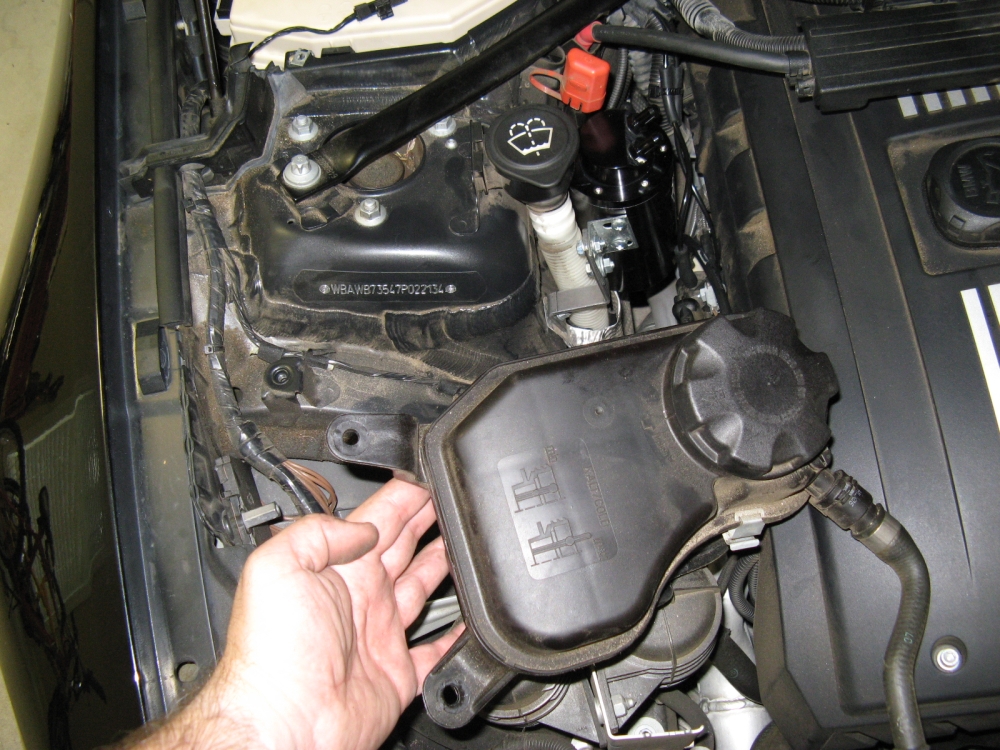
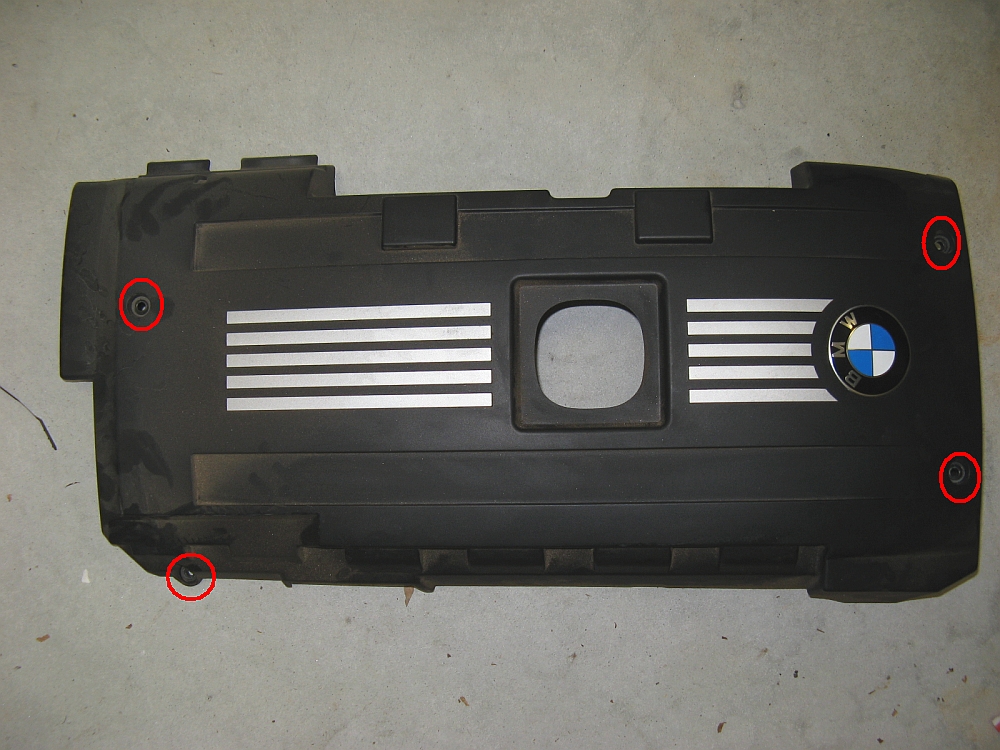
I found that temporarily removing the two 10mm bolts that
held the coolant reservoir in place allowed for easier access to the single bolt the bracket attached too. The two O-rings provided are inserted between the can
and washers before attachment to the bracket to prevent oil leaks. The fourth bolt holding the engine
cover on is hiding down on the passenger side. The four-clip connectors were kind of difficult since four clips had to be released at the same
time while pulling apart. During installation I did find oil in the lines I disassembled so feel this will be a worthwhile mod.
I took some additional pics to supplement the great RR installation instructions.
Forge Motorsports
diverter valves from North American (NA) Motorsports installed, should work better than OE valves,
holding boost better between shifts while providing more linear power. Kit only came with two clamps and four are required, NAM worked with Forge to get me
the additional clamps in time for the weekend (Thanks Justin and Nick at NAM
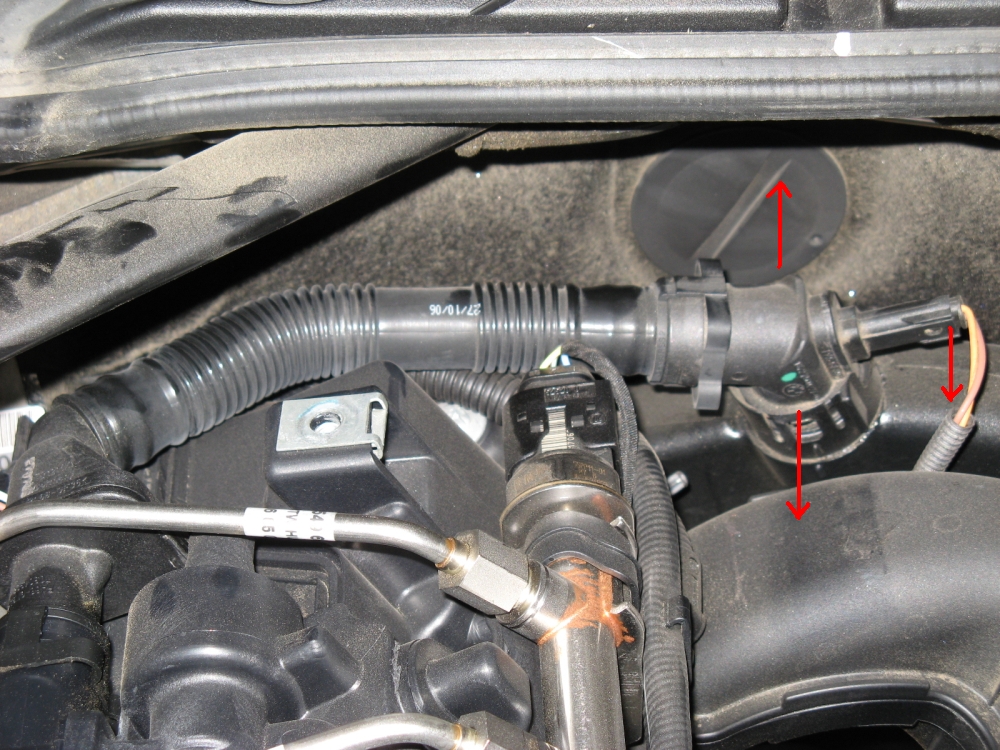
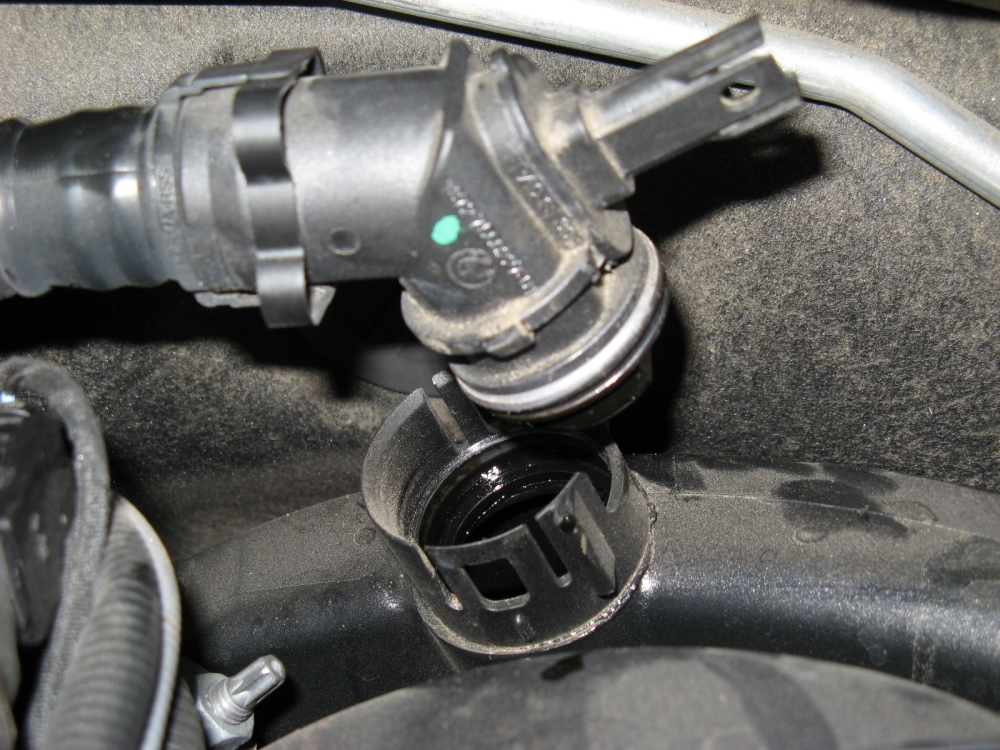
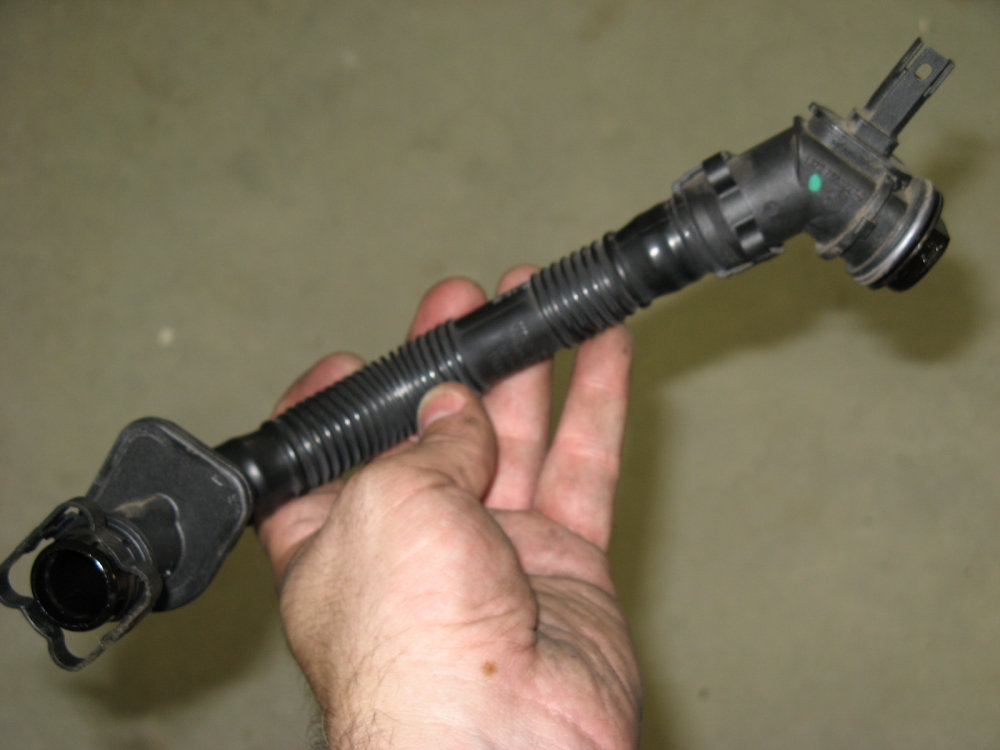
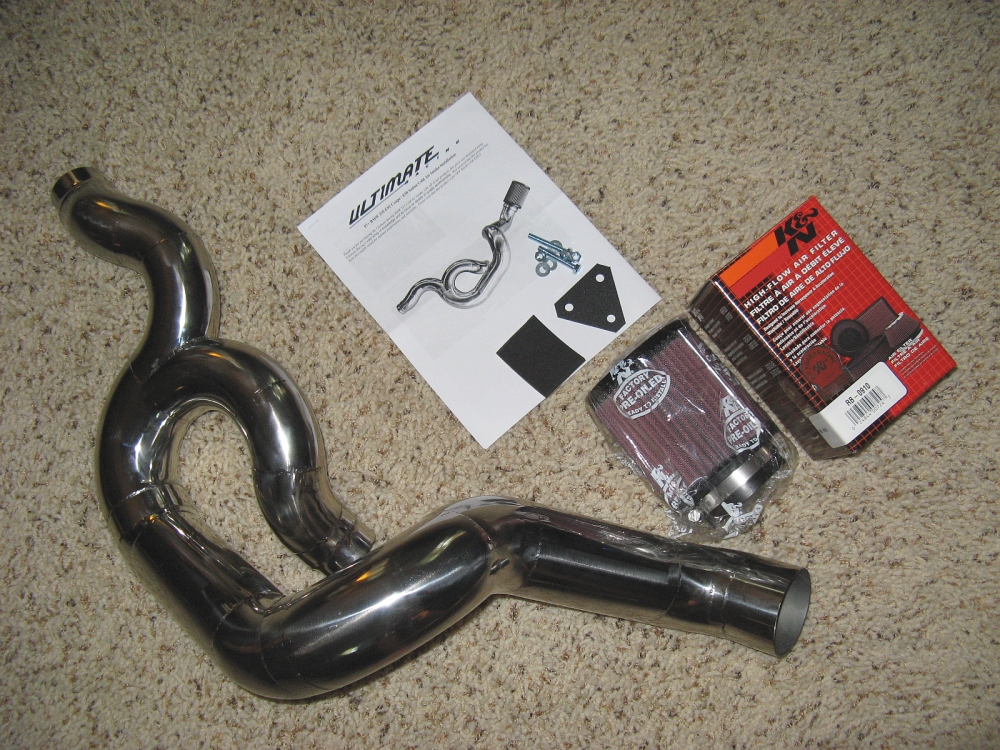
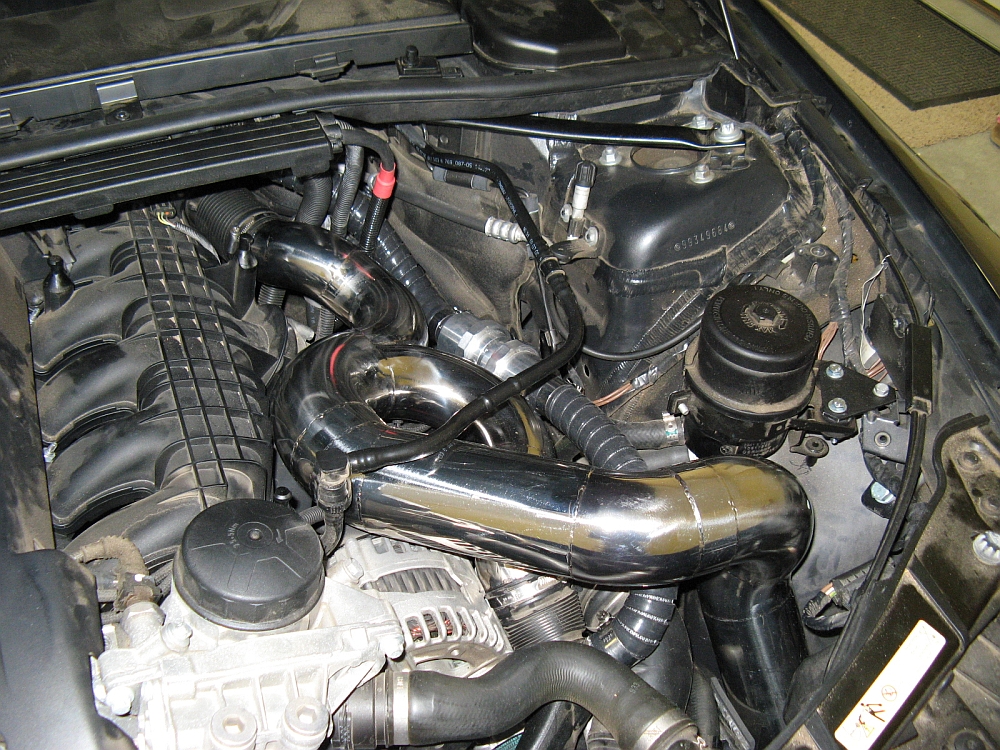
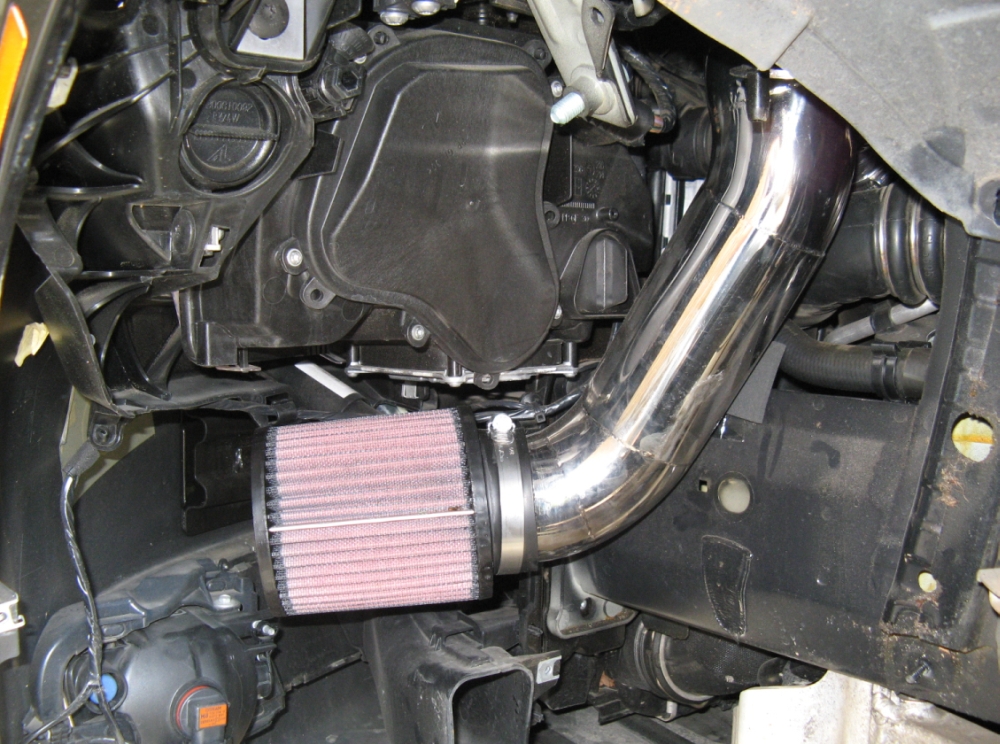
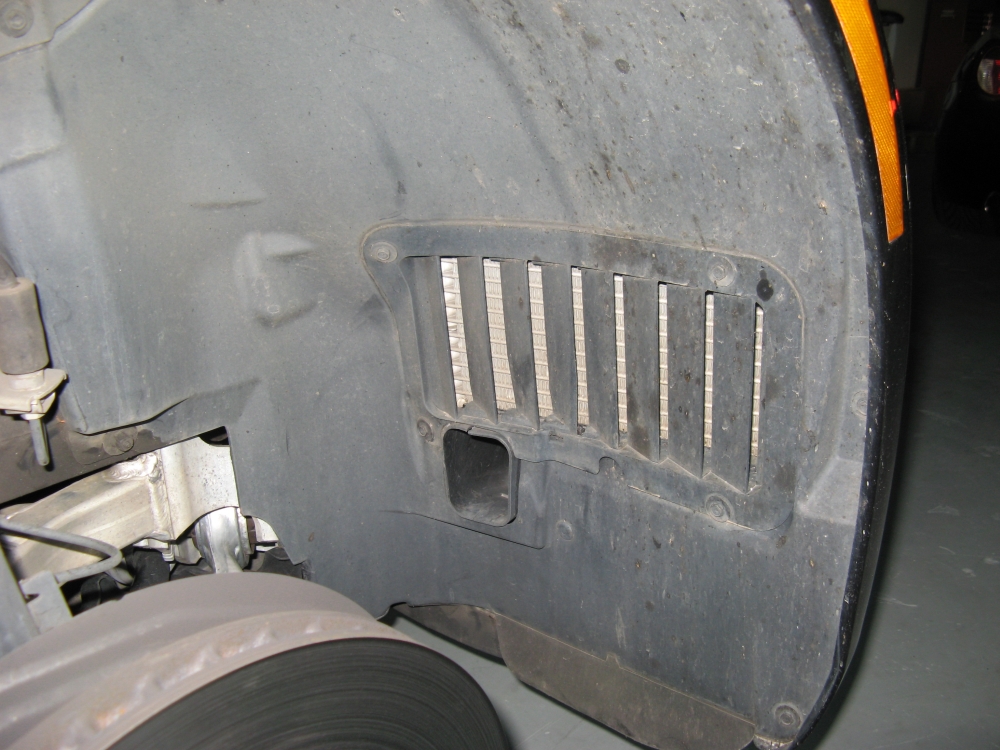
Ultimate Racing
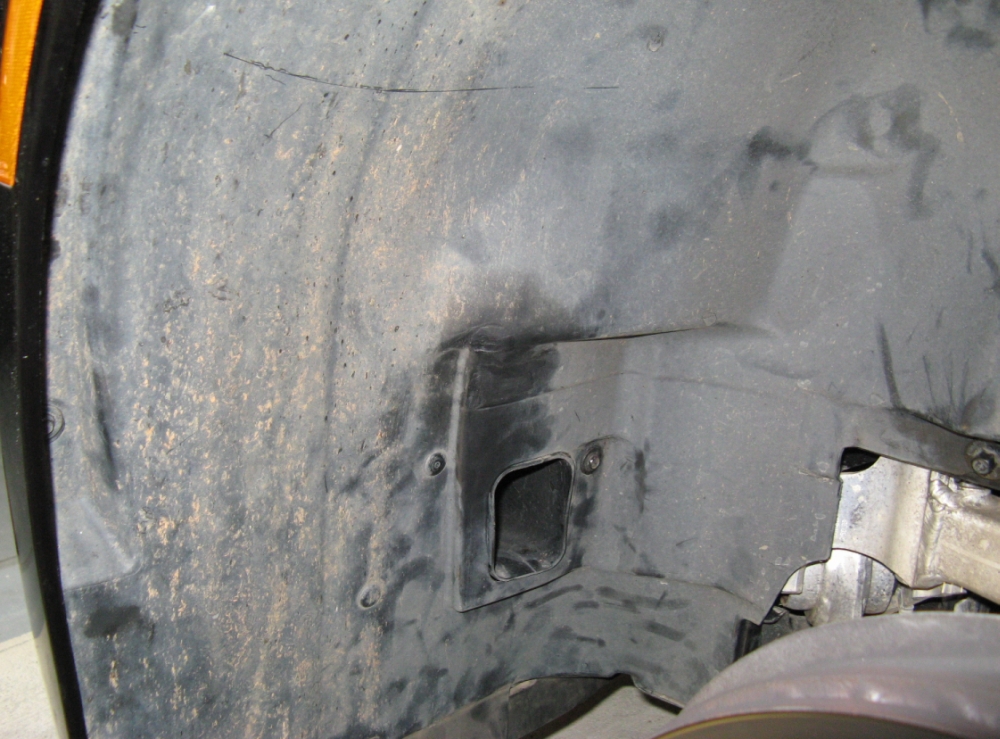
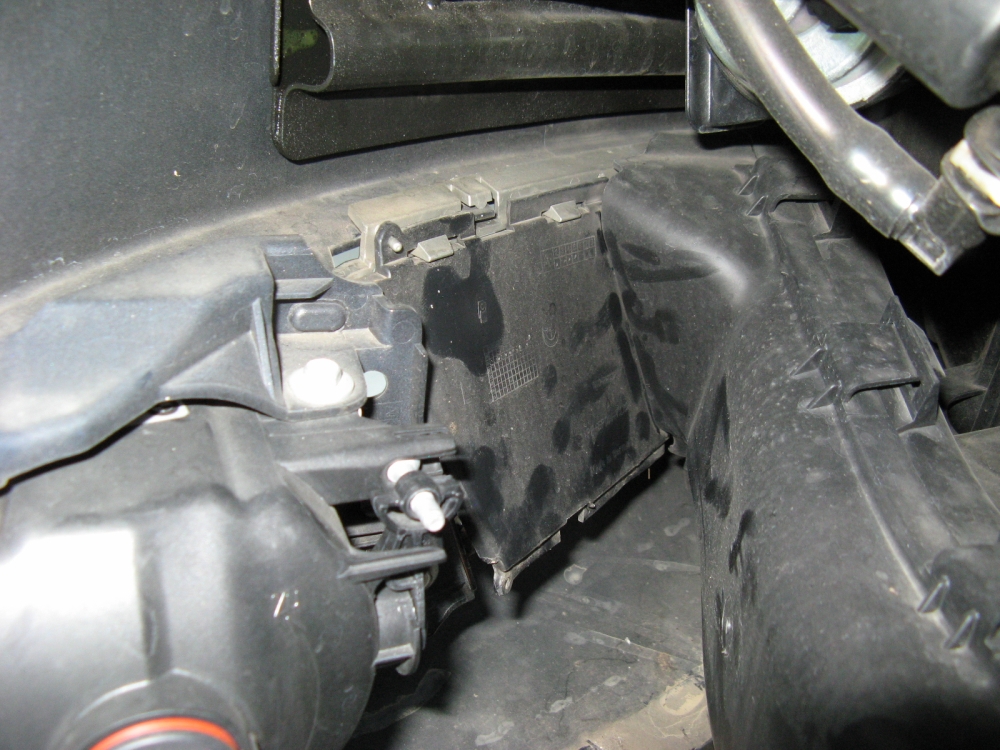
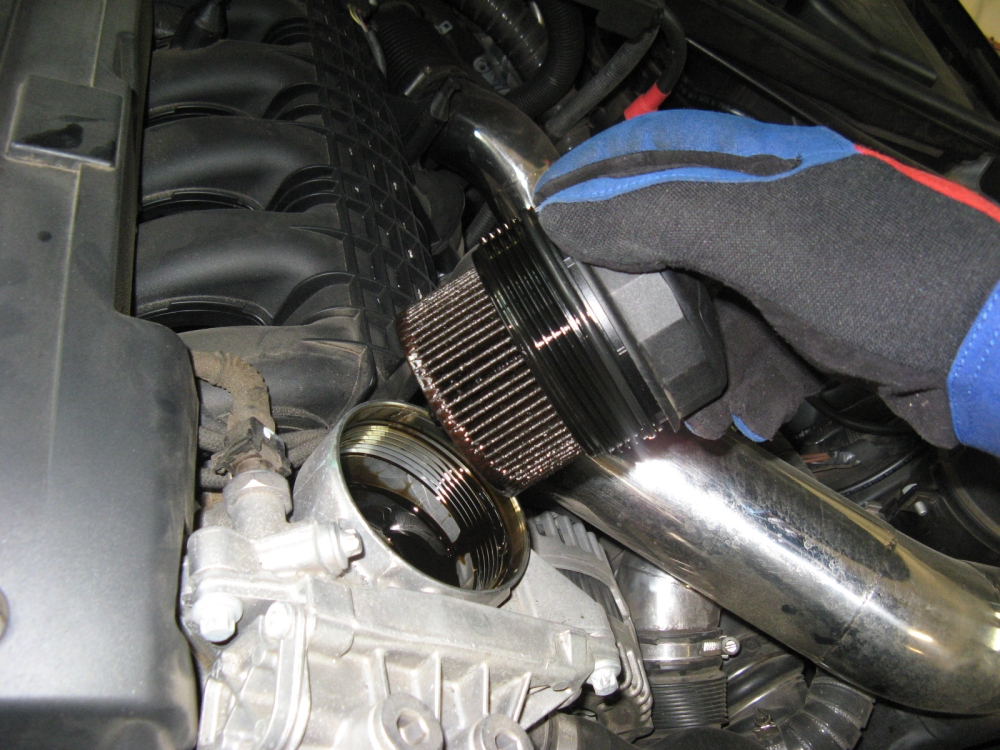
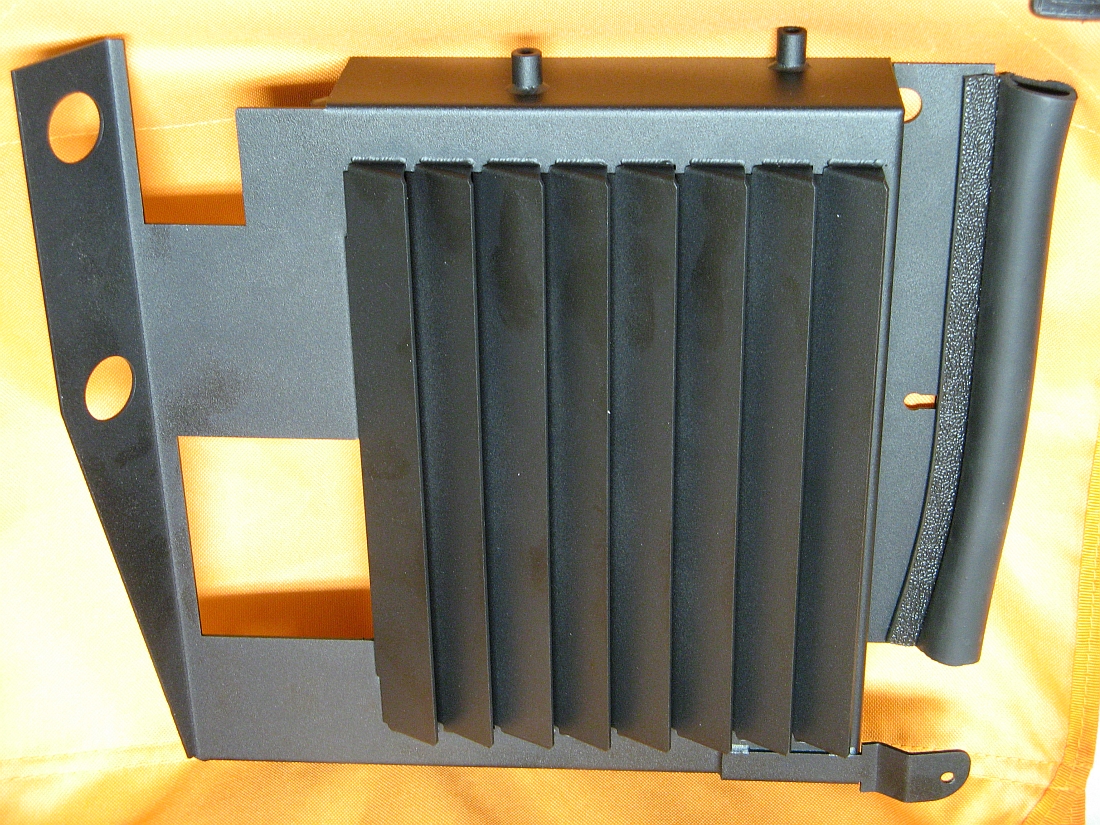
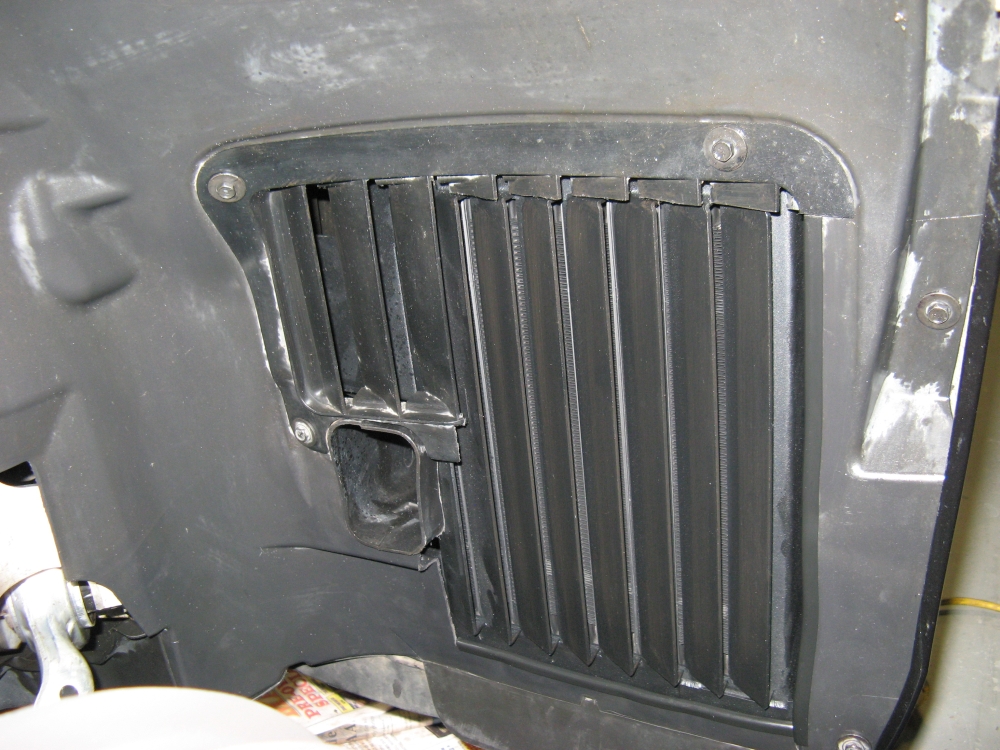
CAI (Cold Air Induction) installed. Installation requires removal of power steering reservoir bracket and support before it is relocated. Fender liner front section
is removed for air filter installation on intake pipe- there are several bolts around the perimeter AND under the front bumper that need to be removed. Between
this and the new DVs, the diverter sound is now very apparent as is the turbos spooling up
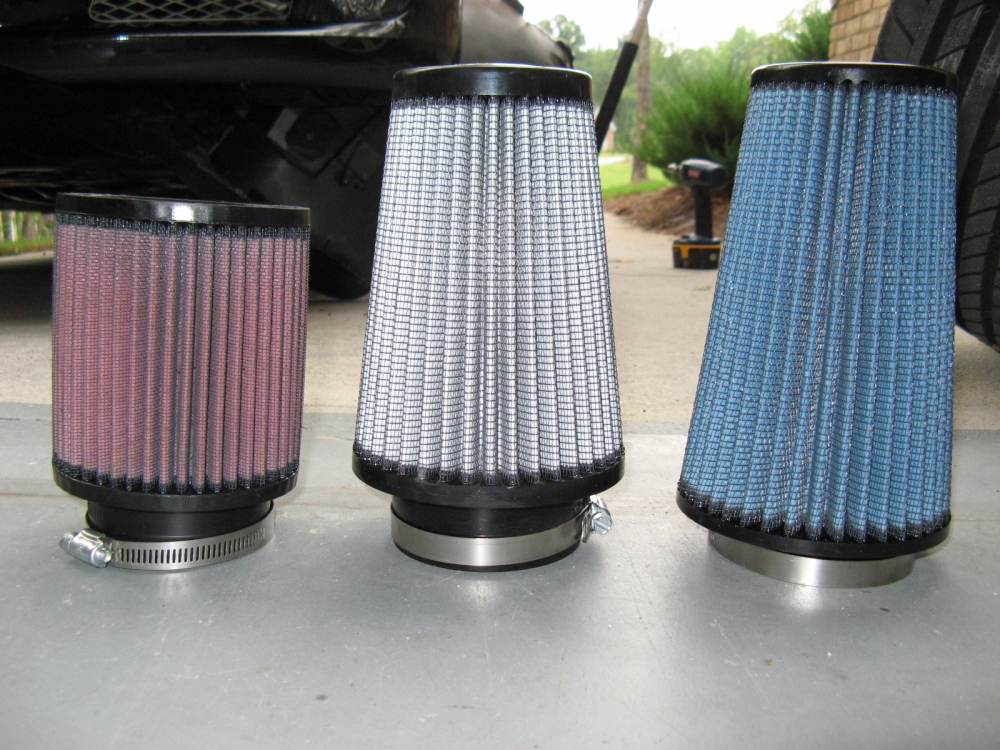
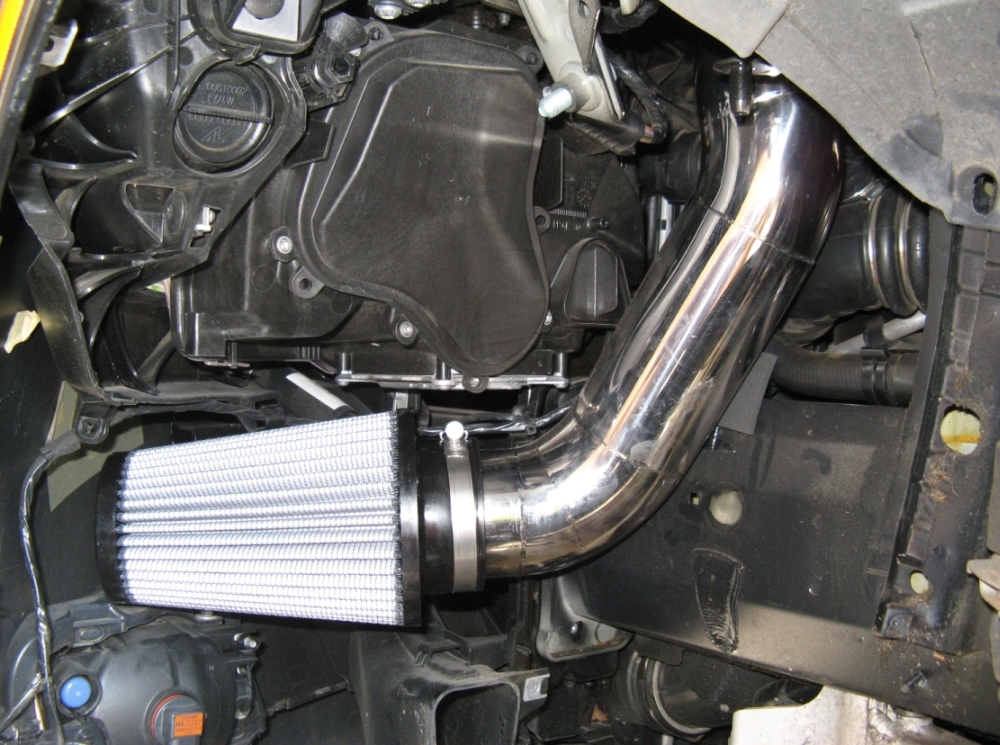
aFe
Pro Dry S air filter (P/N 21-30003, dimensions 3"F x 5"B x 3-1/2"T x 7"H) purchased to try on UR CAI. Noticeably larger than the provided K&N, it should
allow better filtration with more filter area, but may not flow as well as it's oiled counterpart (P/N 24-30003 or 8"H P/N 24-30508).
I may try the aFe oiled version in this size later. I also
took the opportunity while everything was apart to change the filter to remove the blocking plate for the grill to allow more airflow.
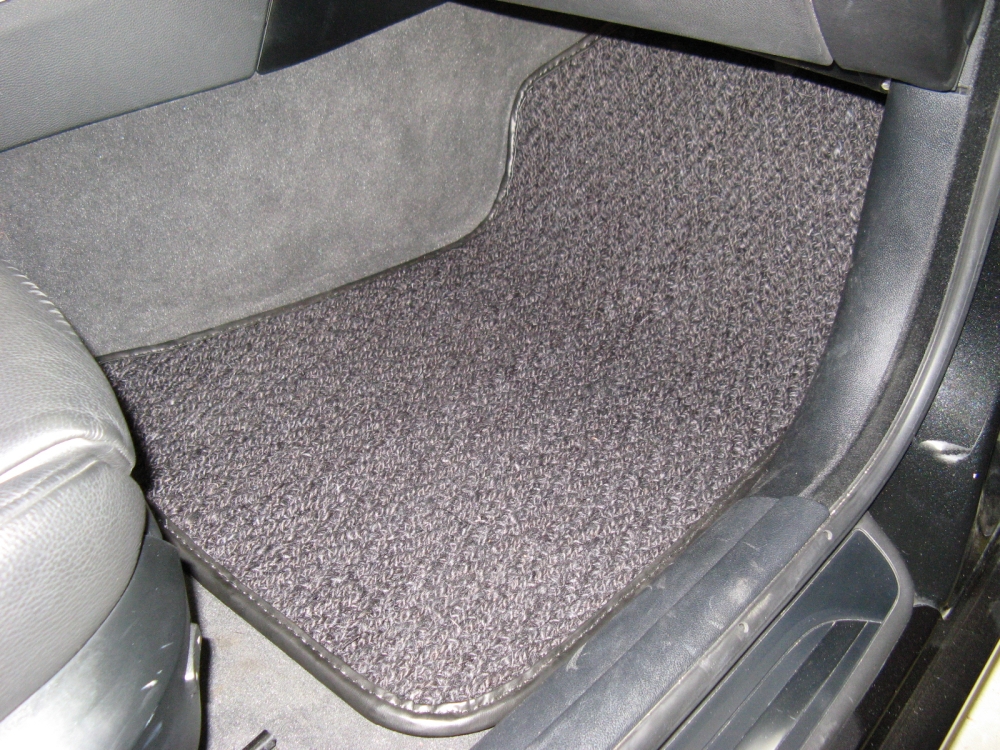
Coco Mats
installed to replace OE mats. These mats are superior in every way: thick and stable with more coverage, I'm sure they will last a long time as well.
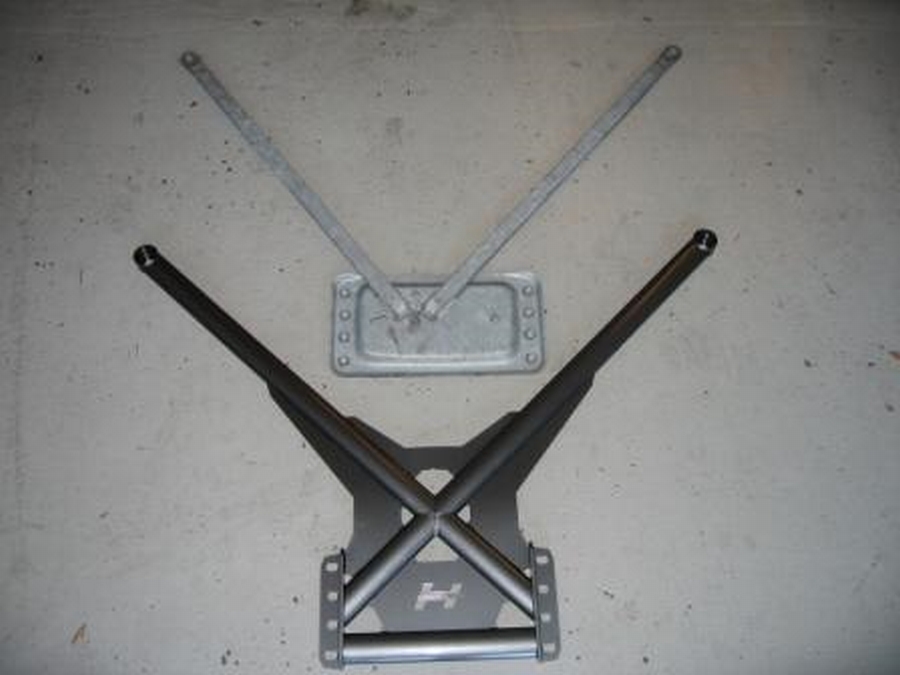
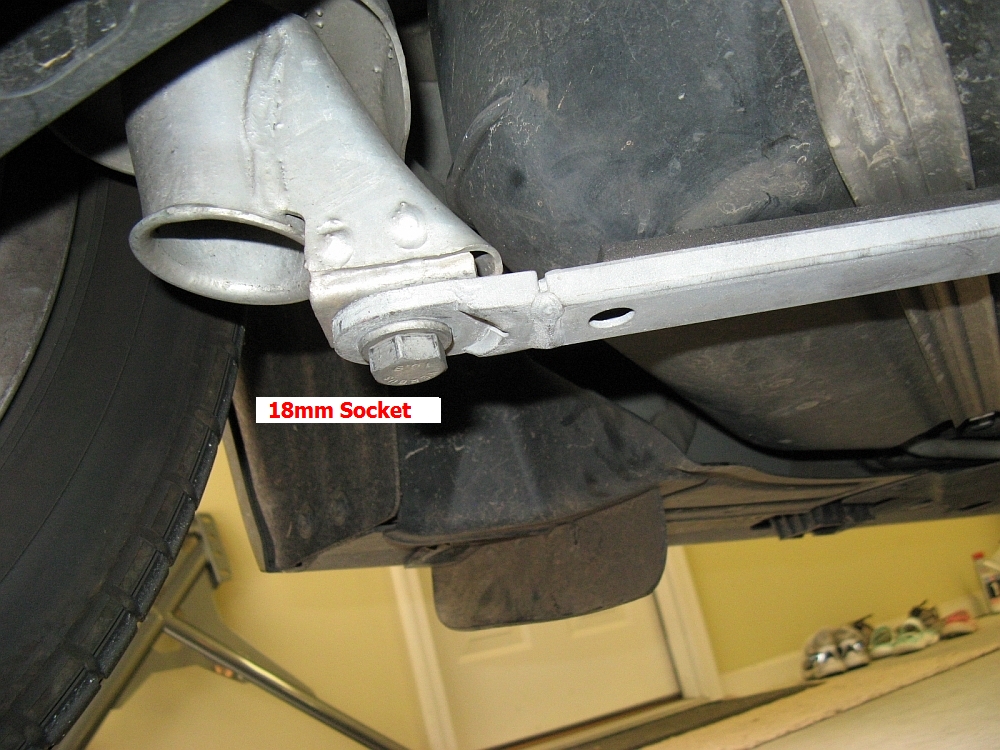
Hotchkis
rear chassis brace (P/N 14834) from HP Autowerks installed.
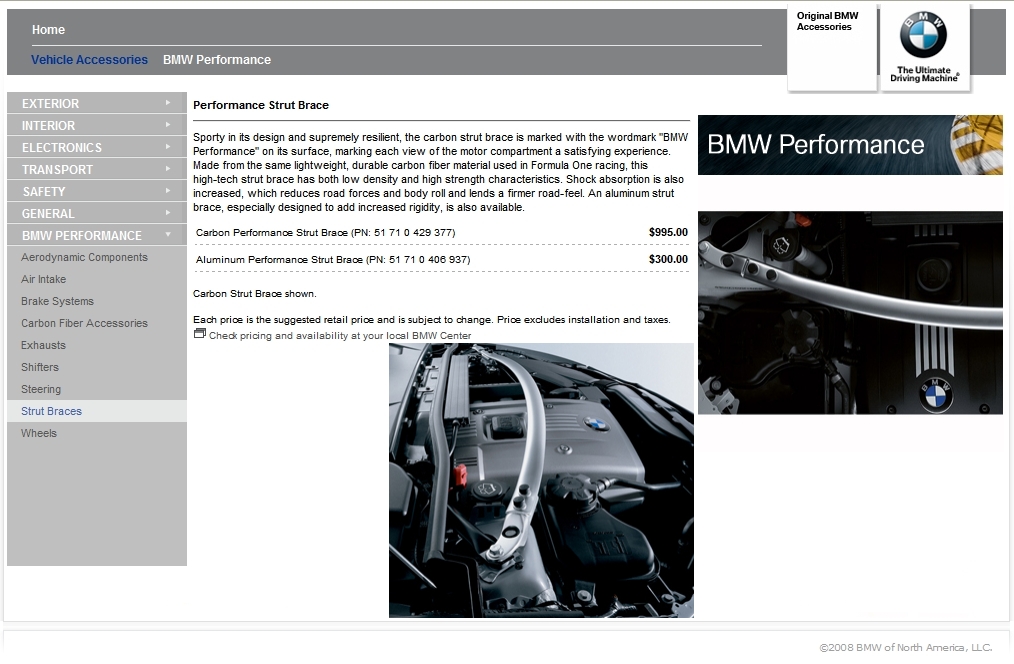
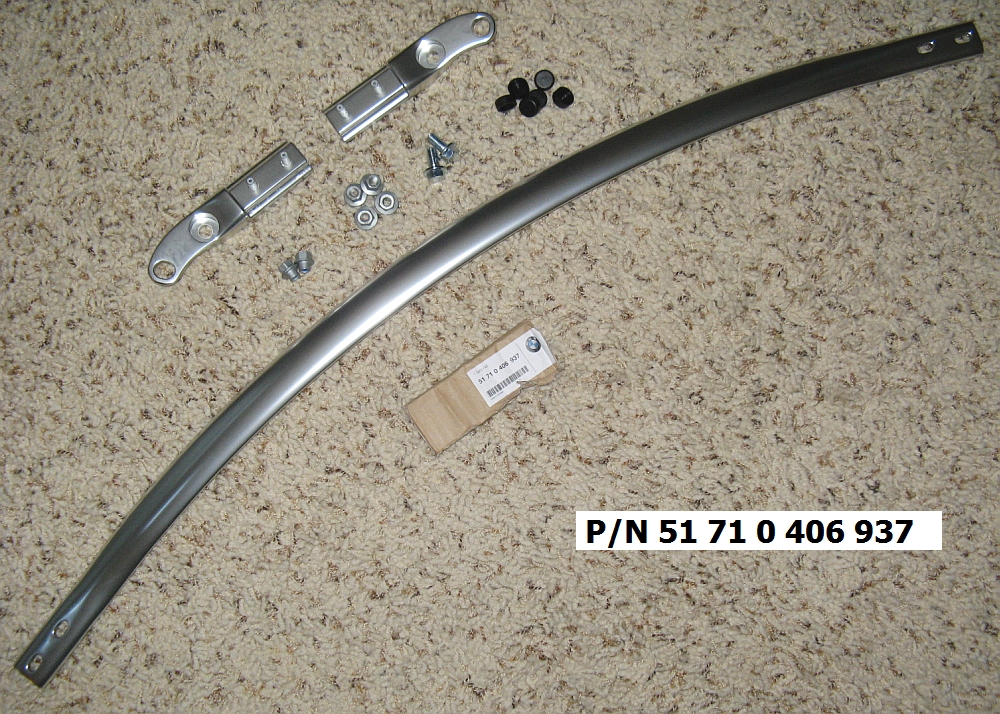
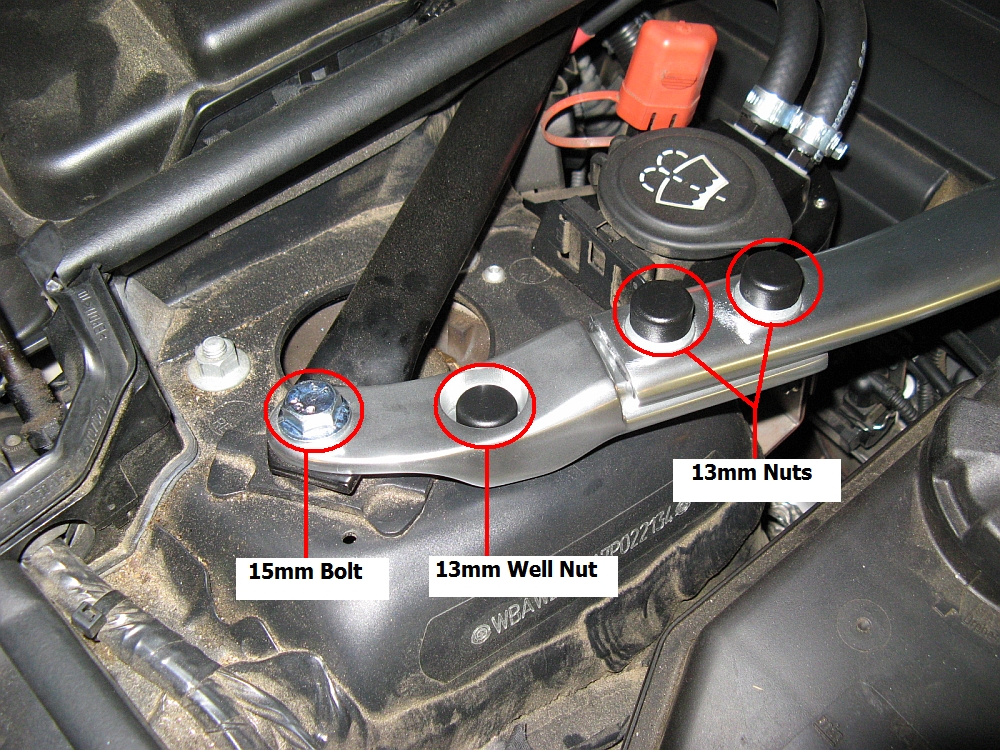
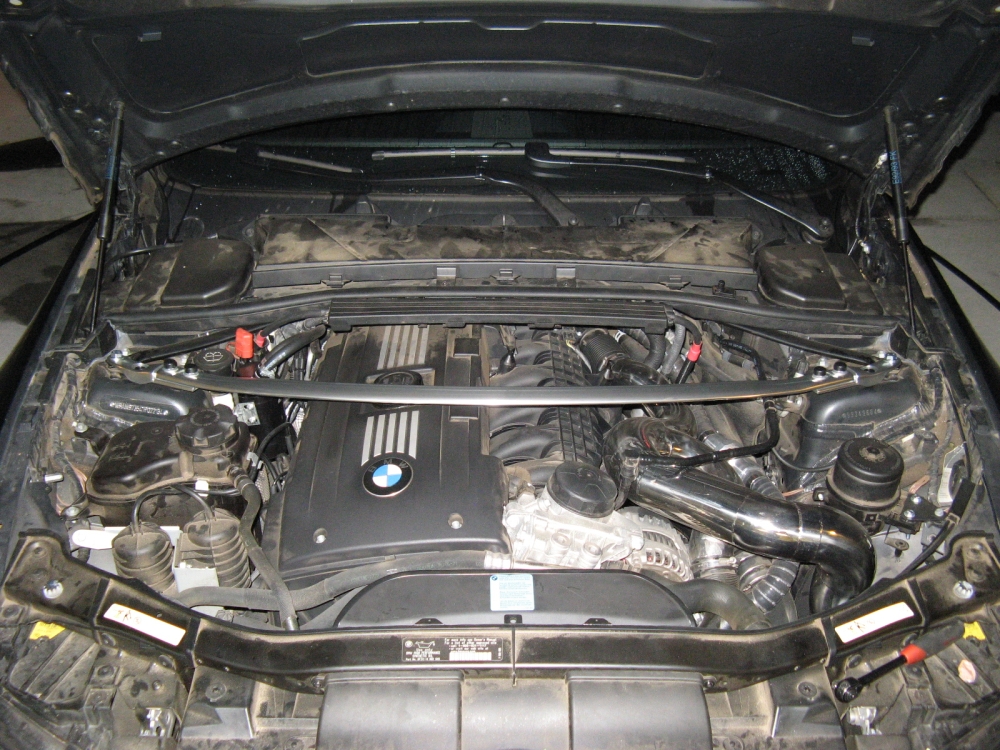
BMW Performance
aluminum strut brace (P/N 51710406937) installed. BMW installation instructions HERE.
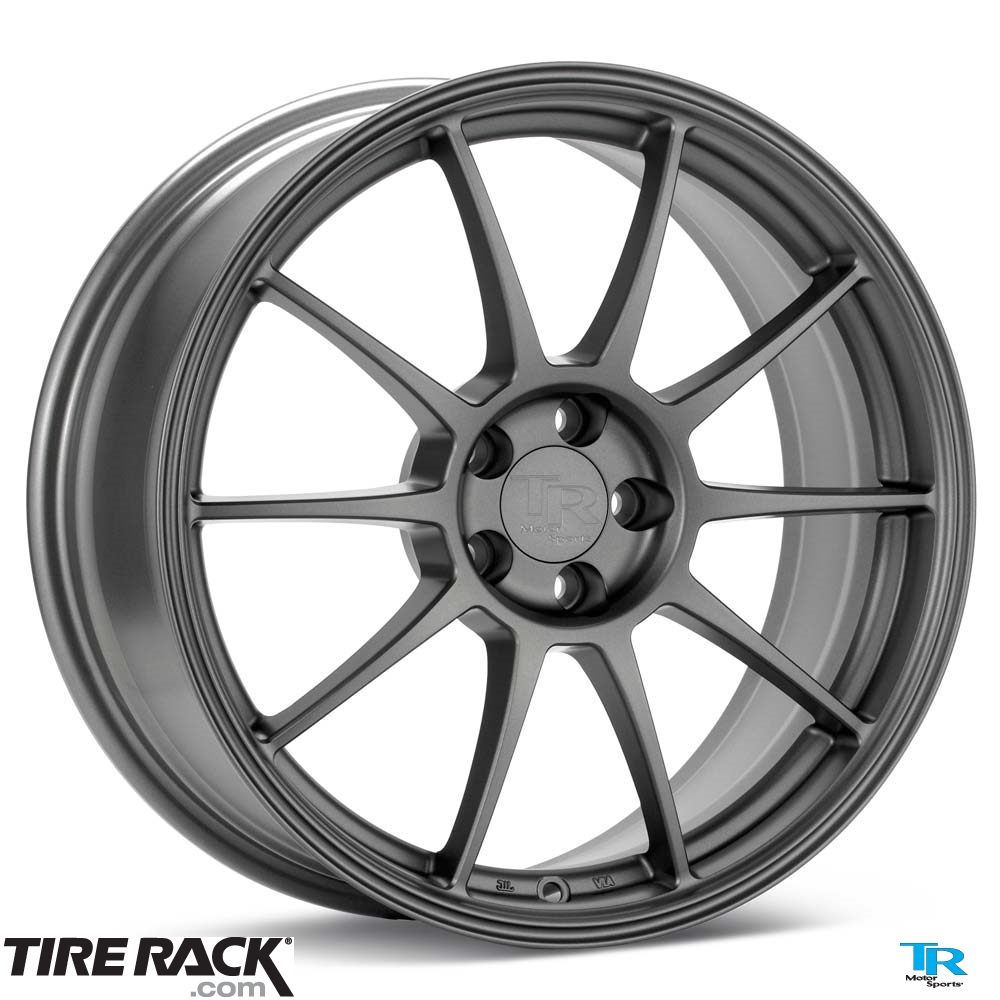
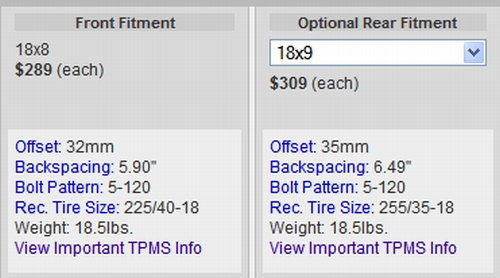
TR Motorsports MT1 wheels from
TireRack,
manufactured for the TireRack by Enkei using MAT technology.
Wheels weigh ~18 lbs so unsprung weight reduction should provide for better handling/braking.
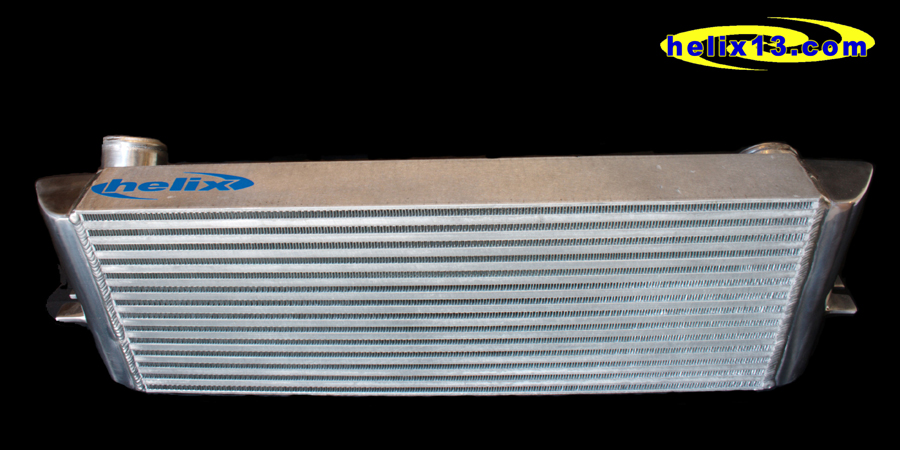
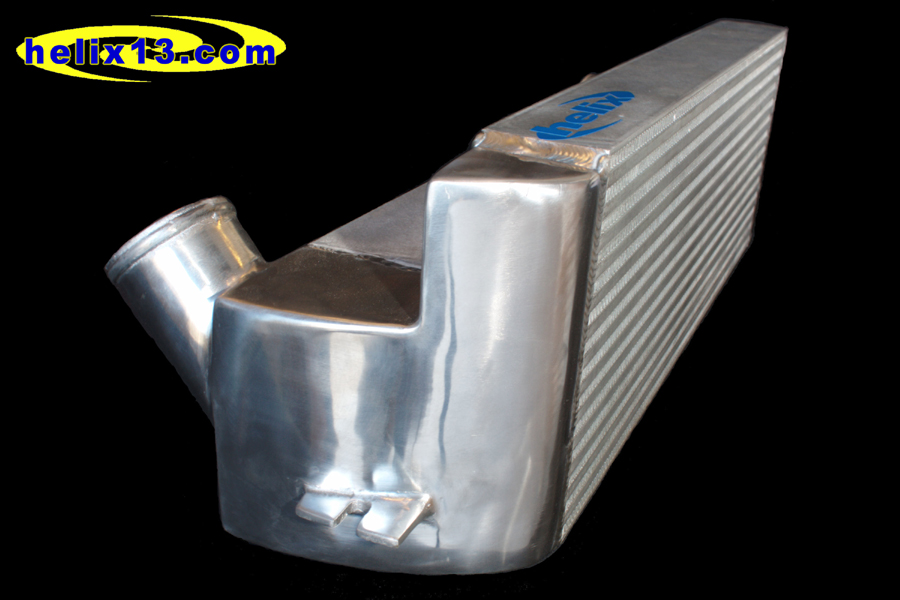
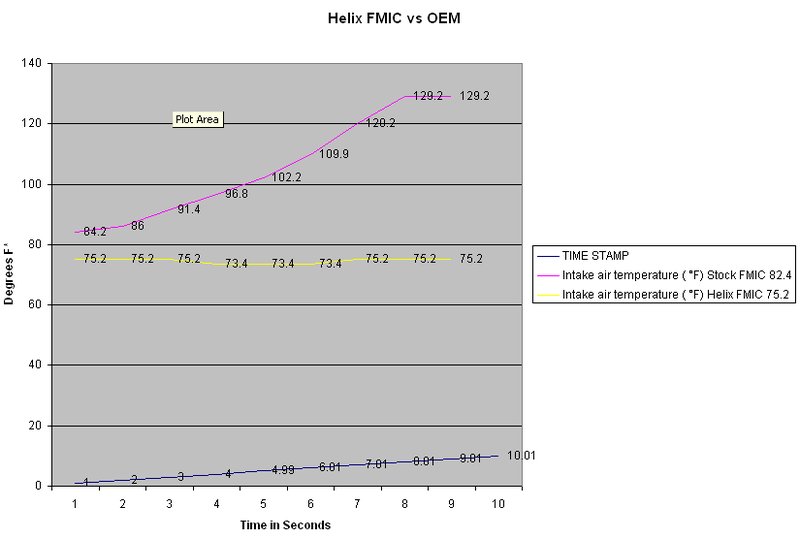
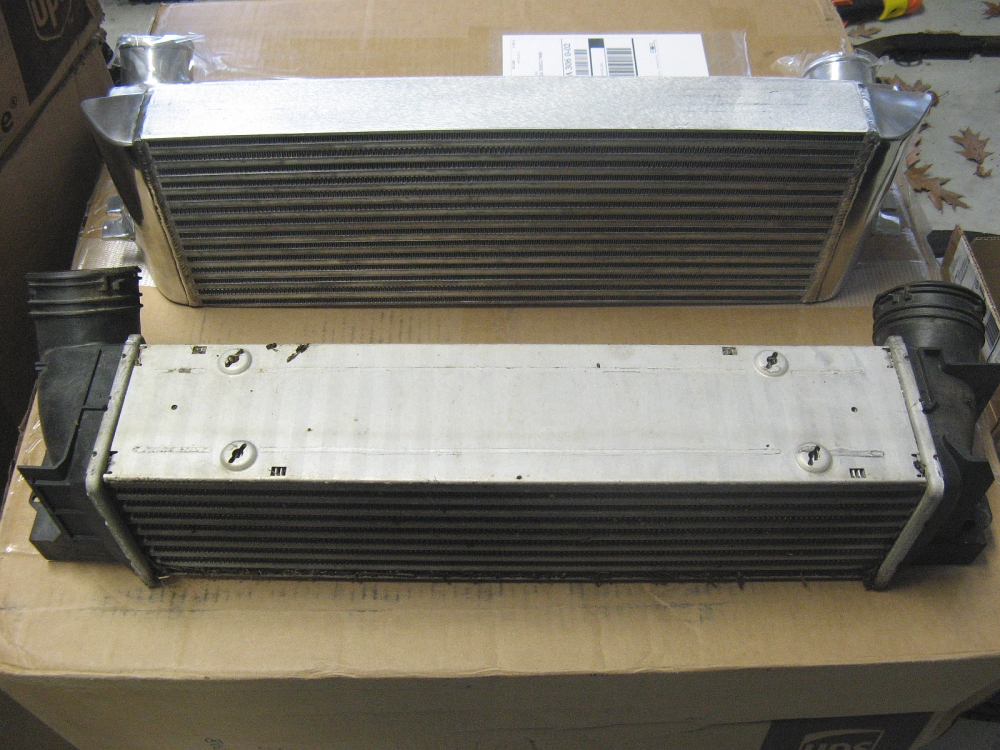
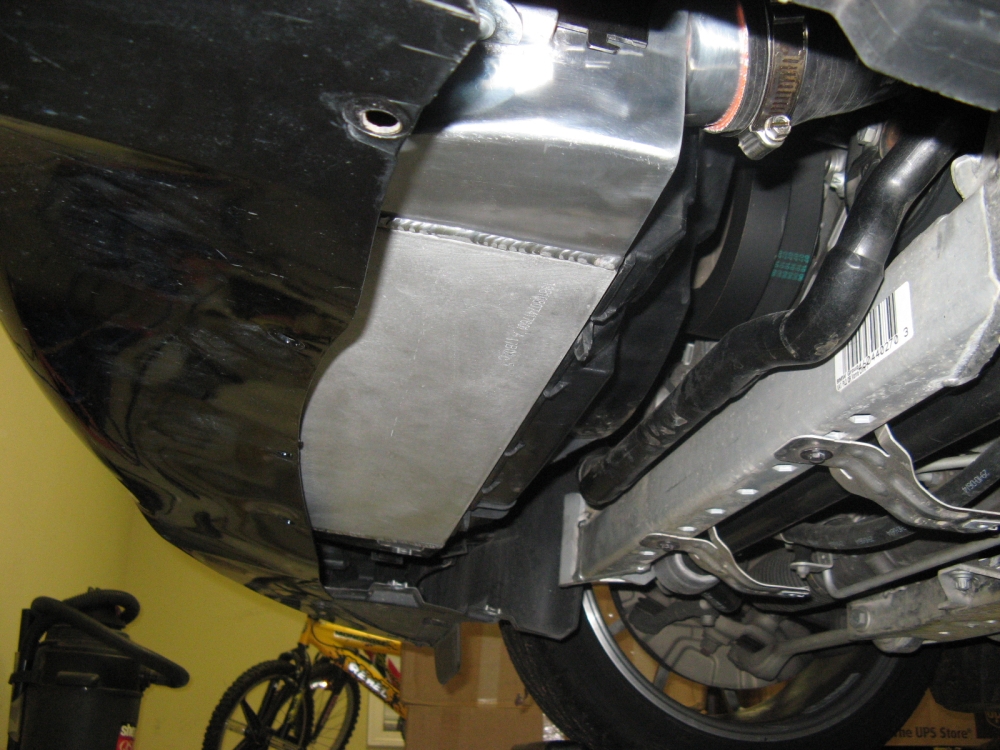
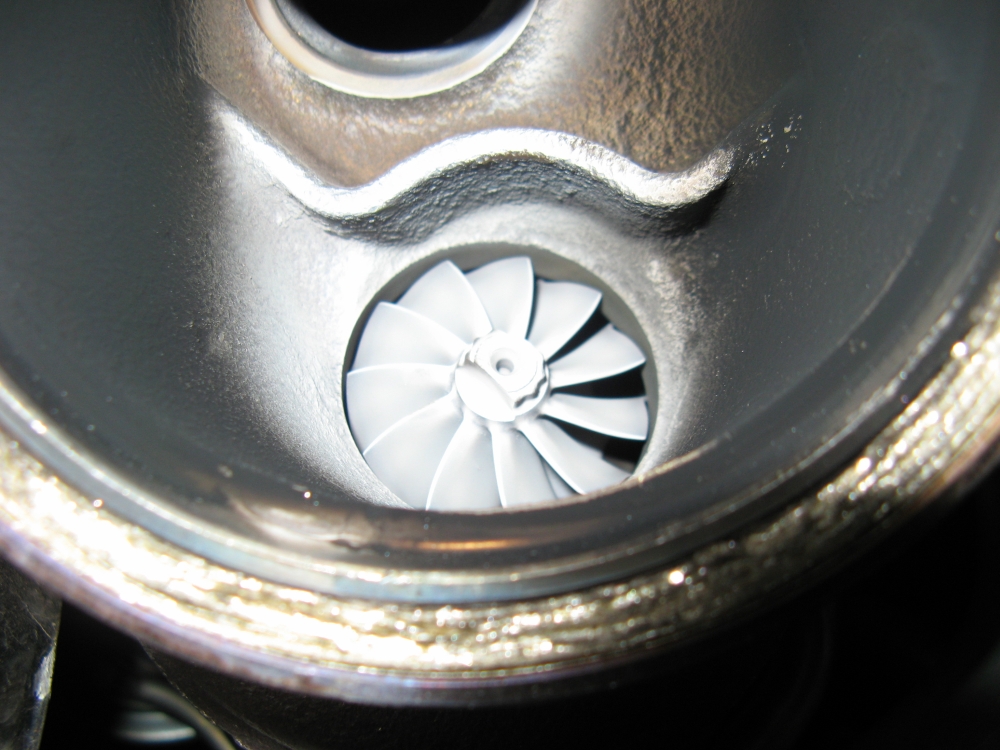
Helix
Intercooler upgrade installed, I assembled a DIY Guide HERE.
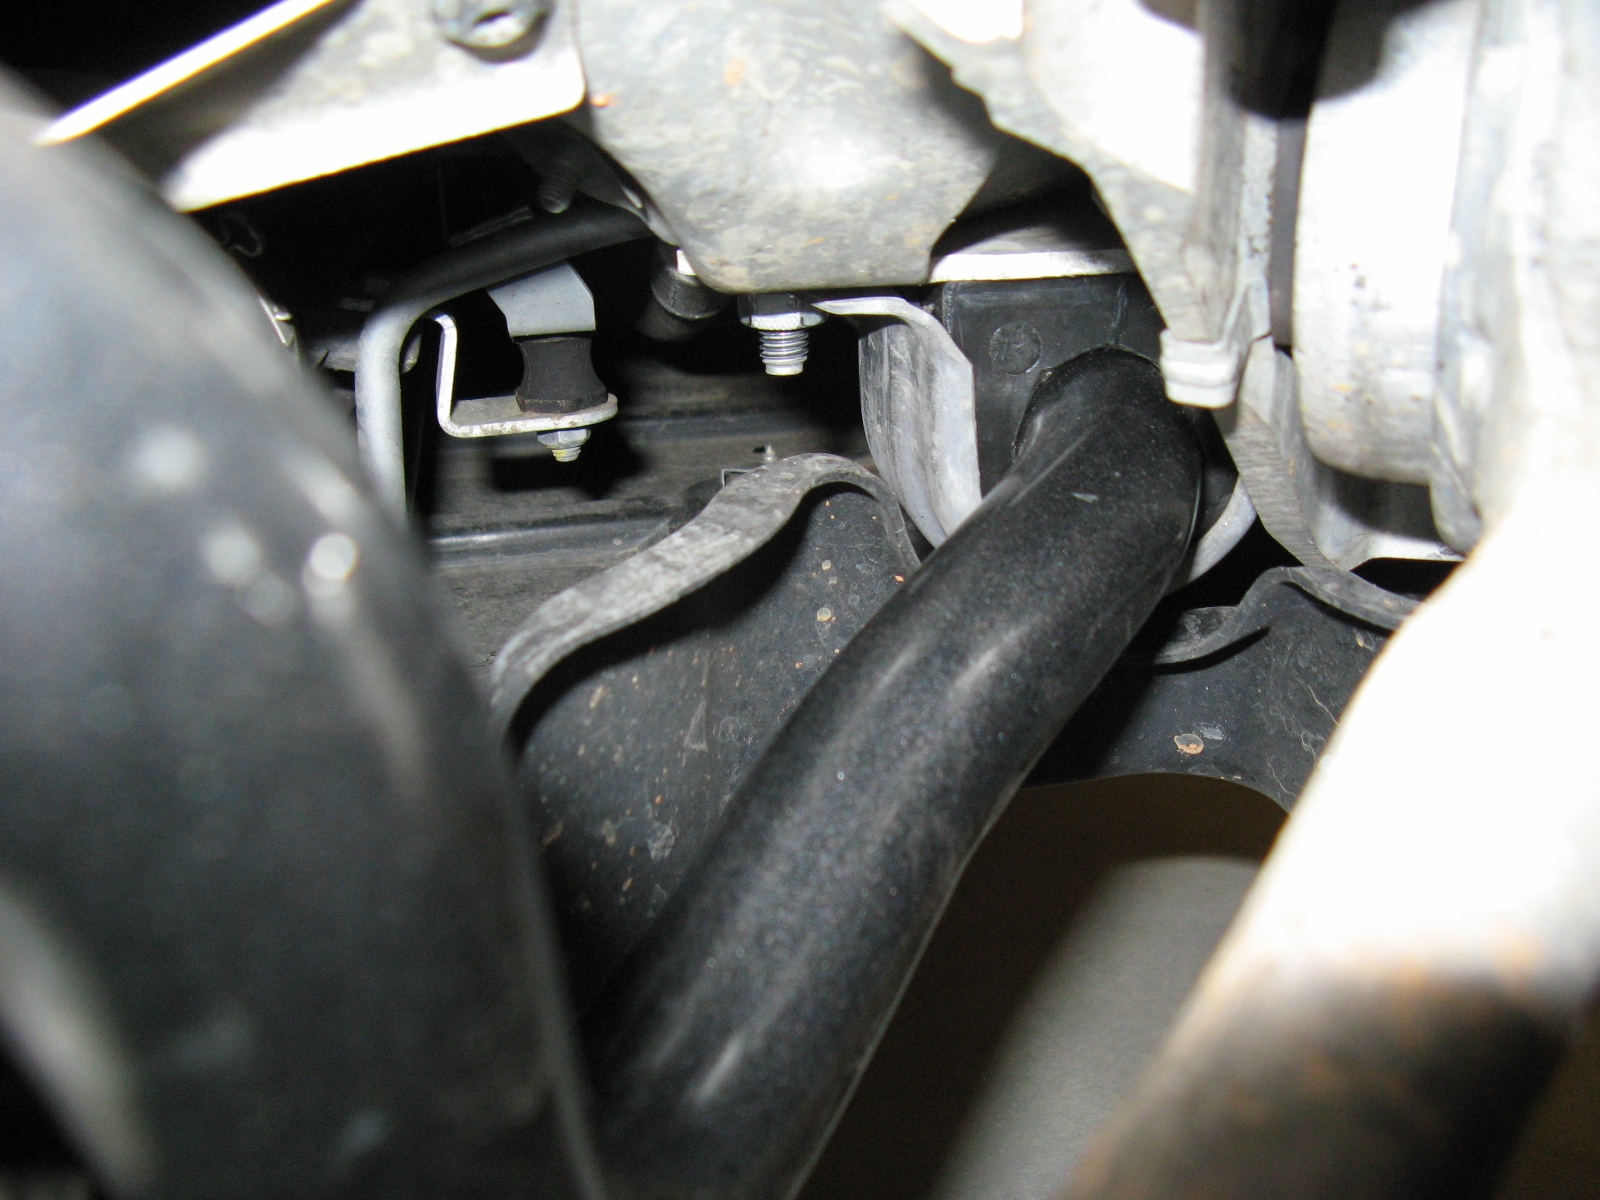
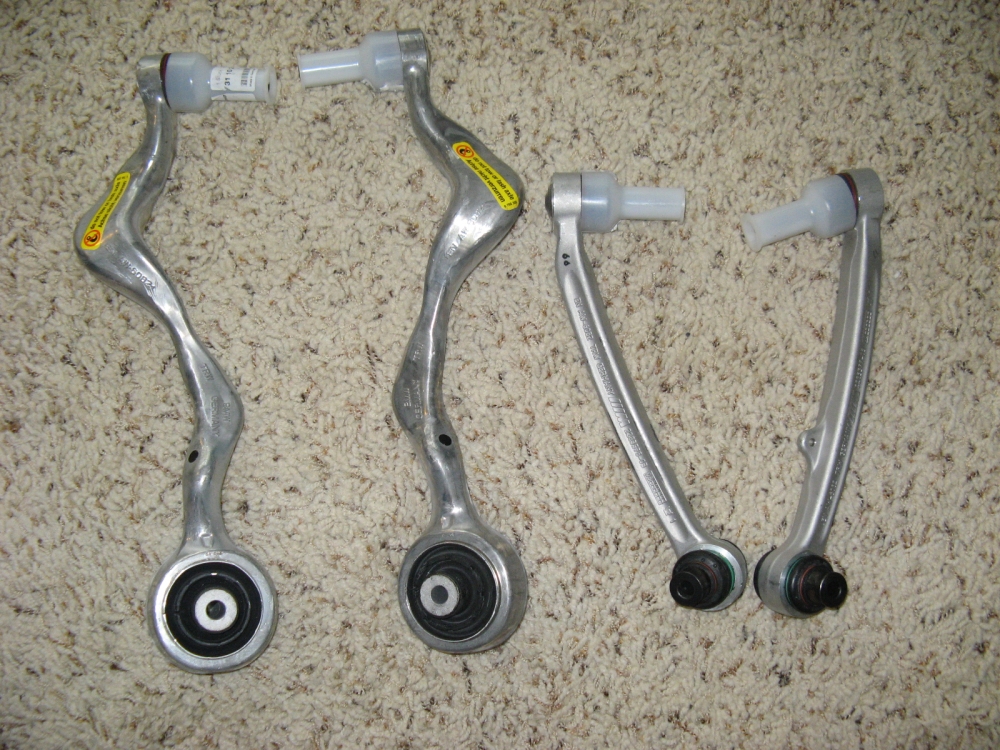
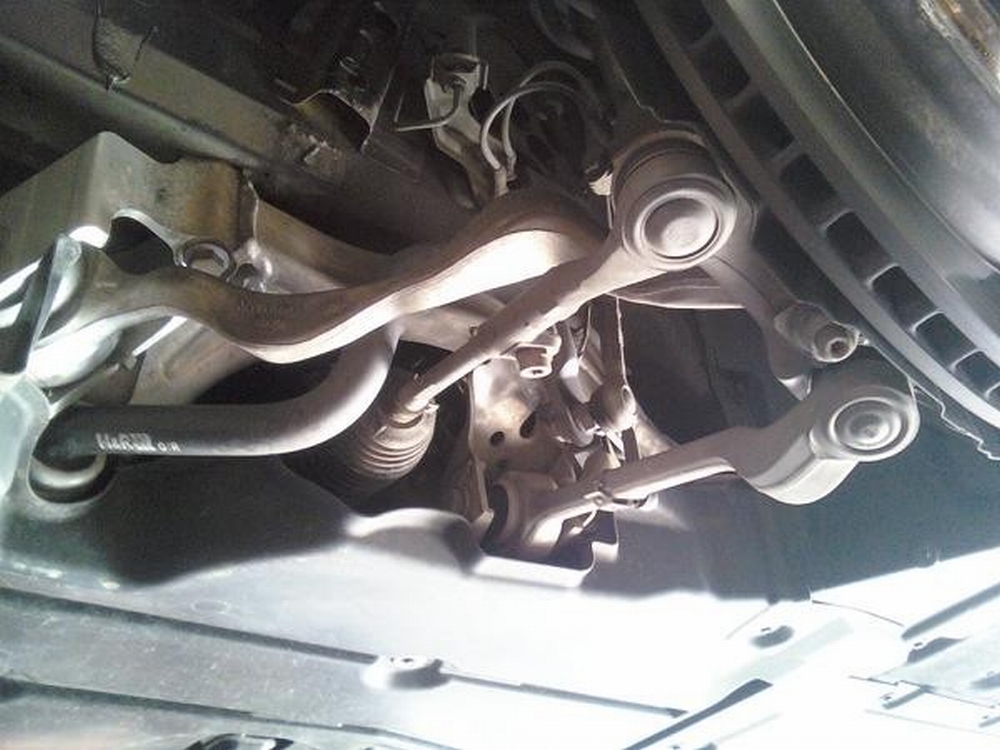
M3 lower control arms and tension struts
from HP Autowerks installed by Kauffman Tire on McGinnis Ferry Road in Suwanee (770-614-5650).
I didn't want to DIY this since the car alignment might make driving 20 miles scary post install and wear out the tires.
I was inspired by Mr 5's thread and
Orb's thread
on e90Post. Parts consist of
left lower control arm/wishbone-31102283577, right lower control arm/wishbone-31102283578, left lower control arm/tension strut-31102283575,
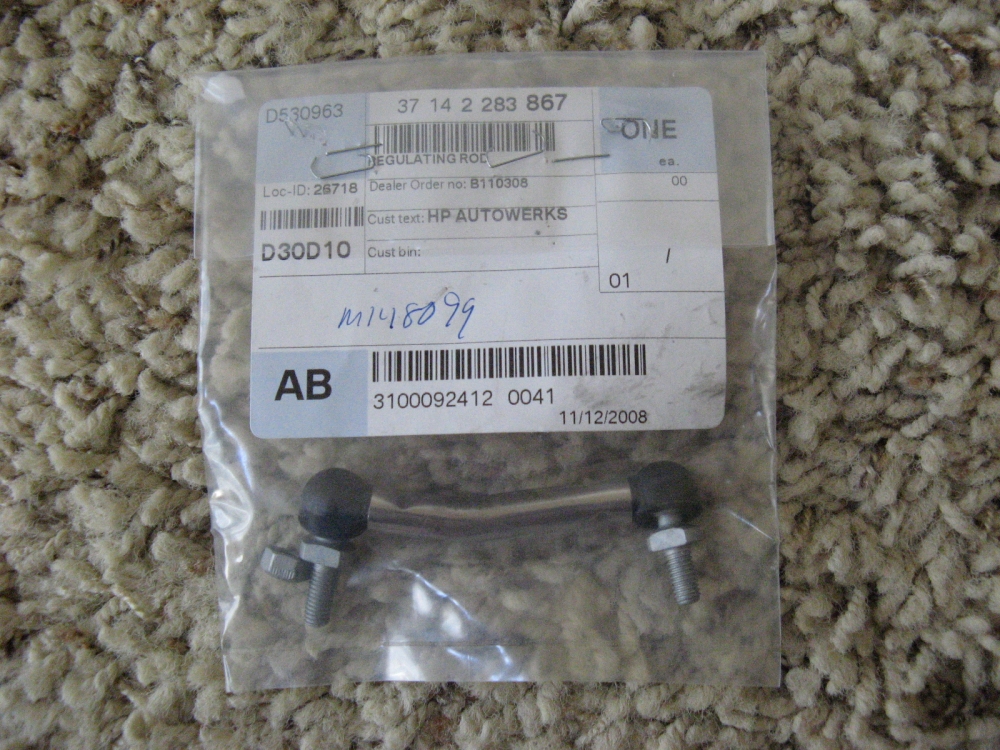
right lower control arm/tension strut-31102283576, and headlight regulating/height adjuster rod-37142283867. Dinan markets some of these OE M3 parts as a
performance bushing kit, a little cheaper ordered from one of the other vendors
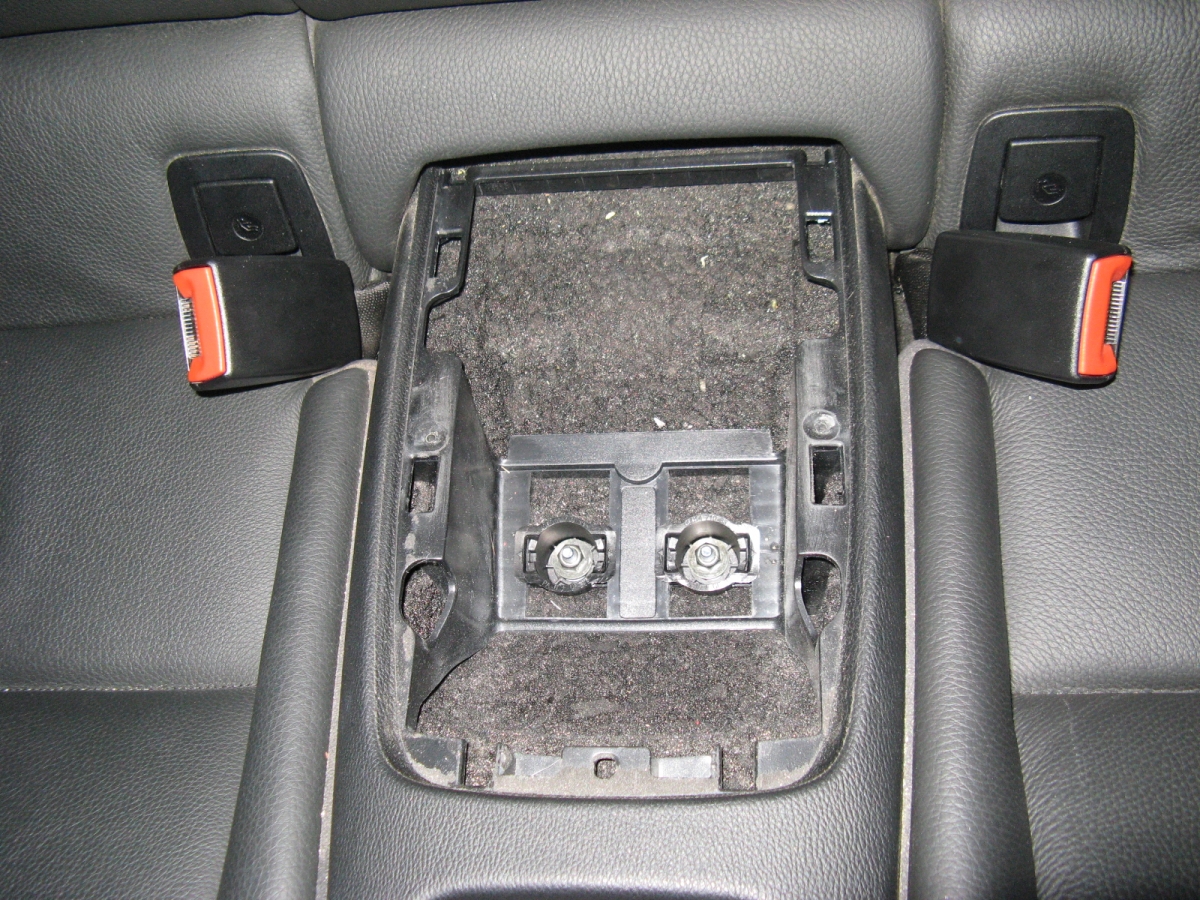
With the MagnaFlow exhaust, the 335 developed a rattle in the rear center
console at a resonant frequency occurring somewhere around 2000 RPMs. Initially I used the tennis ball and rag trick stuffed into the compartment to dampen the noise
but decided to remove the storage compartment and see if something else would work better and still allow it to function as a.....well, storage area.
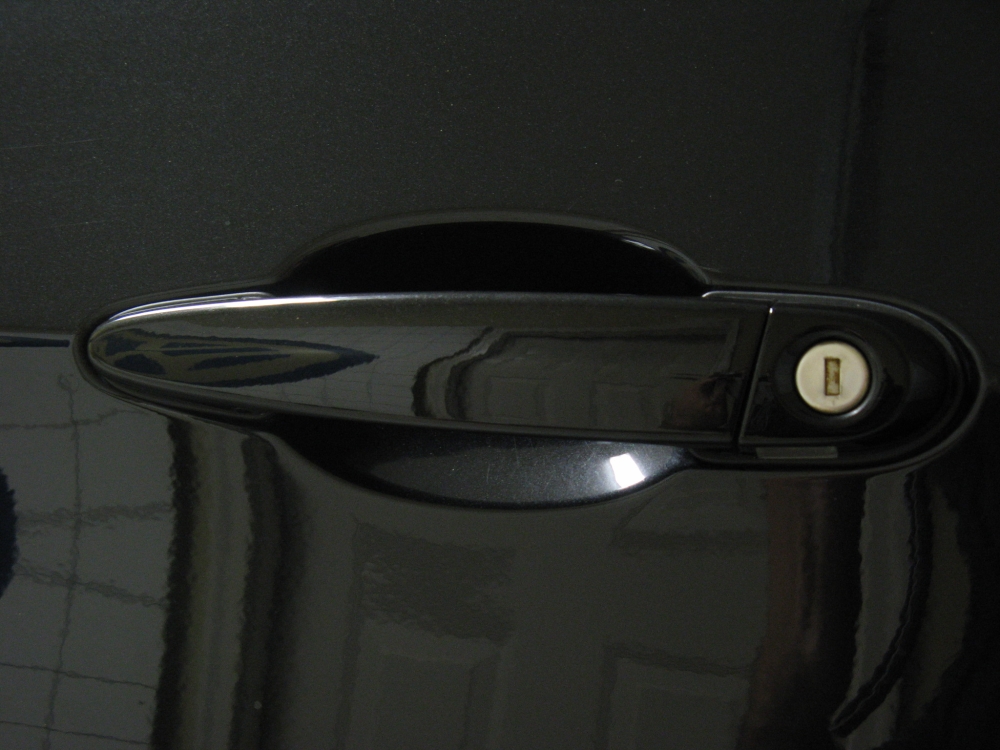
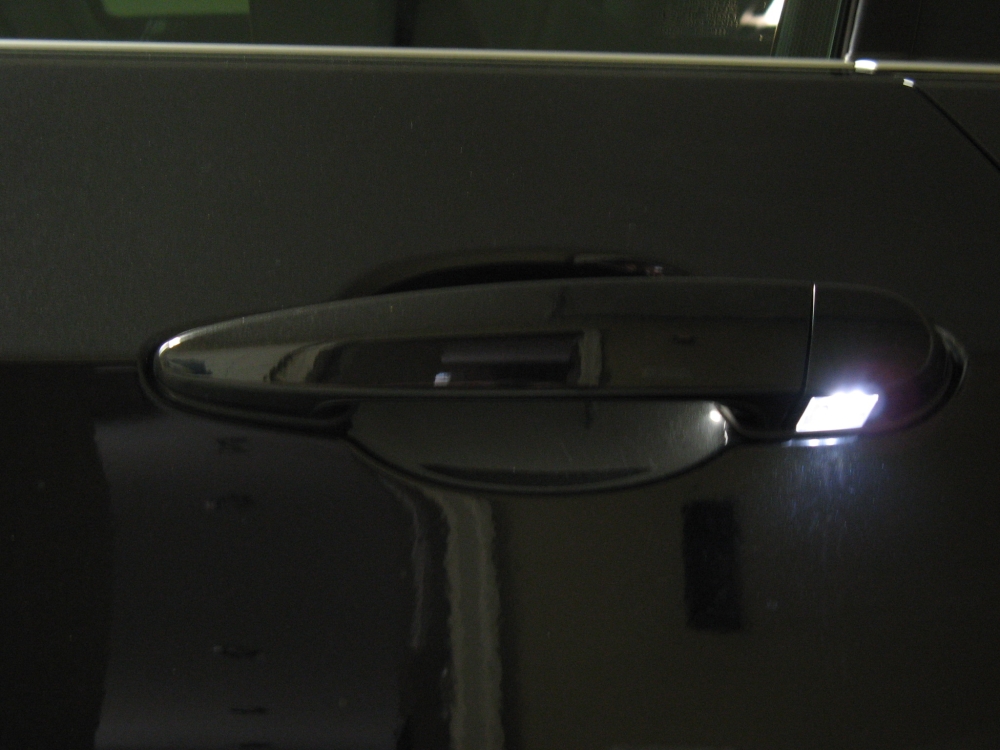
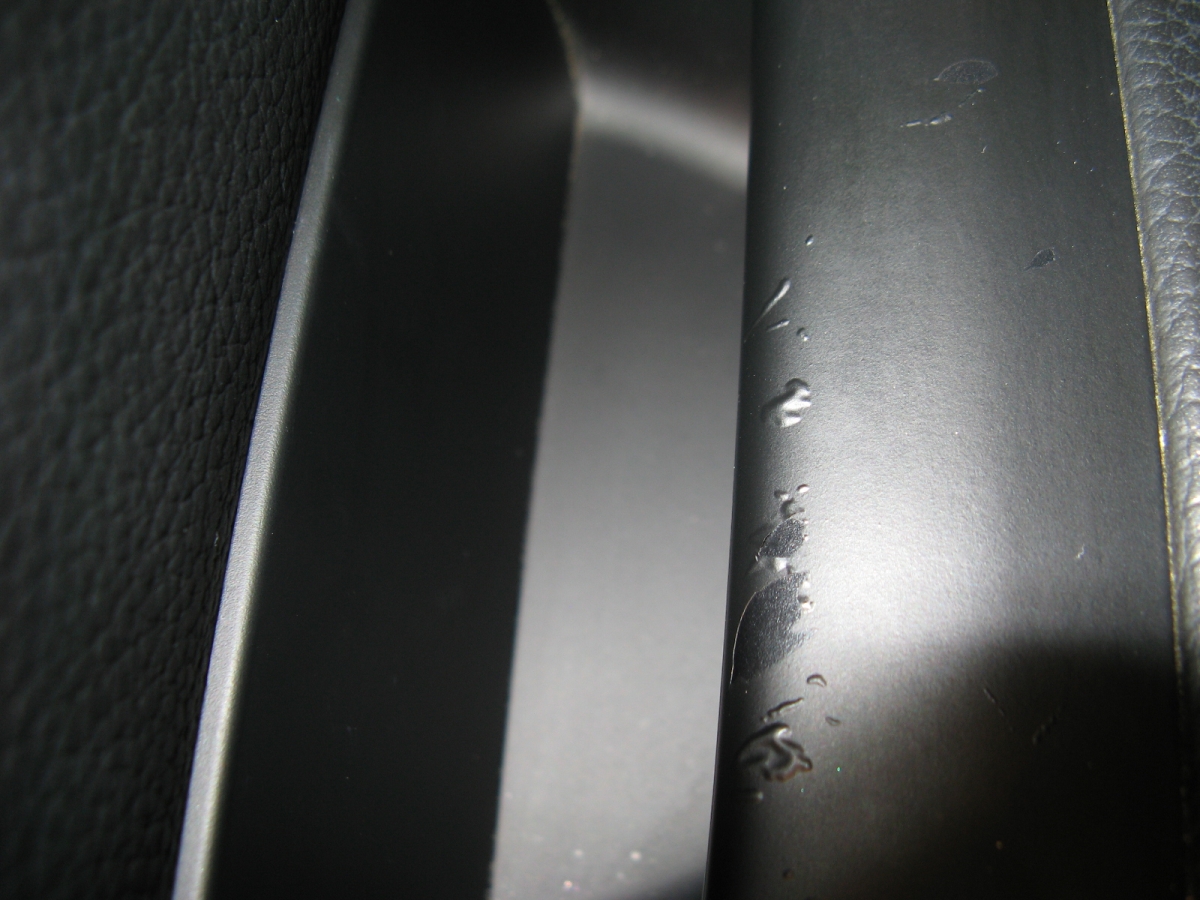
Door Handle Peeling: On a previous occasion I was at the dealer for service, I requested they take a
look at my driver side door handle as the soft touch coating had started to peel. The SA at
United BMW Gwinnett told me the shop foreman had denied a warranty replacement
because it looked like something had scratched it and that was the cause (of course it could not be a faulty design or part?).
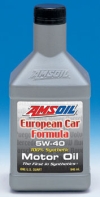
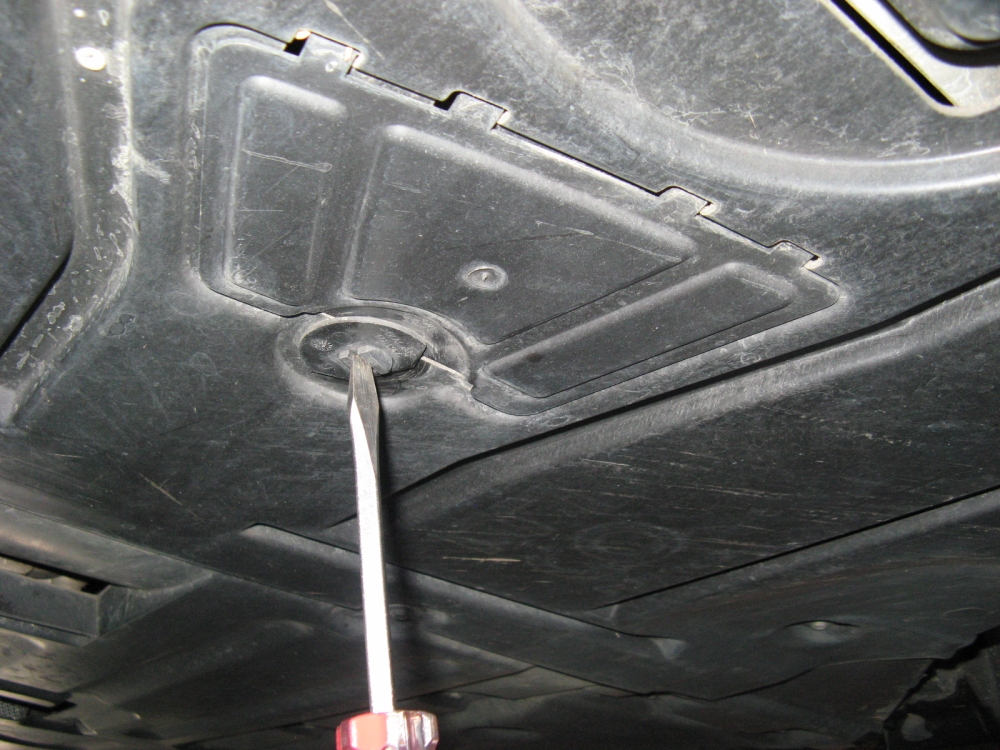
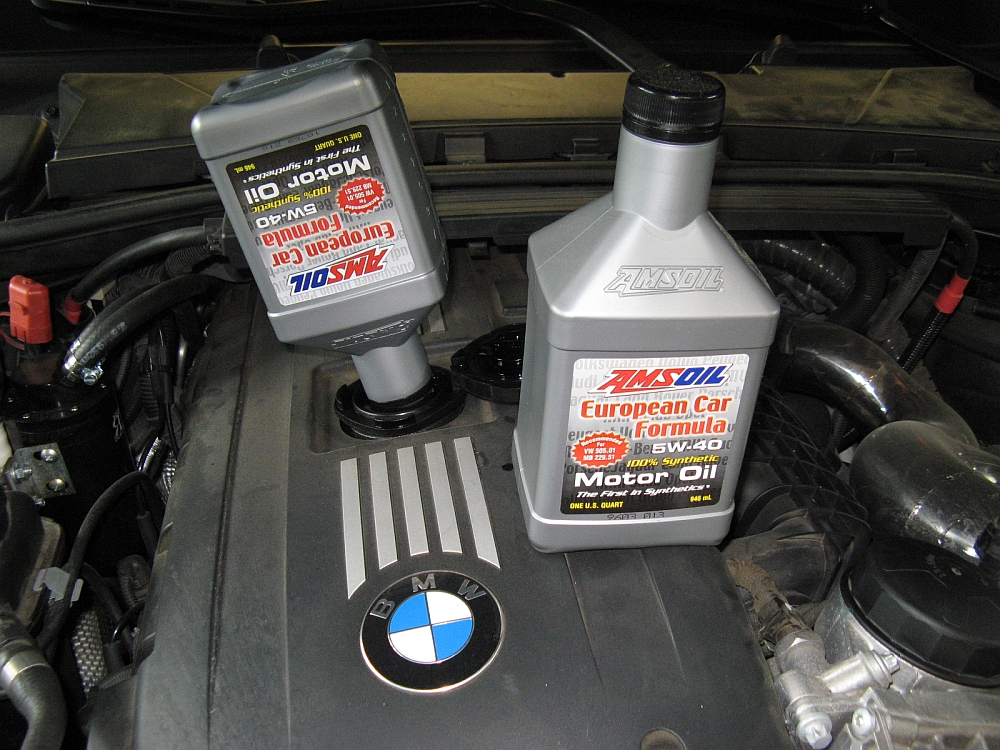
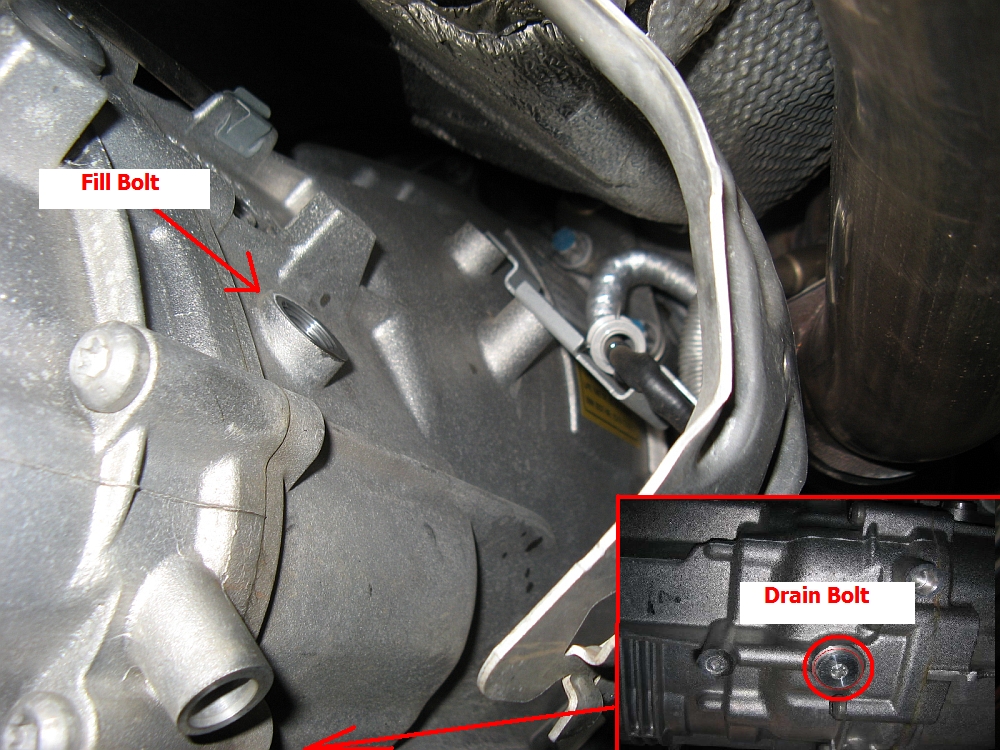
After the last oil analysis, I decided an interim oil change was needed,
BMW can do them every 15k miles and I will do one in between (~7500 miles per oil change). The first thing is to drive the car up on ramps and chock the rear wheels.
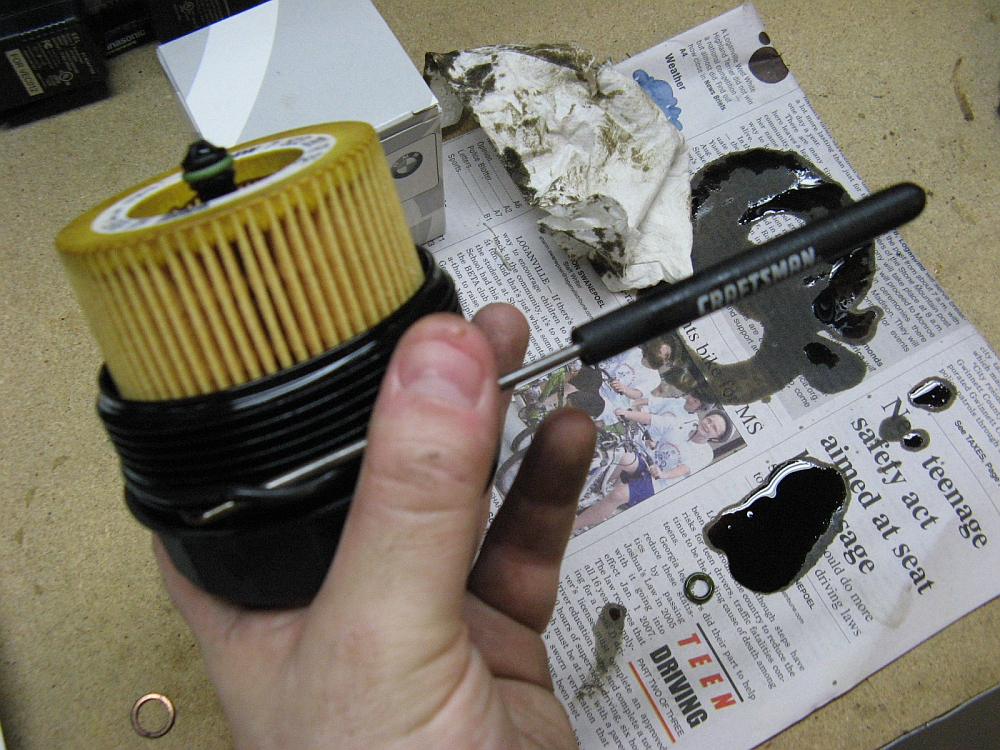
After doing this, the oil drain trap door can be opened with a coin or flat-head screwdriver, and then removed by unhooking it at the hinge. A 17mm socket/ratchet can
then be used to loosen and remove the drain plug after placing a suitable drain pan underneath the spout. While the oil is draining, we can move to the top of the
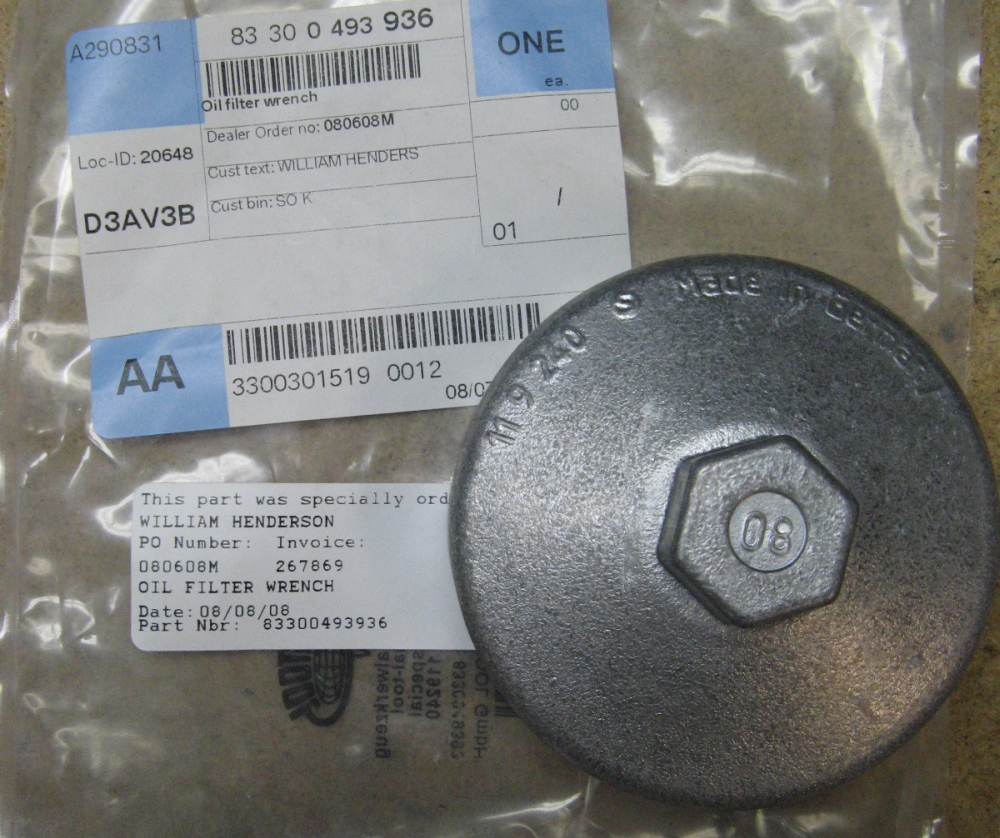
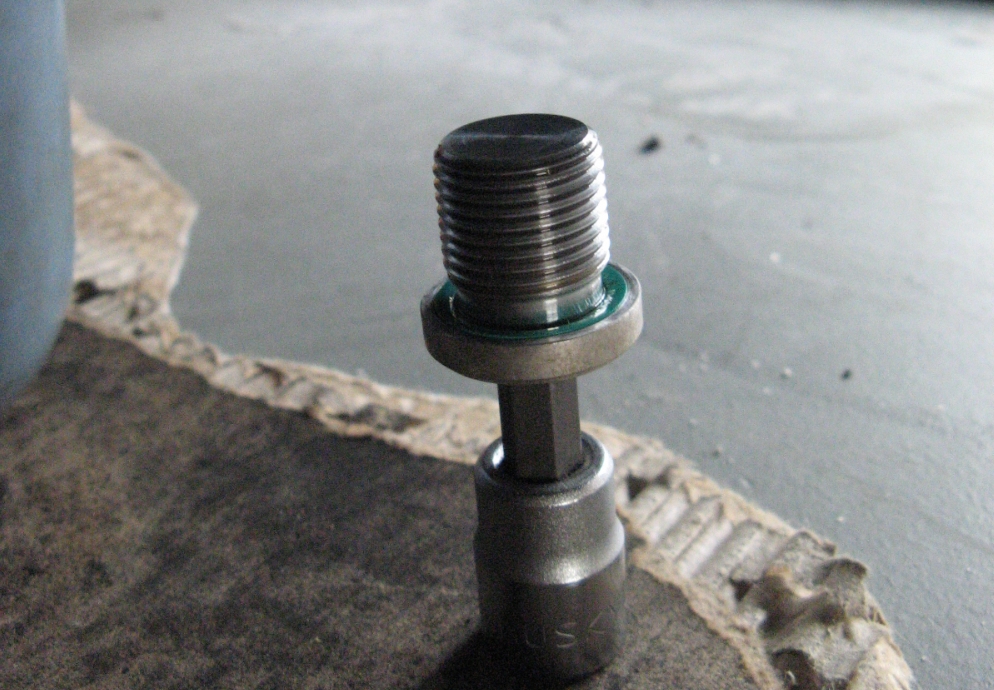
engine and change the filter- BMW P/N 11427566327. The BMW filter comes with the 2 O-ring seals for the oil filter as well as a new crush washer for the pan bolt.
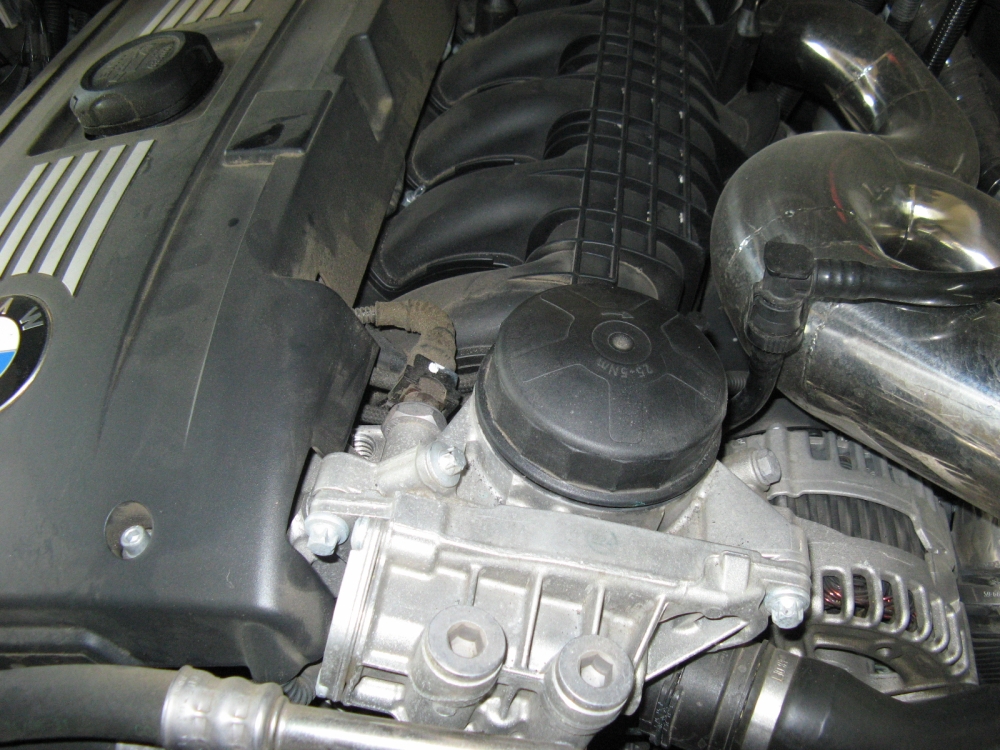
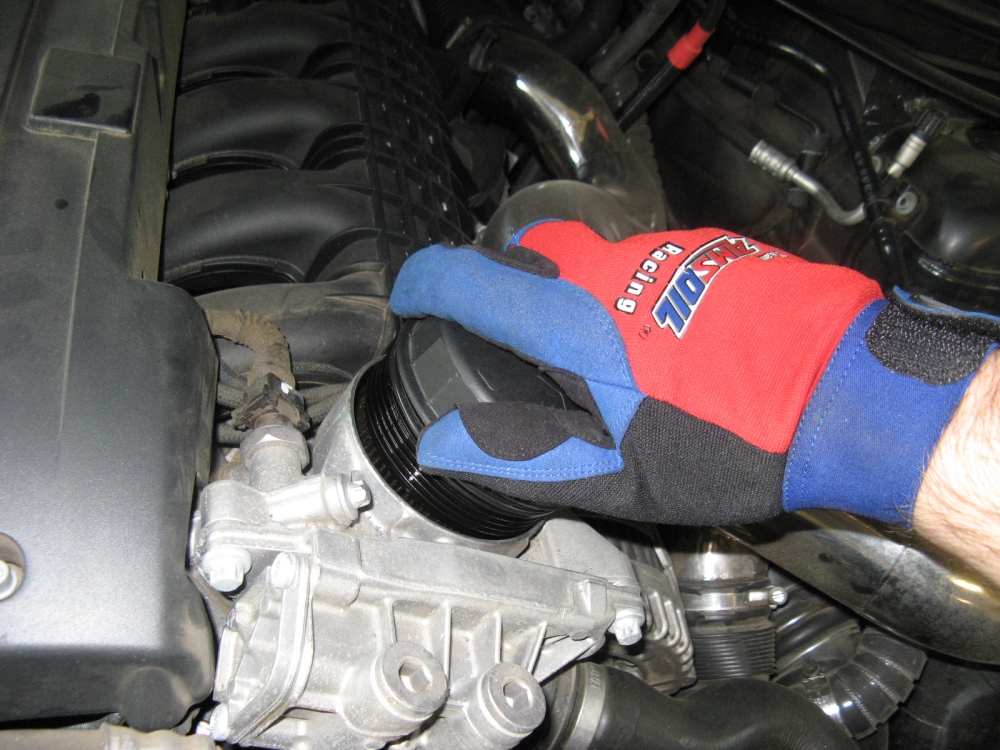
In order to remove the oil canister lid to remove the oil filter, you will probably start with the BMW tool (P/N 83300493936) that fits over the cap (or you may be able to loosen
by hand?). The old filter can be removed from the oil filter holder by pulling it off, the old O-rings can be removed using a pick. The new O-rings and filter
are installed on the oil filter holder and reinstalled in the oil filter canister, keep in mind the cap is plastic so do not overtorque- I would recommend hand tight.
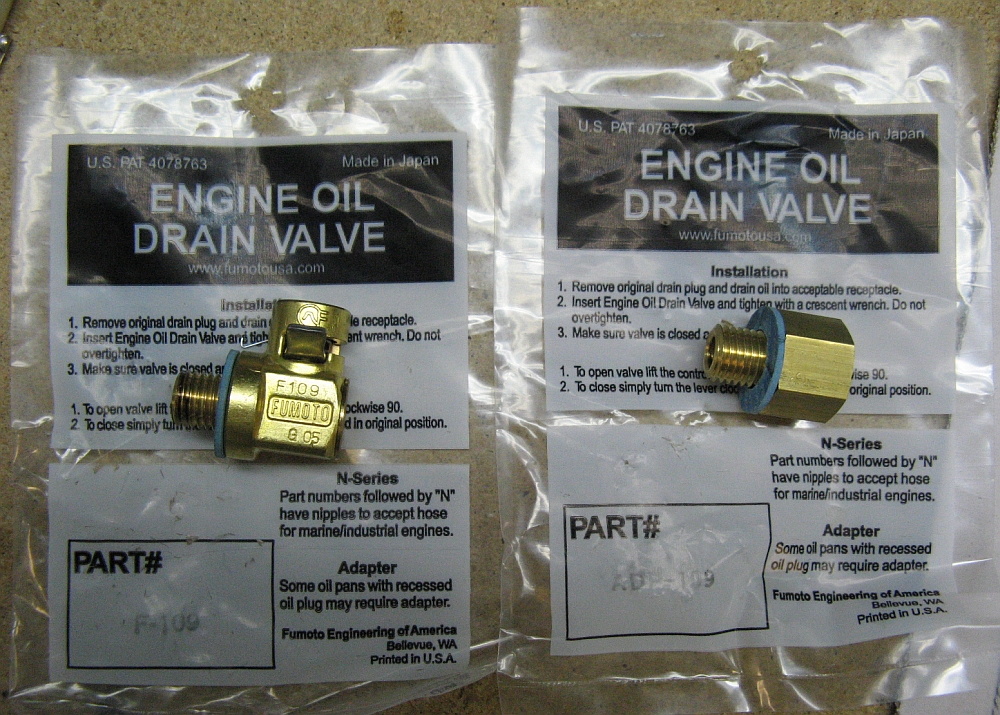
The next step would be to reinstall the drain bolt with the new crush washer.....but I use the first oil change I do as an excuse to install a
Fumoto Oil Drain Valve.
The valve is P/N F109 and the adpater needed is P/N ADP109, greatly simplifies subsequent oil changes. With the oil filter and drain bolt installed, the only
thing left to do is add oil. I decided to use Amsoil 5w40 Euro, it takes about 7 quarts (BMW specification
is 6.9):
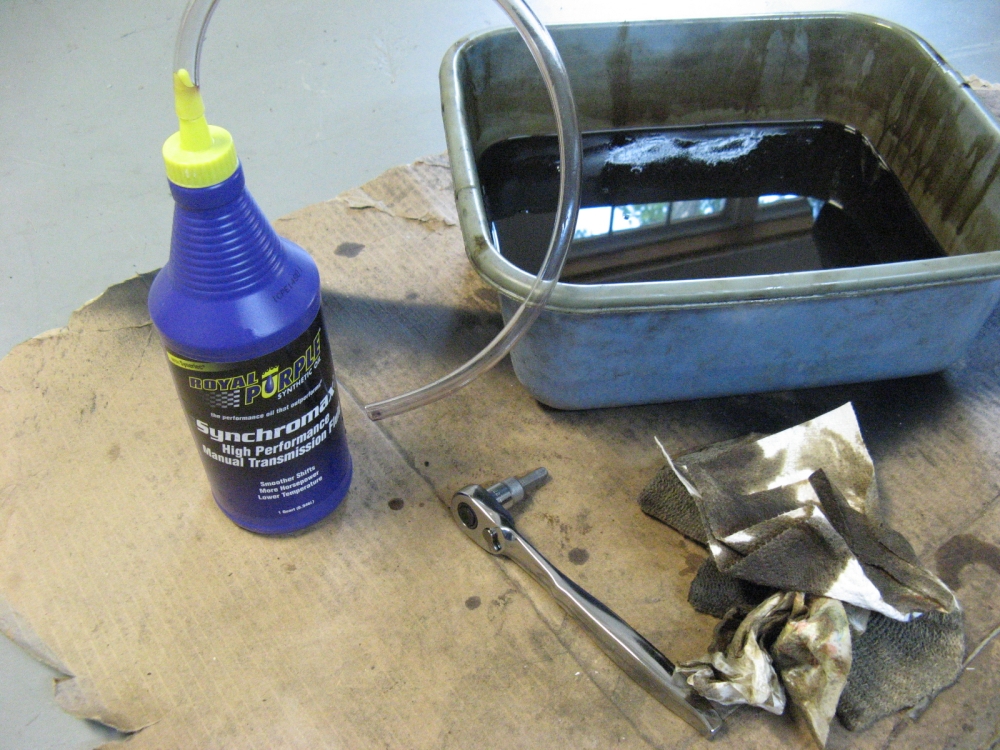
At around 43k miles the shifter started to feel really notchy, it had progressively
gotten that way over the last few thousand miles. After hearing all the rave reviews of Royal Purple Synchromax I decided to try this, even though I had the BMW
OE MTF-LT-2. Mr.5 has a DIY guide HERE and some forum comments on the different
transmission fluids available HERE.
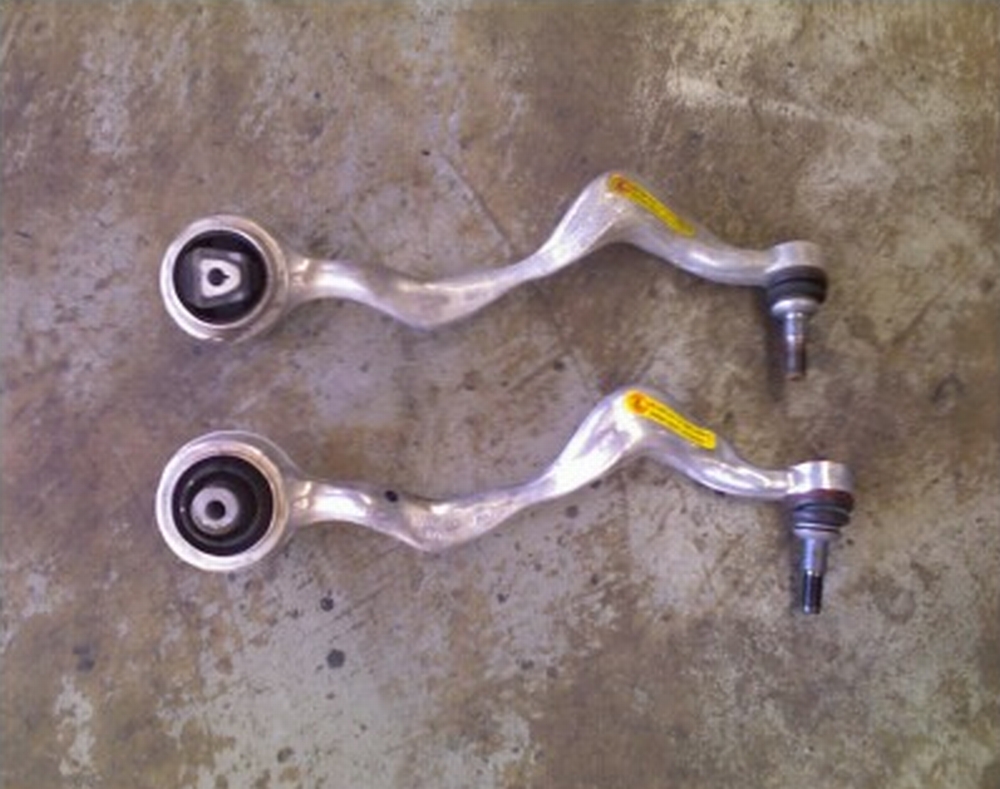
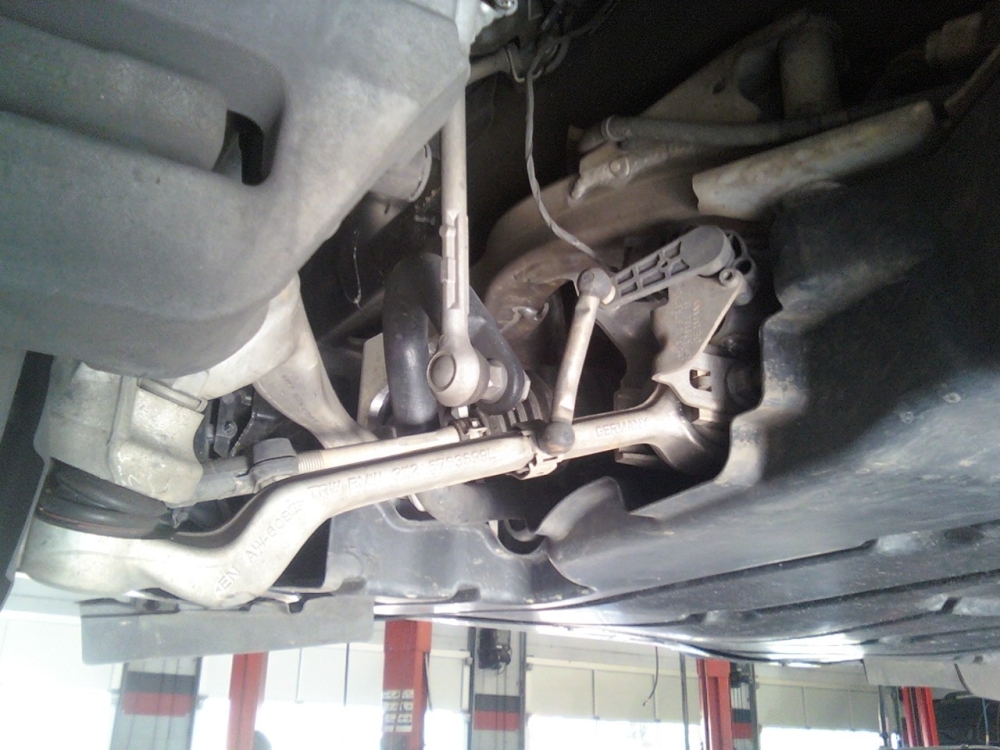
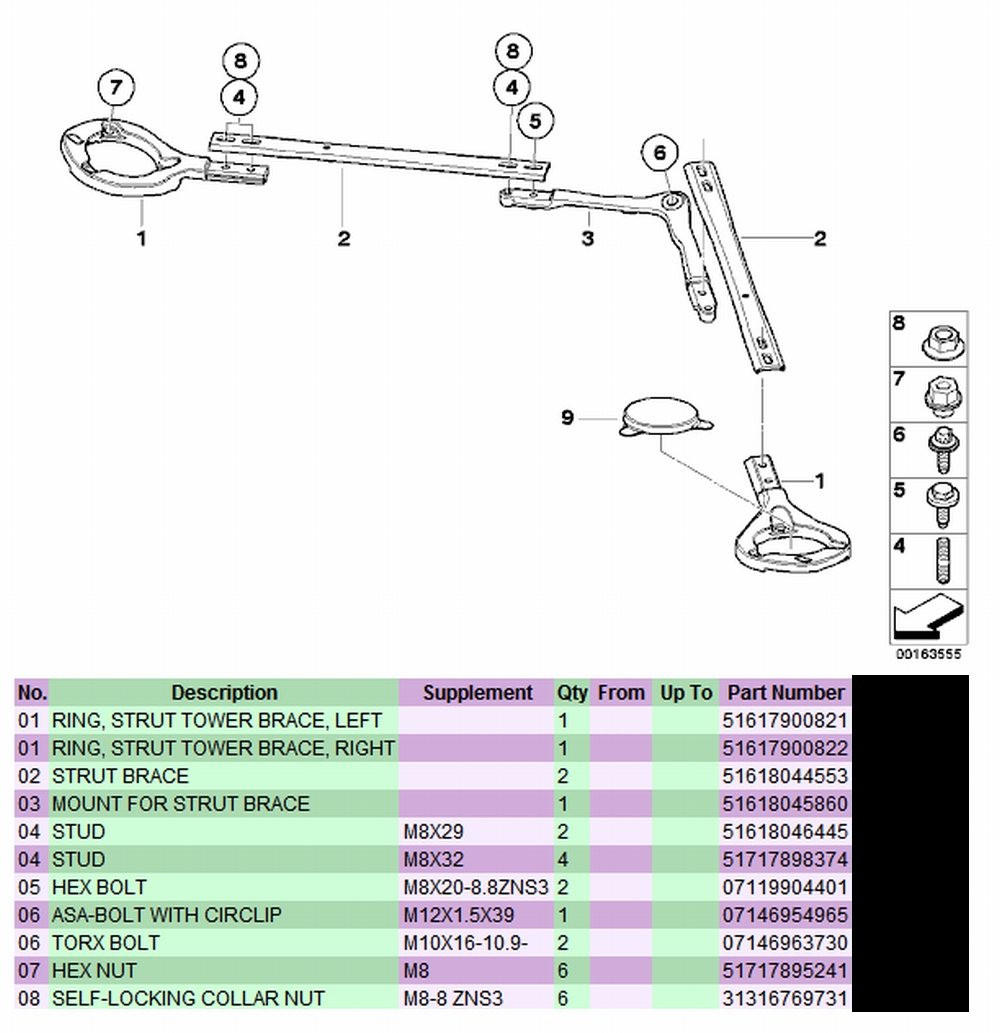
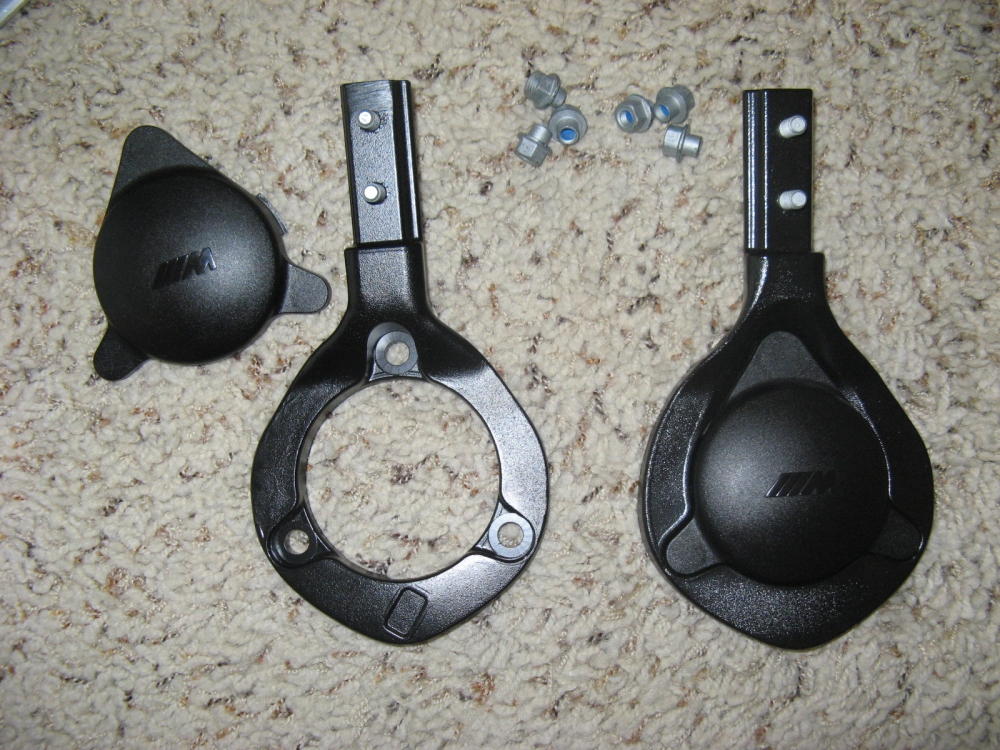
M3 front strut brace
from HP Autowerks installed (replaced BMW E90 Performance Brace installed prior),
inspired by Orb's thread
and Mr 5's thread
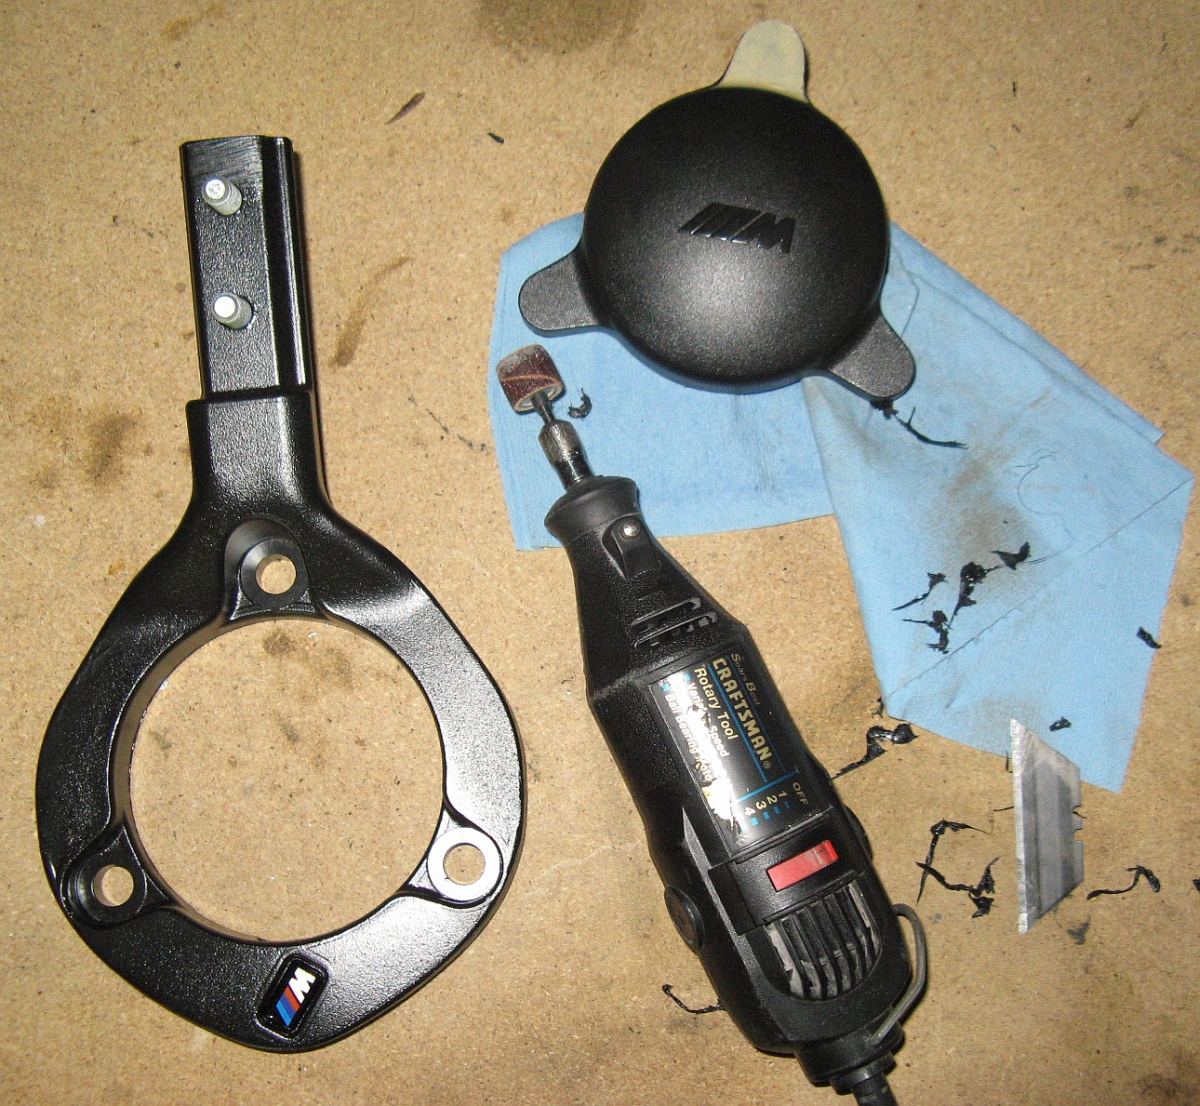
on e90Post. Parts diagram with part numbers pictured below. The passenger side plastic cover did not fit the passenger side mount since the mount was
slightly different when compared to the driver side. I made a template and modified the piece using a Dremel tool and sanding disc, using a razor blade
to clean up the melted plastic. It fits perfect now and looks OE.
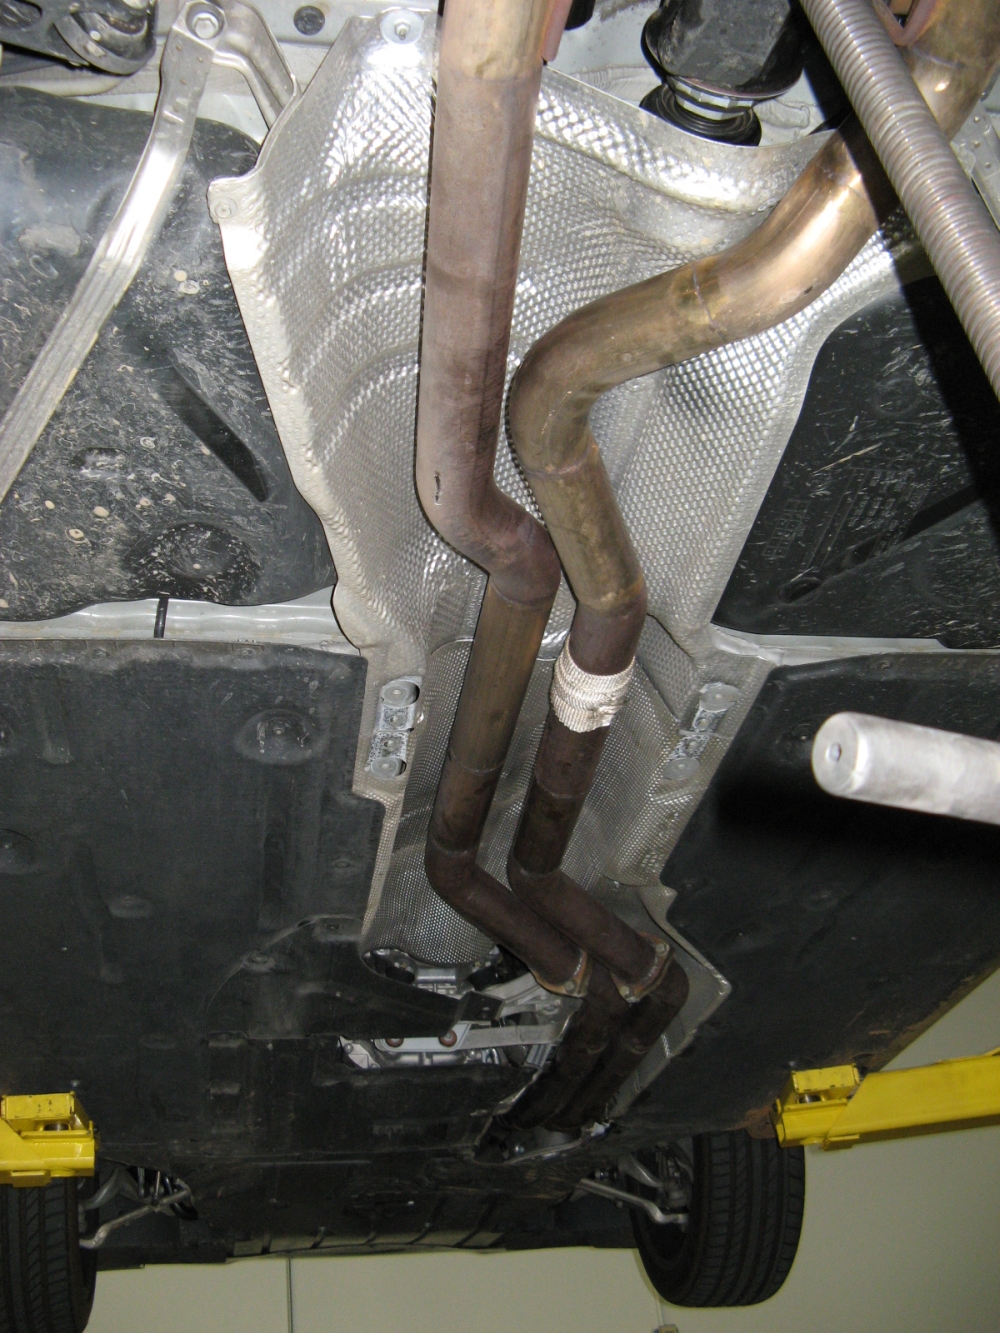
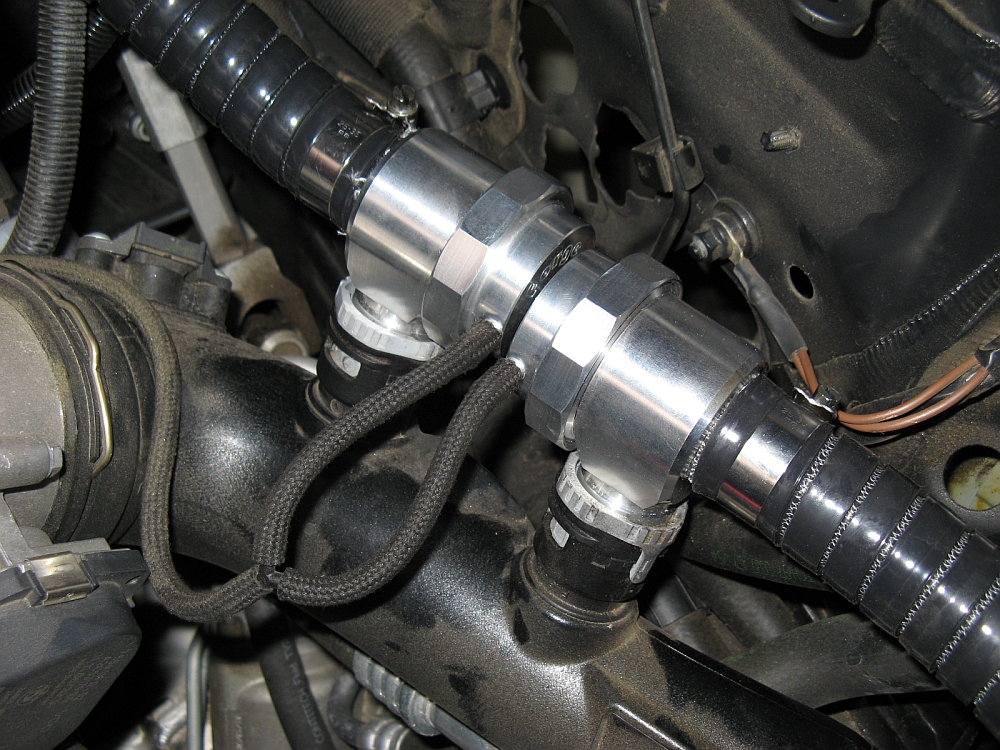
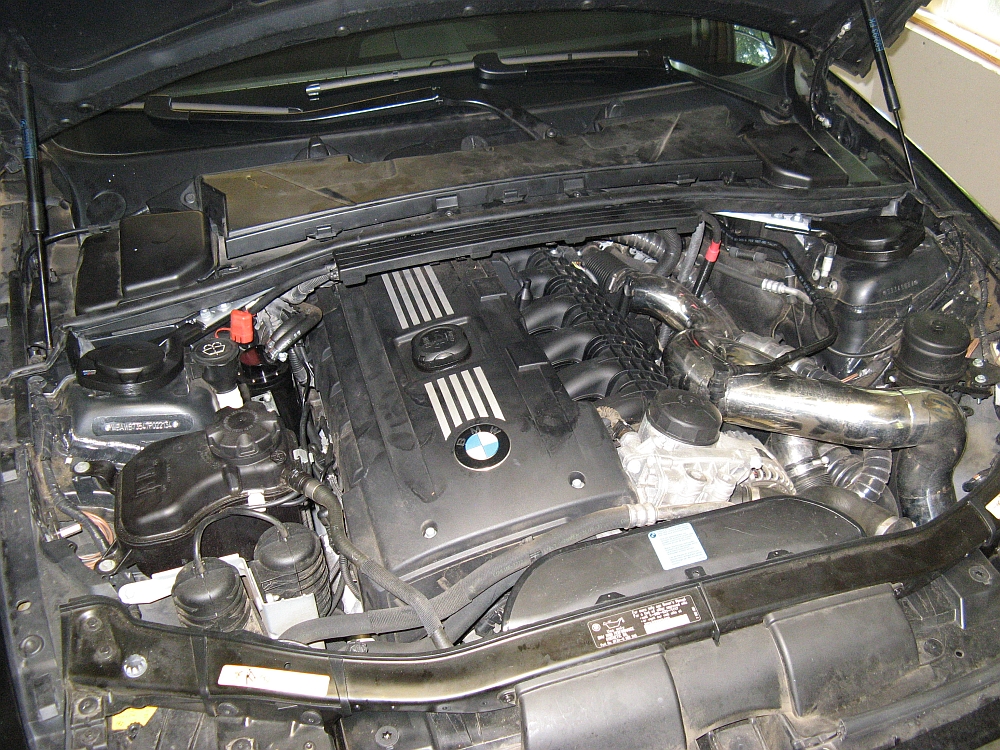
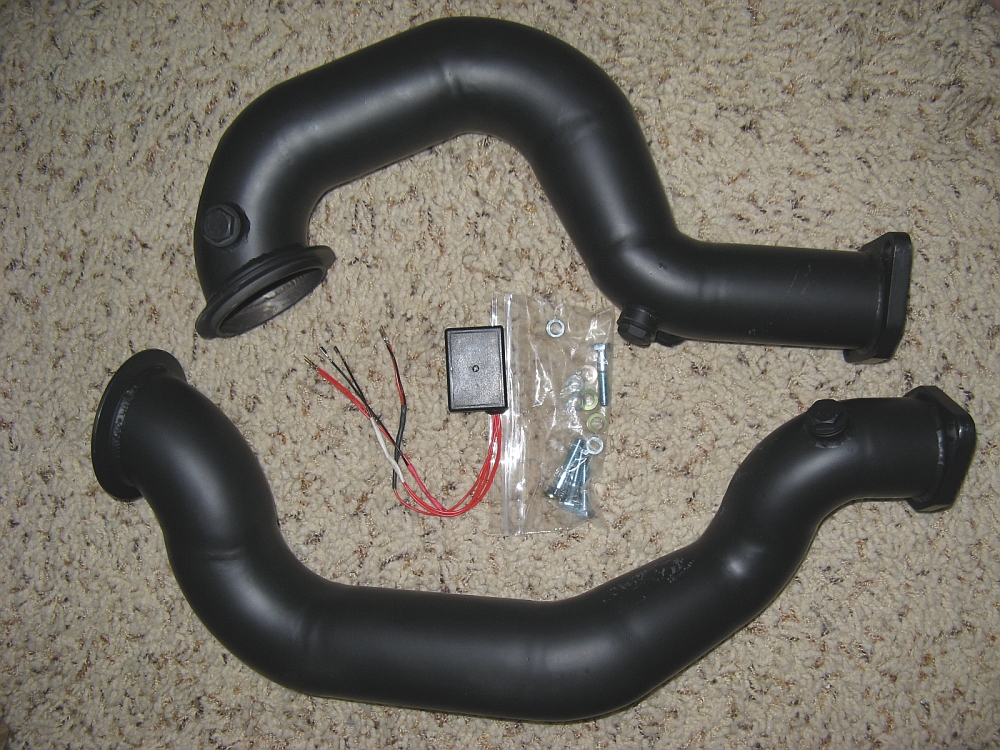
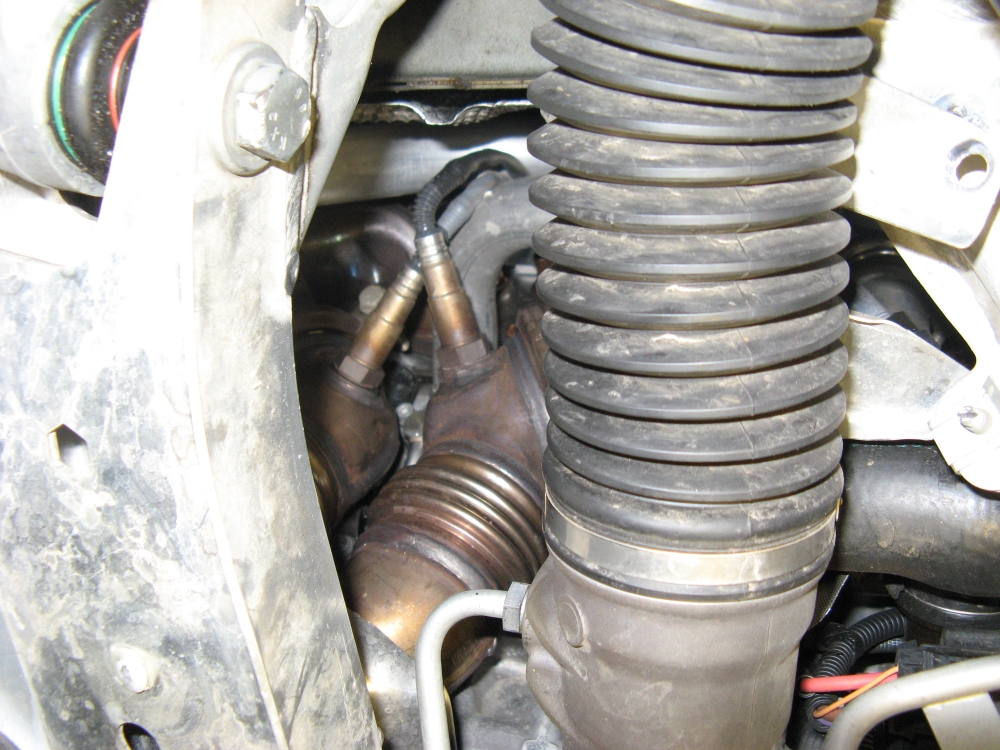
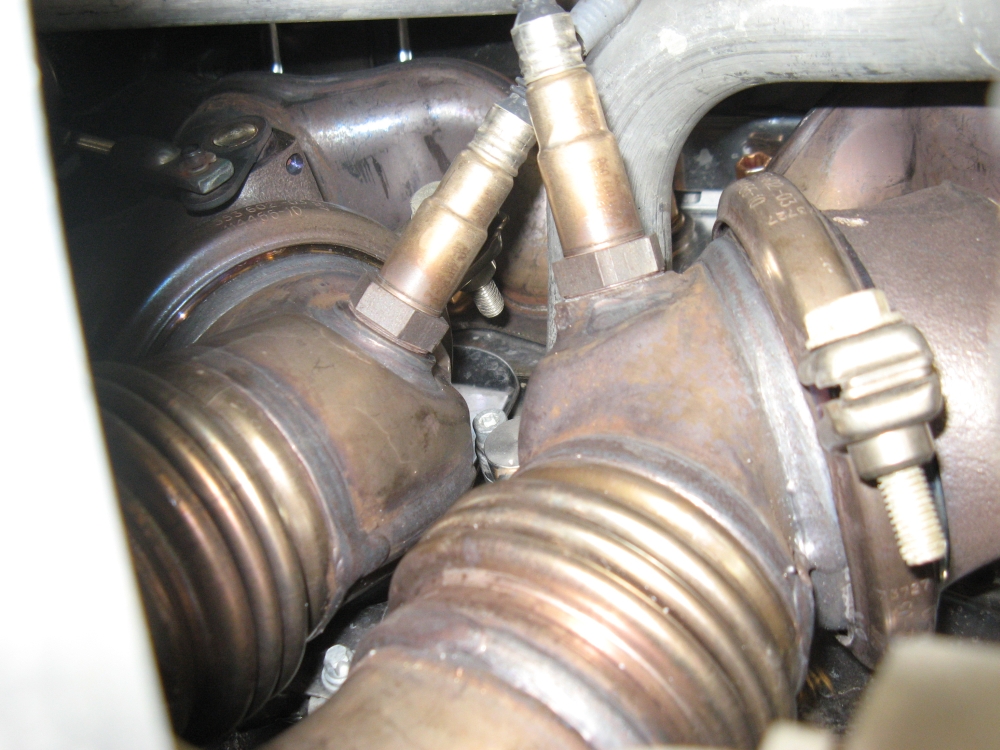
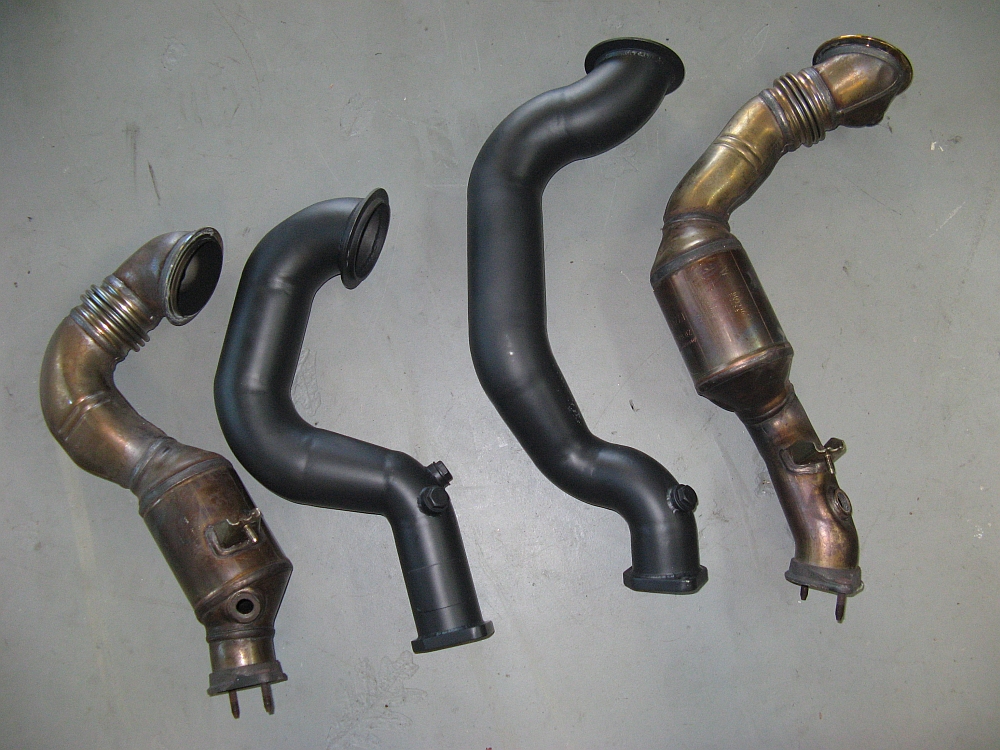
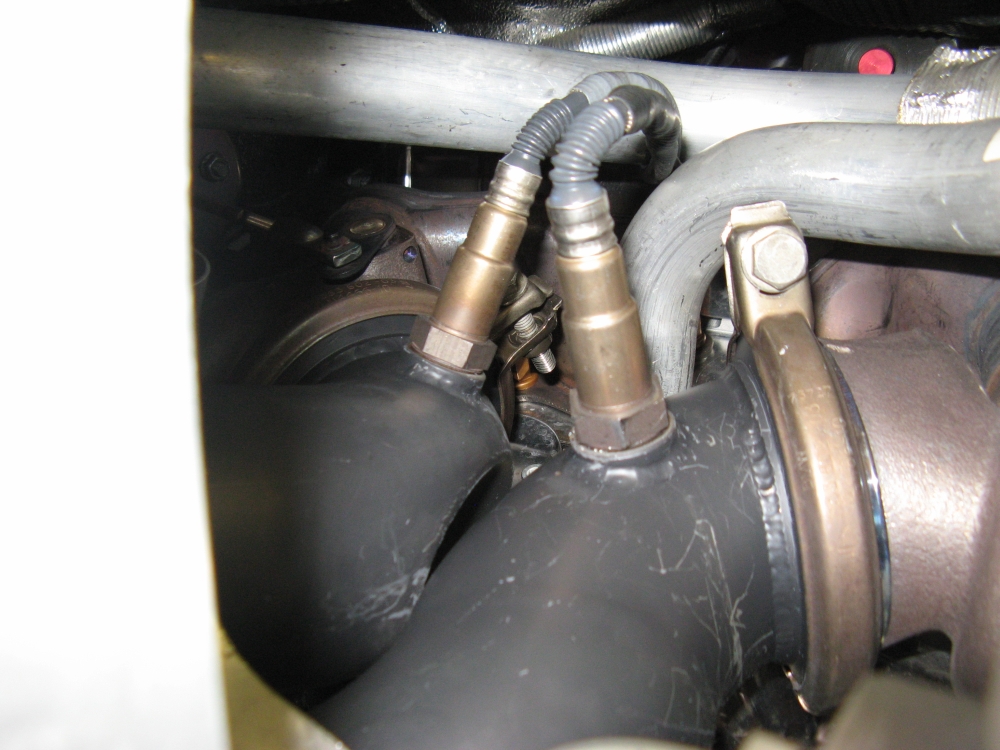
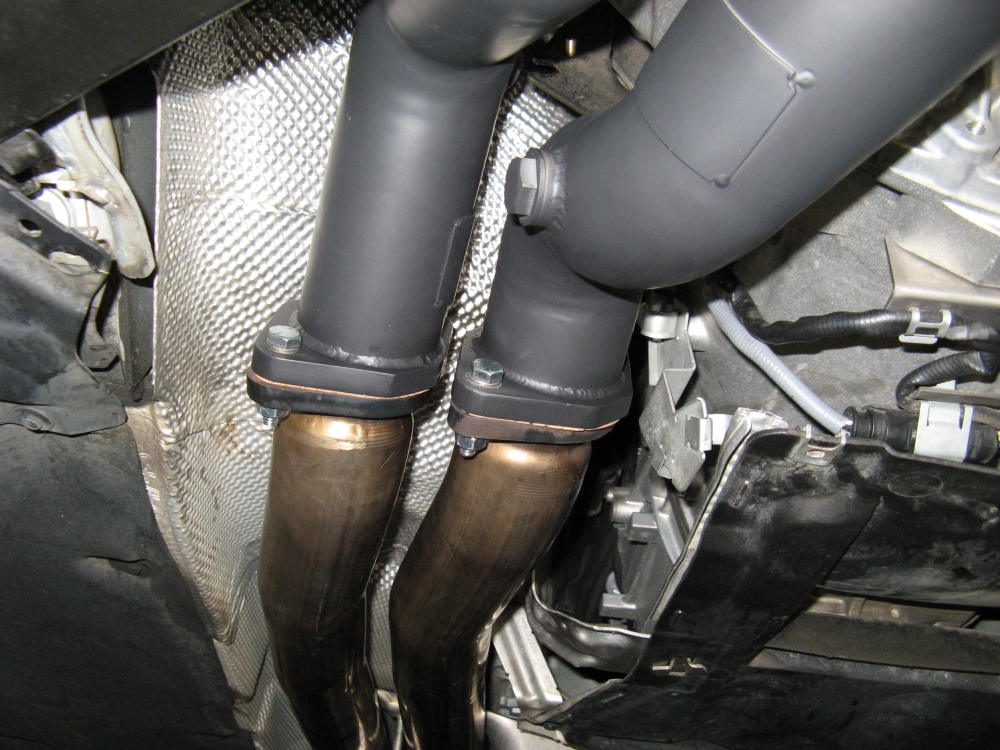
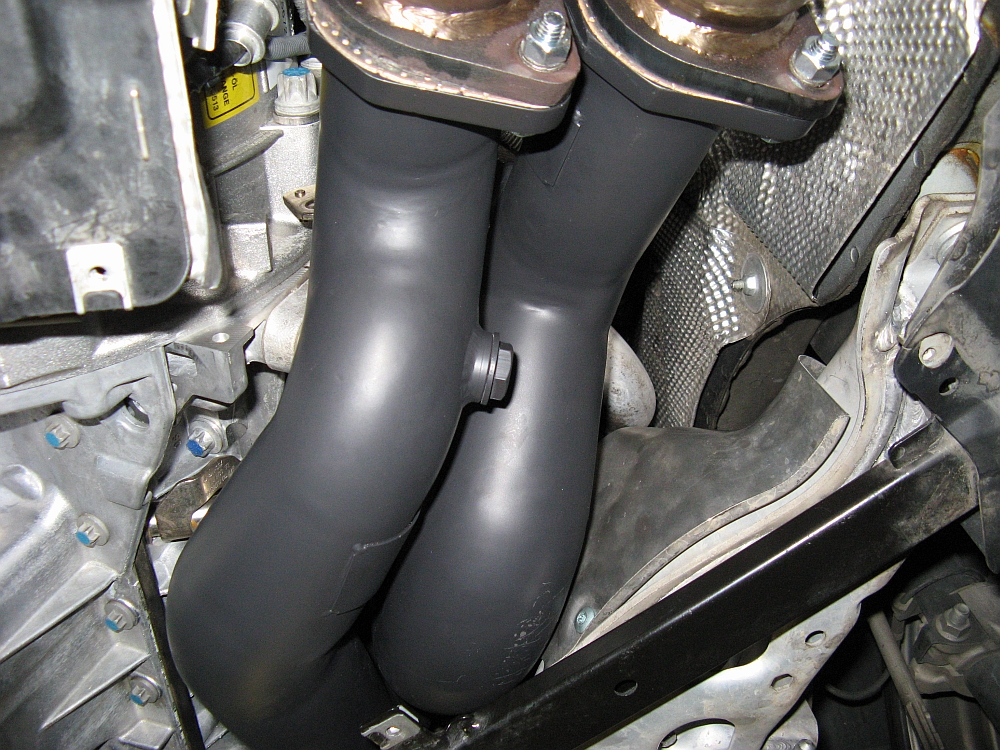
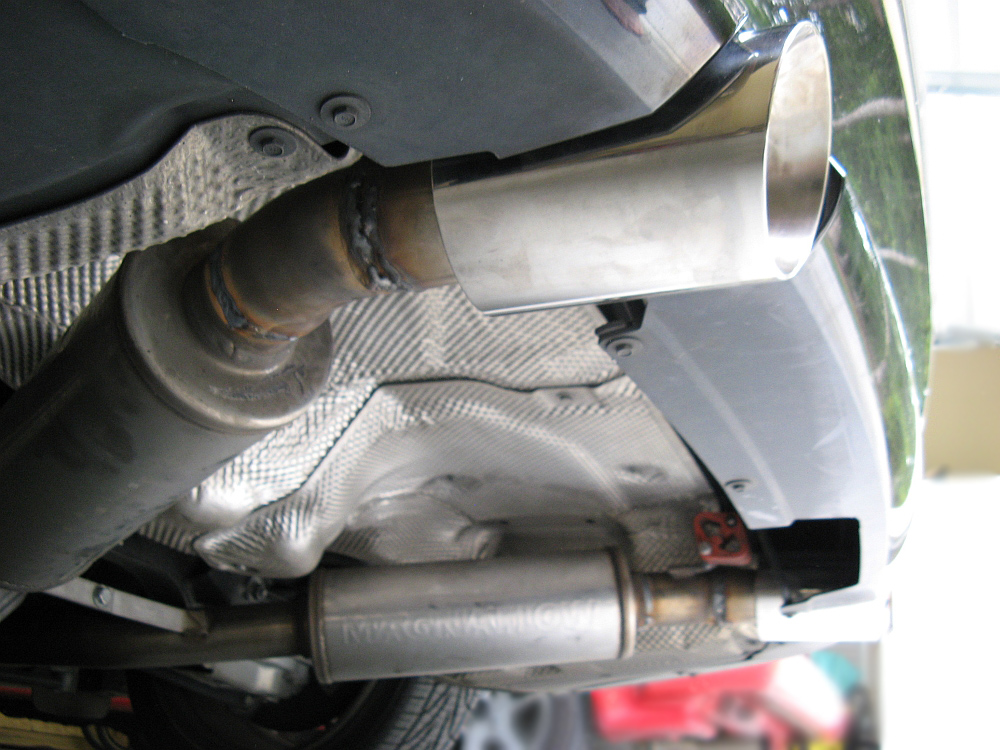
Ceramic coated catless downpipes from
Riss Racing installed. These downpipes taper from 3" down to 2.5" to mate with the OE exhaust or any
aftermarket DP back exhaust. An extra O2 sensor bung is provided for use with an installed wideband A/F ratio gauge or dyno A/F ratio sensor.
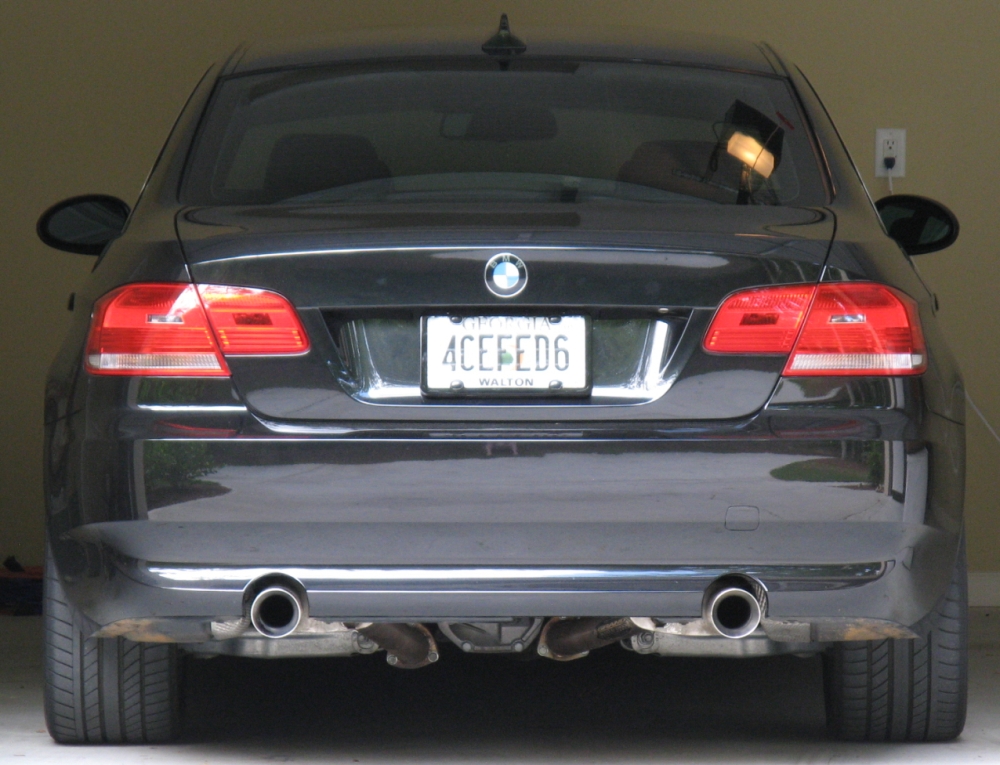
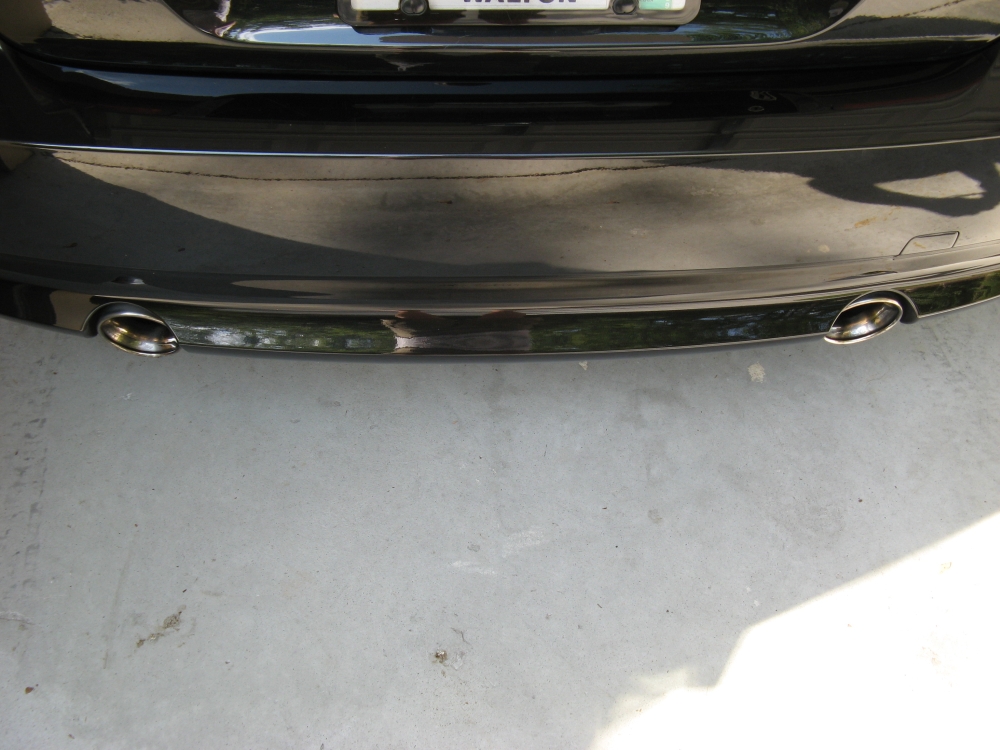
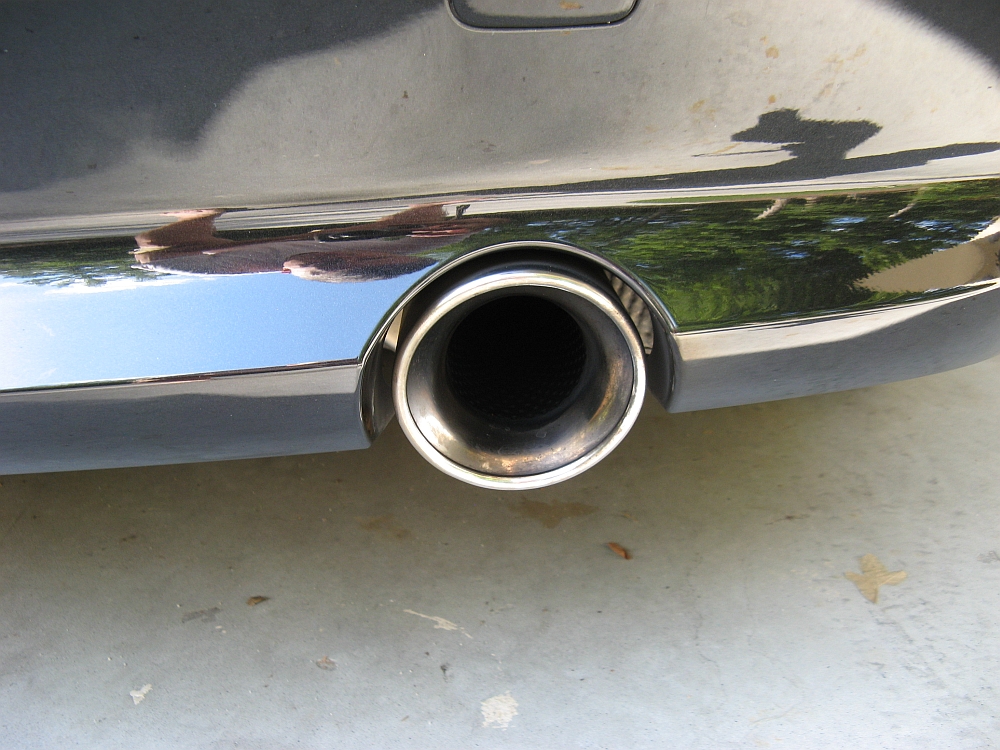
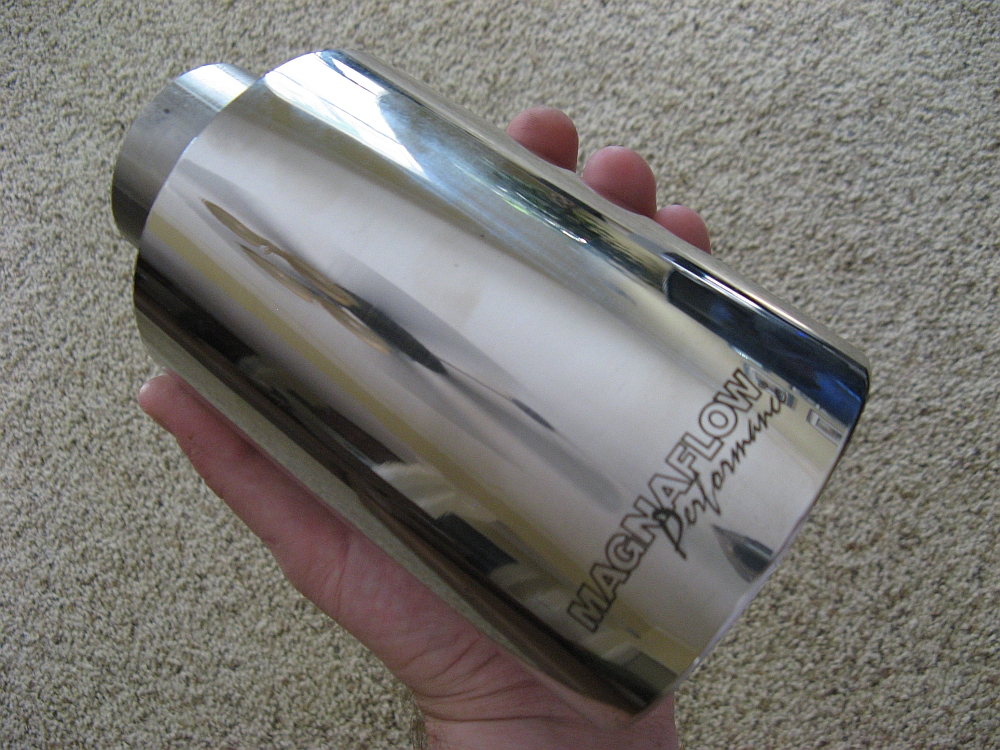
New
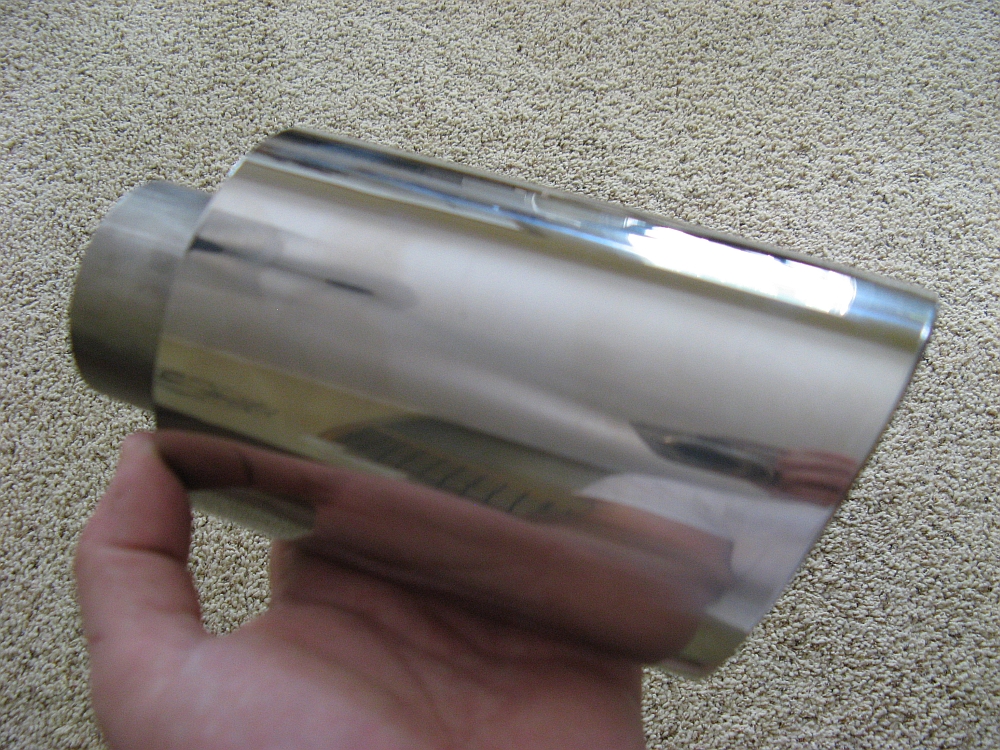
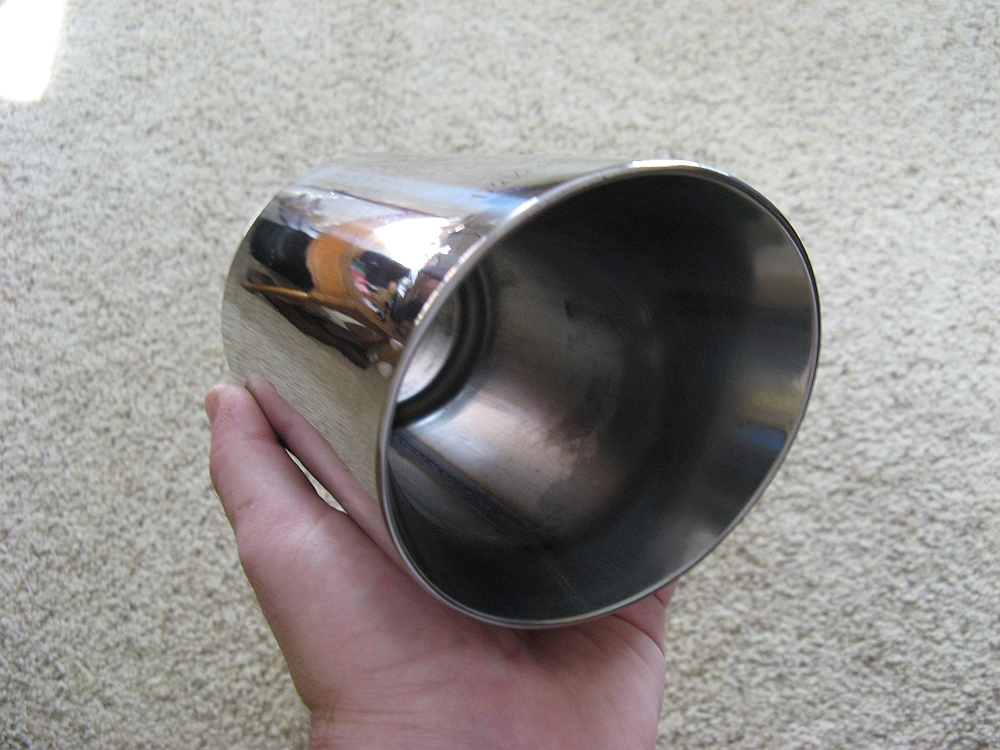
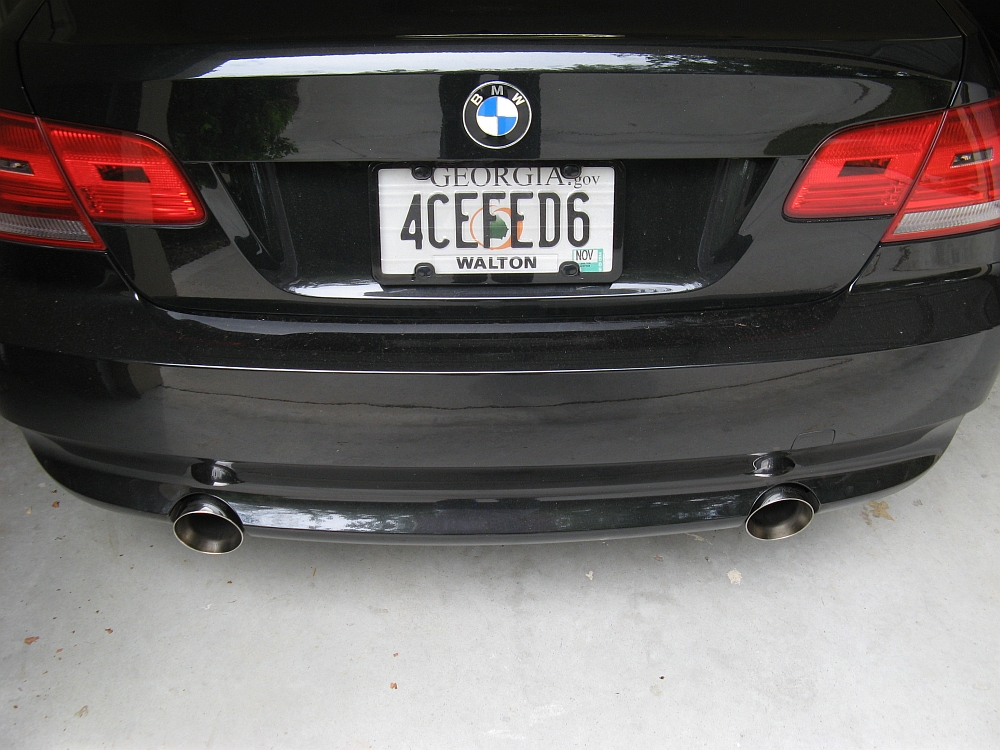
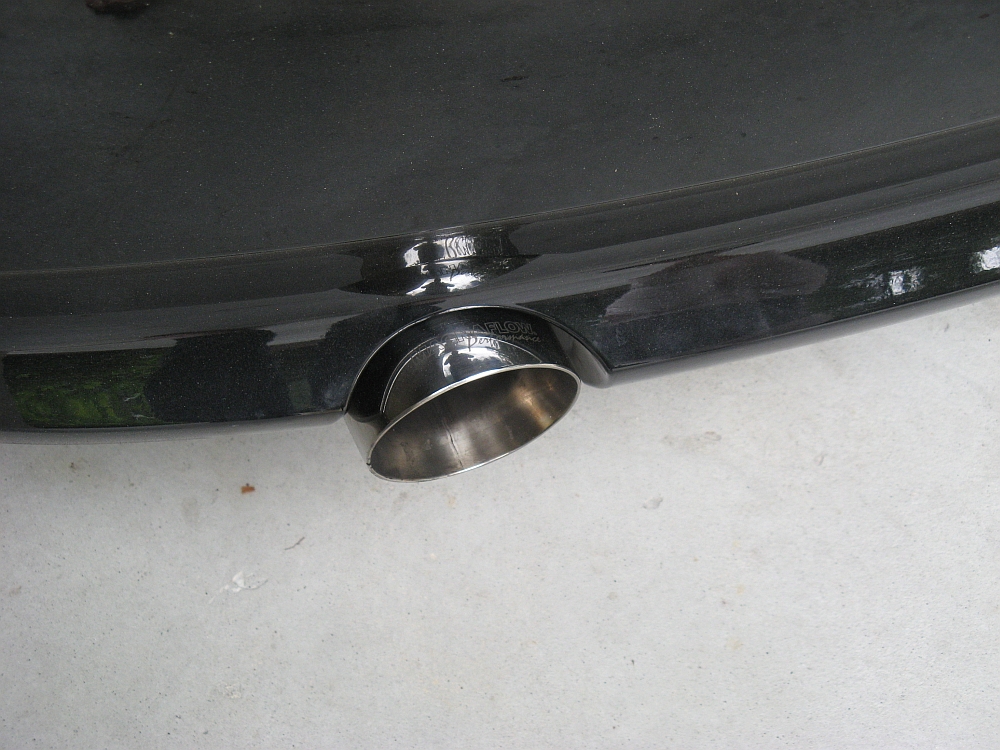
MagnaFlow exhaust tips installed, P/N 35121.
I really never cared for the rolled-edge tips the MagnaFlow system came with, and got a half price deal on these straight edge tips,
the last two at an Amazon.com online store.
I went to Stone Mountain Muffler and Brake to have the old tips cut off
and the new ones welded on, but due to time constraints and people stacked up in front of me ended up at the other location in Monroe.
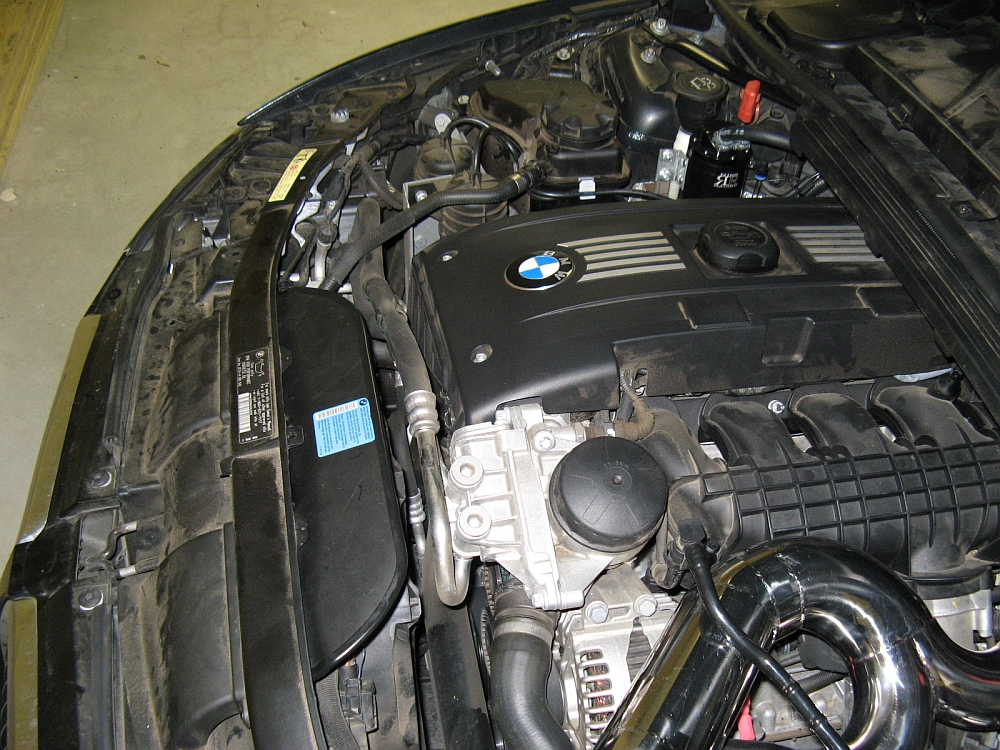
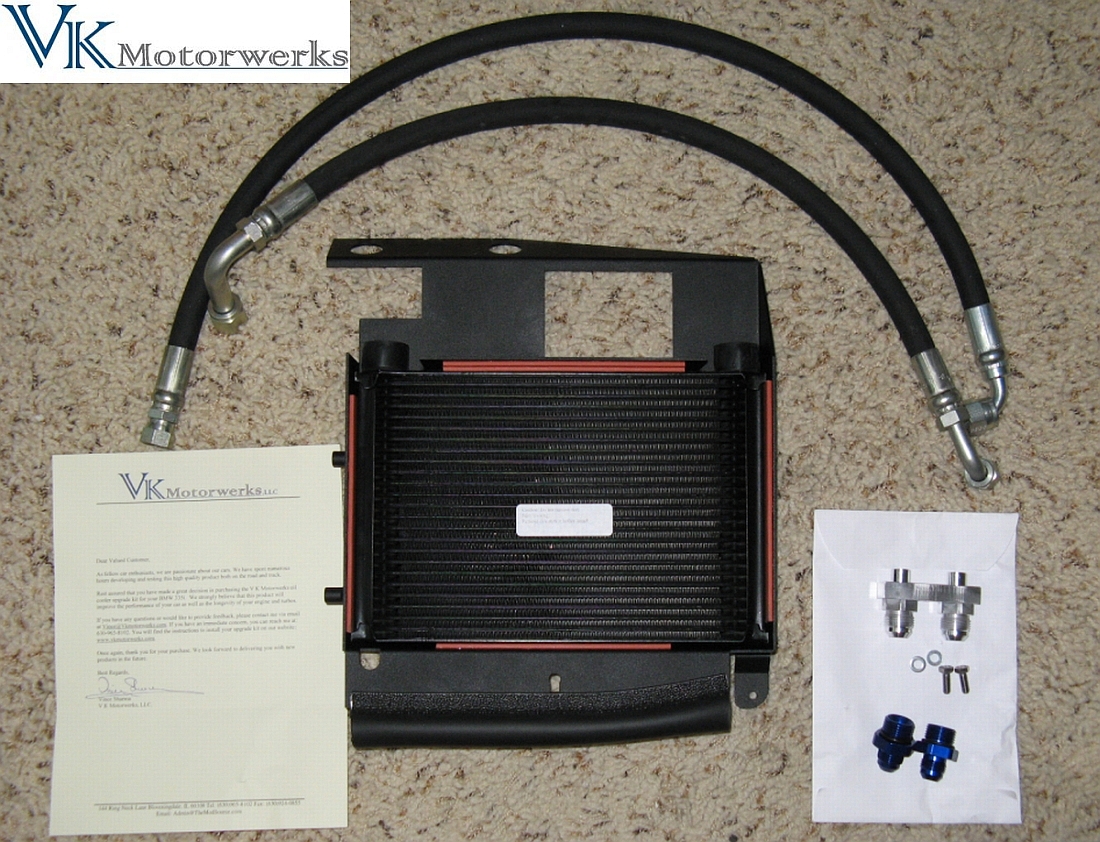
VK Motorwerks
Oil Cooler upgrade installed after some time in the office floor
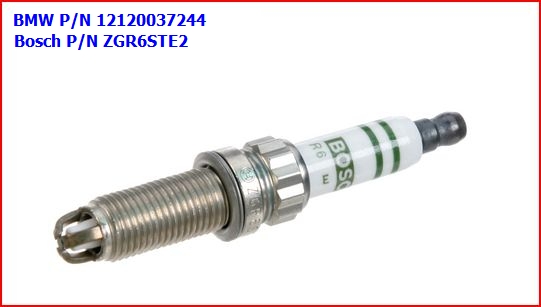
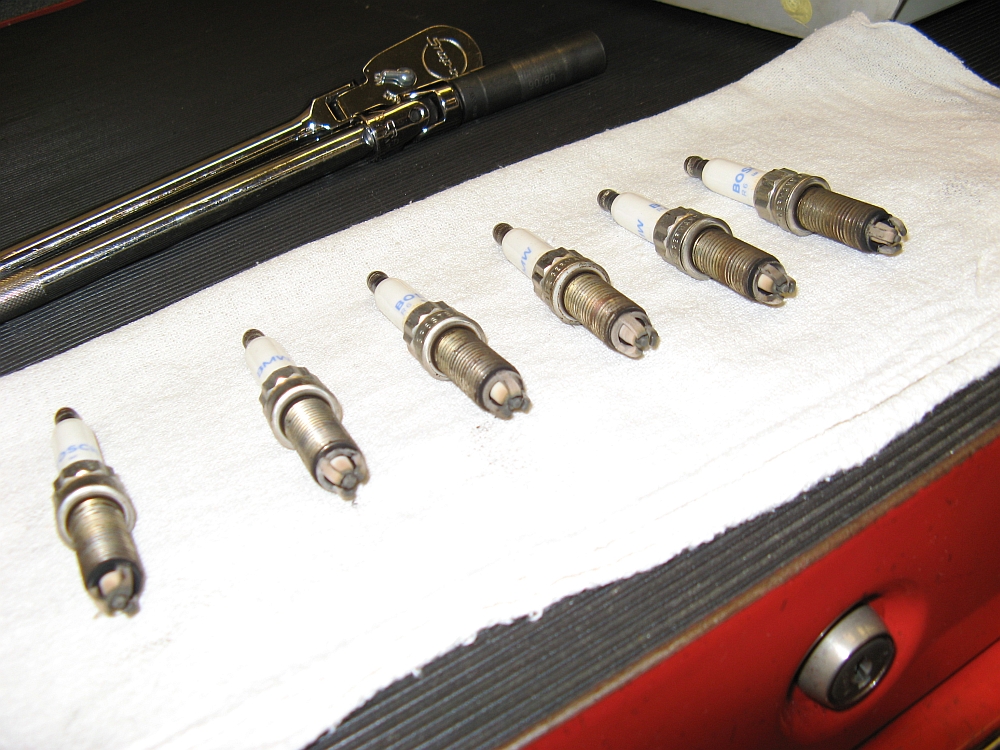
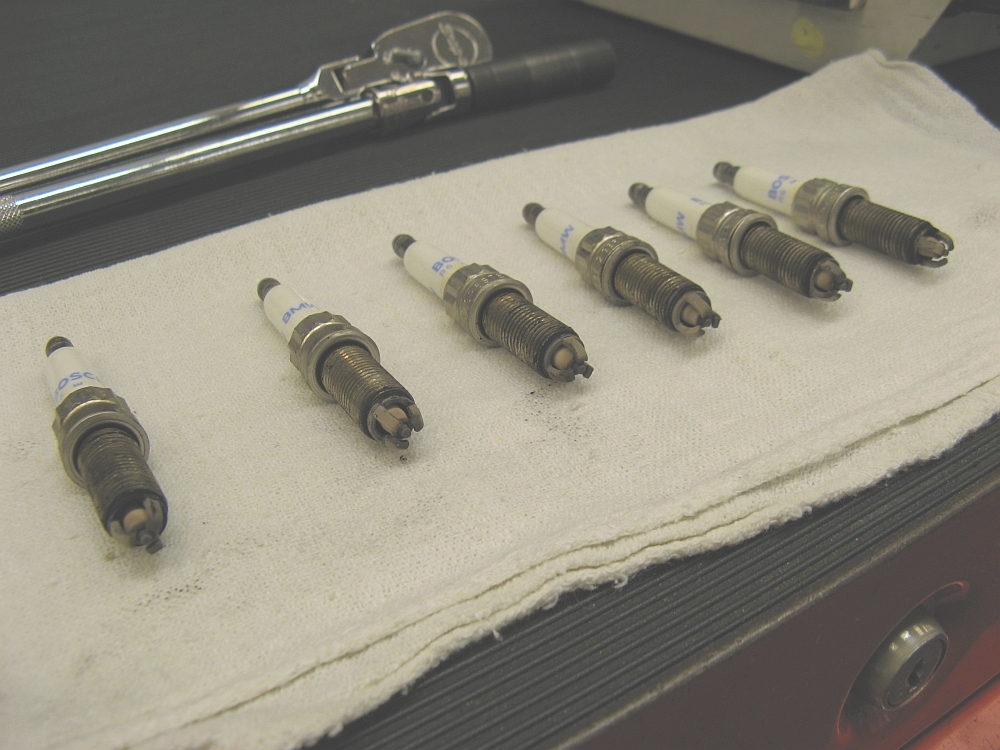
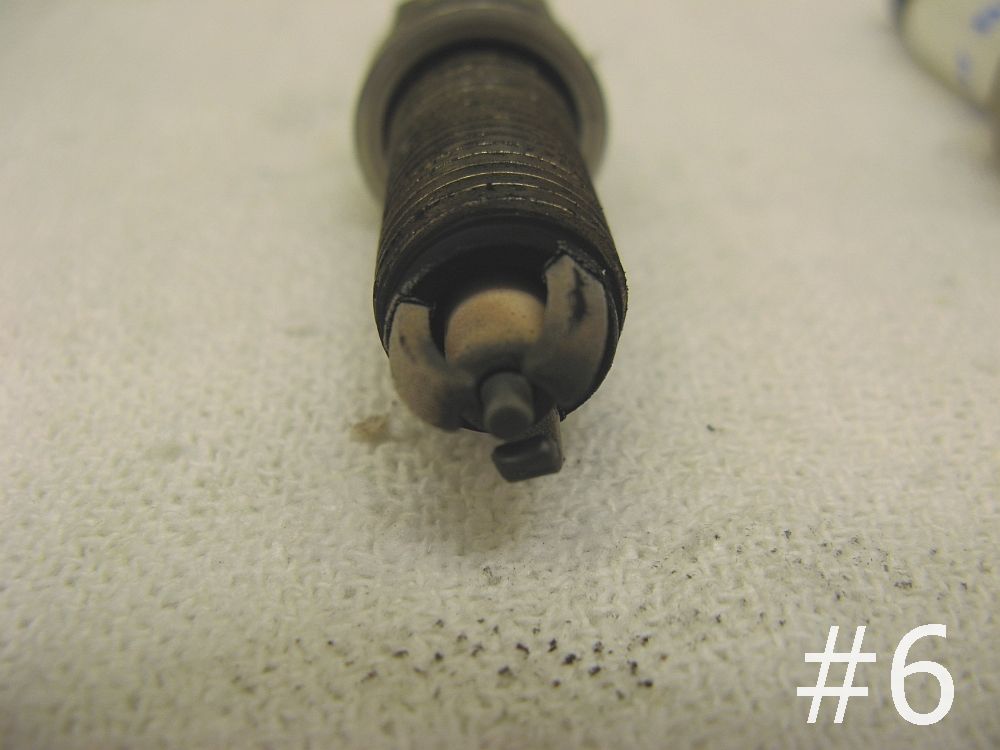
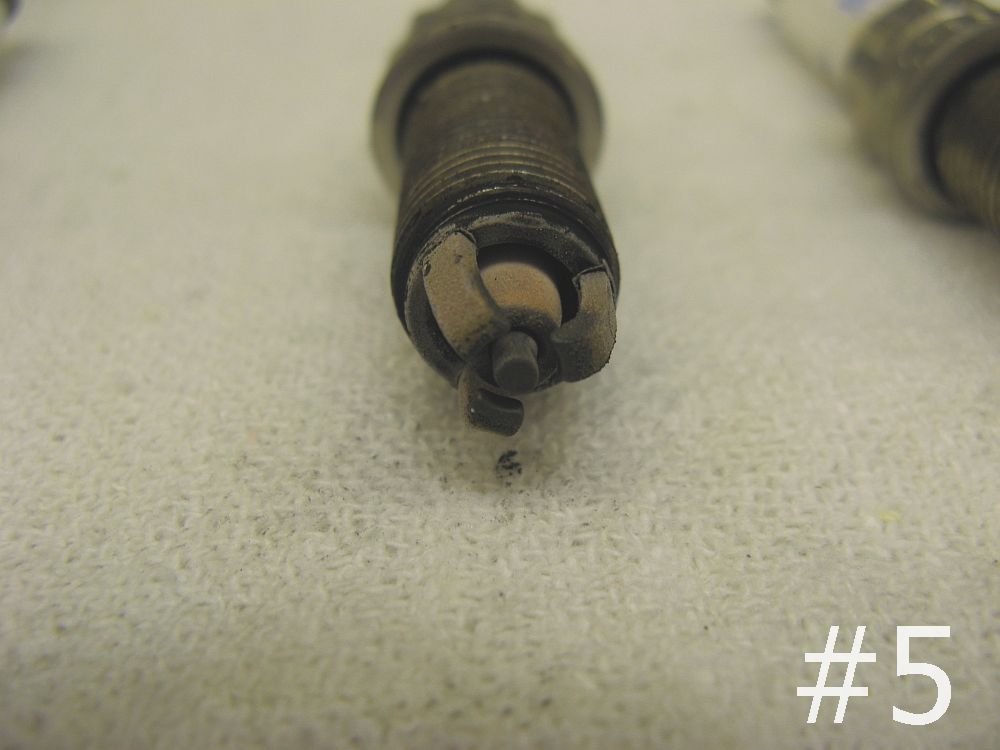
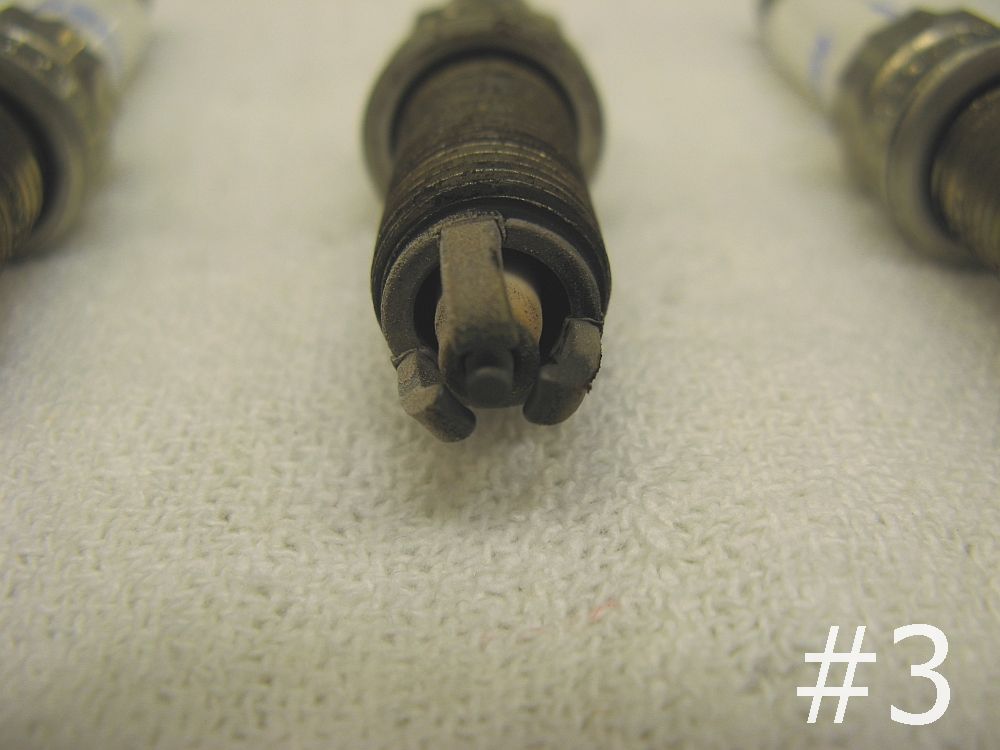
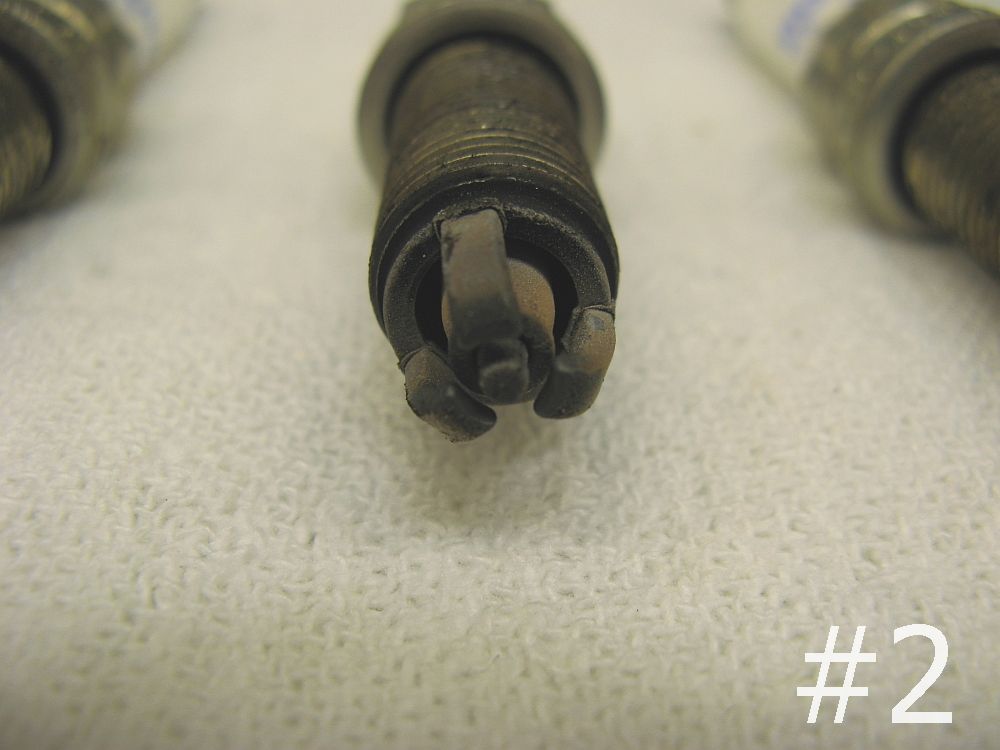
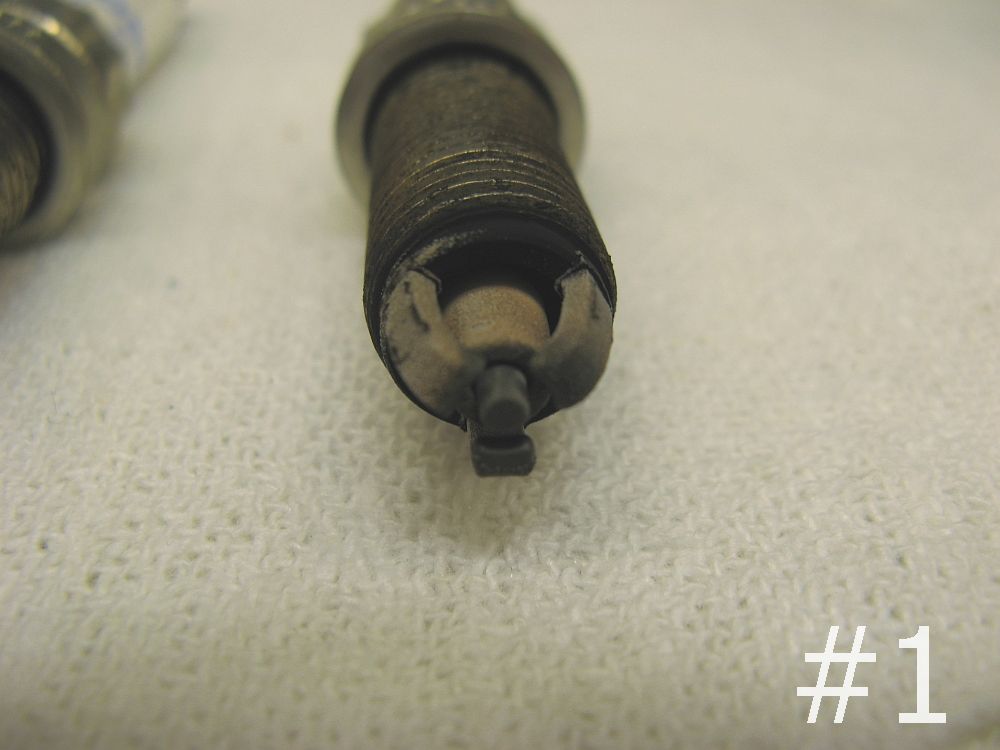
At 44,898 miles the car told me it was time to get new spark plugs,
BMW P/N 12120037244 or Bosch P/N ZGR6STE2.
I get all my warranty and free maintenance service done at United BMW Gwinnett. Adriana Gillman
was my SA this time and she was very accomodating at my request to see the plugs- plugs are a great indicator of engine health. Jeffrey, the service tech
working on my car, was GREAT and had staged the plugs in cylinder order for me to see and take some pics- he was very pleasant to talk with and even
entertained some questions I had. The plugs really do look great after almost 45k
miles, 20k miles of this on a PES chip. The car does seem to idle and drive better with the new plugs. Pics below represent cylinder 6 to 1, Left to Right.
[UPDATE] We finally fell victim to M3 fever, the 335 was returned to stock and taken to the dealer where we picked up
our 2008 M3. We never had any issues with the turbos or the HPFP on this 335 that was traded in with ~ 46k miles on the clock.
Oil Analysis performed by
Blackstone Laboratories
Oil Changed at 19800 miles- OEM BMW 5w30 [Sample NOT collected due to unknown duration]
Oil Analysis at 34779 miles- OEM BMW 5w30 P/N 07510017866
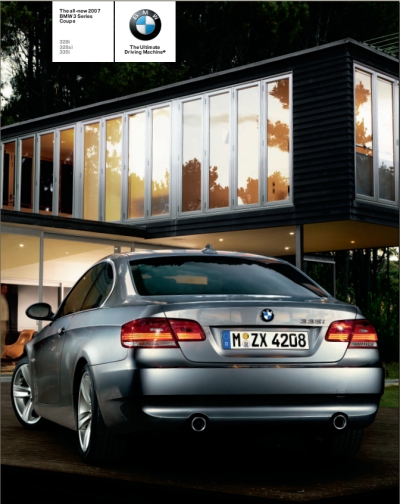
BMW 2007 335i Coupe Brochure
BMW 335i Reviews:
Automobile Magazine- 2007 BMW 335i Coupe Review
Automobile Magazine- 2007 BMW 335i Coupe Dynamometer Run Automobile Magazine- 2007 BMW 335i Coupe Dynamometer Run #2 Road & Track- 2007 BMW 335i Coupe First Drive
Road and Track- 2007 BMW 335i Sedan Road Test
Car and Driver (October 2006)- 2007 BMW 335i Coupe Road Test
Car and Driver (November 2006)- 2007 BMW 335i Coupe Road Test
MotorTrend- 2007 BMW 335i Coupe Review
Edmunds Inside Line- 2007 BMW 335i Coupe Road Test
Edmunds Inside Line- Comparison Test: 2002 BMW M3 vs. 2008 BMW 135i vs. 2008 BMW 335i
Edmunds Inside Line- Comparison Test: 2007 BMW 335i vs. 2008 Mercedes-Benz C350 Sport
The Auto Channel- 2007 BMW 335i Coupe Review
EuroTuner- 2007 BMW 335i Coupe Review
Sport Compact Car- 2007 BMW 335i Coupe Just Driven
Autoweek- 2007 BMW 335i Coupe Exclusive US Review (pdf)
Autoweek- 2007 BMW 335i Coupe Review
Winding Road- 2007 BMW 335i Coupe Review
The Car Lounge/MWerks- 2007 BMW 335i Coupe Review
Forbes Autos- 2007 BMW 335i Coupe Preview
Forbes Autos- 2007 BMW 335i Coupe Test Drive
The Car Connection- 2007 BMW 335i Coupe Preview
The Car Connection- 2007 BMW 335i Coupe Review
c|net- 2007 BMW 335i Coupe Review
Yahoo Autos- 2007 BMW 335i Coupe Review
The Family Car Web Magazine- 2007 BMW 335i Coupe Review
Autodrum- 2007 BMW 335i Coupe Review
Vehicles Online- 2007 BMW 335i Coupe Review
BusinessWeek- 2007 BMW 335i Coupe Review
BusinessWeek- BMW N54 Wins International Engine of the Year
Automotive.com- 2007 BMW 335i Coupe Review
AutoExpress (UK)- 2007 BMW 335i Coupe Review
Drive.com (AU)- 2007 BMW 335i Coupe Review
evo (UK)- 2007 BMW 335i Coupe Review
Auto123 (CA)- 2007 BMW 335i Coupe Review
Independent (UK)- 2007 BMW 335i Coupe Review
WorldCarFans (UK)- 2007 BMW 335i Coupe Review
Wheels24 (ZA)- 2007 BMW 335i Coupe Review
BMW Video:
*High Speed Connection Recommended*
2007 BMW 335i Features Videos from www.bmwusa.com
2007 BMW 335i Dynamic Stability Control
2007 BMW 335i Enhanced Braking
2007 335i Adaptive Brake Lights
2007 335i Xenon Adaptive Headlights
2007 BMW 335i Coupe Promotional Video
BMW Press Release Video- E92 335i Coupe
2007 BMW 335i Coupe TV Commercial- Business As Usual
2007 BMW 335i Coupe TV Commercial- Elegance.flv
2007 BMW 335i Coupe-Sedan Visual Comparison
5th Gear 2007 BMW 335i Coupe Review
Edmunds Inside Line First Drive- 2007 BMW 335i Coupe
Edmunds Inside Line- Comparison Test: BMW E46 M3 vs. 2008 BMW 135i vs. 2008 BMW 335i
Edmunds - 2007 BMW 335i Coupe vs Infinity G37 Coupe
Motoring TV Canada- BMW 335i Road Test
AMS Germany 2007 335i Coupe Review
PES Tuning: Lotus Elise and BMW 335i
BMW DIY Guides/Installation Instructions:
UUC BMW 335i Evo3 Short Shifter Installation
RIX Effects Boost Gauge Installation Notes
Helix BMW 335i Intercooler Upgrade Installation
Code3 335i Intercooler Upgrade Installation
BMW OEM Alarm Installation Instructions
BMW OEM iPod Interface Installation Instructions
BMW OEM Strut Brace Installation Instructions
BMW M3 Strut Brace Installation Instructions for E92 335i
E92 335i: Riss Racing Downpipes Installation DIY
BMW 335i HPFP (High Pressure Fuel Pump) Installation DIY by AMS Performance- PDF Version HERE, Web Version HERE
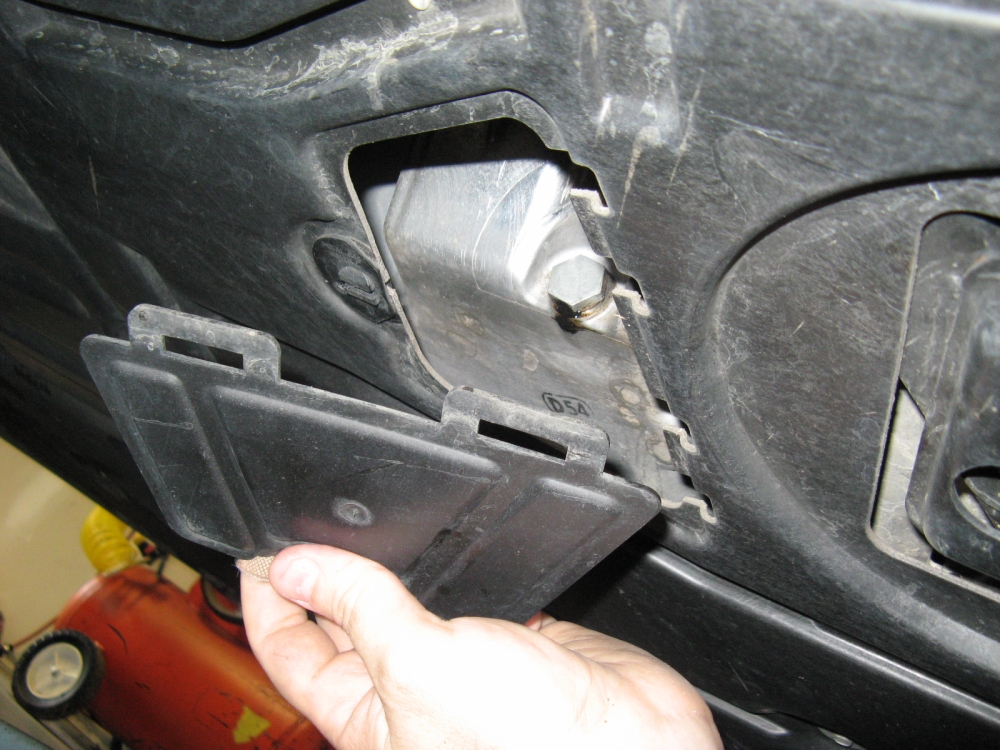
BMW 335i Sunroof Switch Panel Removal and Radar Detector Hardwire by e90post.com's sfbmw
BMW E90 Radar Detector Fuse Box Hardwire Installation by e90post.com's bilbarstow
BMW E92 Door Panel Removal by e90post.com's installmd
BMW E90 Manual Transmission Fluid Change by e90post.com's Mr. 5
BMW E90 Euro Light Switch (with Rear Fog Light Provision) Installation
BMW Manual Transmission Modified Clutch Delay Valve (CDV) DIY
BMW E92 Manual Transmission Modified Clutch Delay Valve (CDV) Installation
BMW E90 OEM Alarm Installation by e90post.com's CC 330i
BMW E92 Front Bumper Removal by e90post.com's AU335
BMW E90 Sub and Amplifier Upgrade by azwillNJ
Wheel Paint and Light Scratch Repair by AudiWorld.com's NASAracer
BMW 335i Documents/Files/Links:
Real OEM: OEM Part Numbers and Diagrams Online
BMW Fans: OEM Part Numbers and Diagrams Online
BMW Product Knowledge on Demand
BMW 2006 3-series Owners Manual
BMW 2007 3-series (with iDrive) Owners Manual
BMW 2007 N54 Engine Introduction
BMW 2007 N54 Engine Management
BMW 2007 N54 Engine Mechanical
BMW 2007 N54 Engine Technology
BMW 2007 E92 (3 -Series Coupe) Ordering Guide
BMW 2006 E90 Product Information
BMW E92 M3 Aftersales Training-Product Information
Siemens Piezo Direct Gasoline Injection Technology used in the N54
BMW 335i SIBs:
BMW Operating Fluids: Manual Transmission
BMW Operating Fluids: Final Drive (Differential)
HPFP Extended Warranty (10 years/120k miles)
Interior Door Grab Handle Peeling
Gears Difficult to Select in 6-Speed Manual Transmission - Diagnostic Hints
BMW/E92 Forums/Links:
 2007 BMW 335i Coupe

 . When the windows are tinted I may go ahead and get
a strip across the top of the windshield to better conceal these....
. When the windows are tinted I may go ahead and get
a strip across the top of the windshield to better conceal these....
Valentine 1 installed to replace Passport 8500 a year later- (manual here).
A good radar detector/speed detection counter measure forum: www.radardetector.net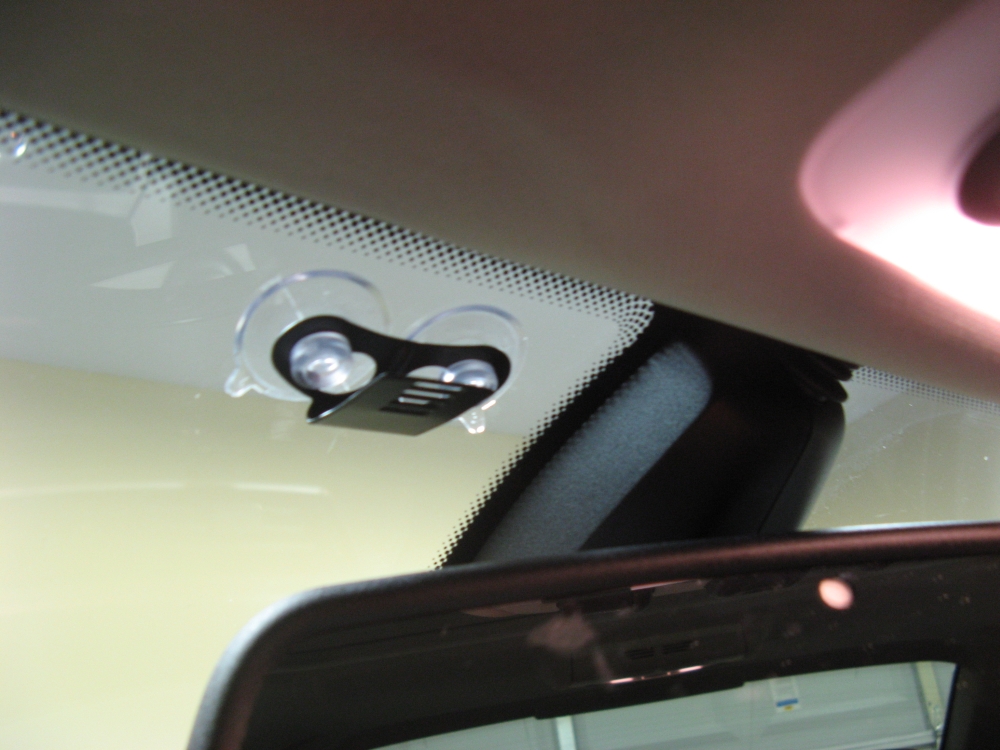

 ).
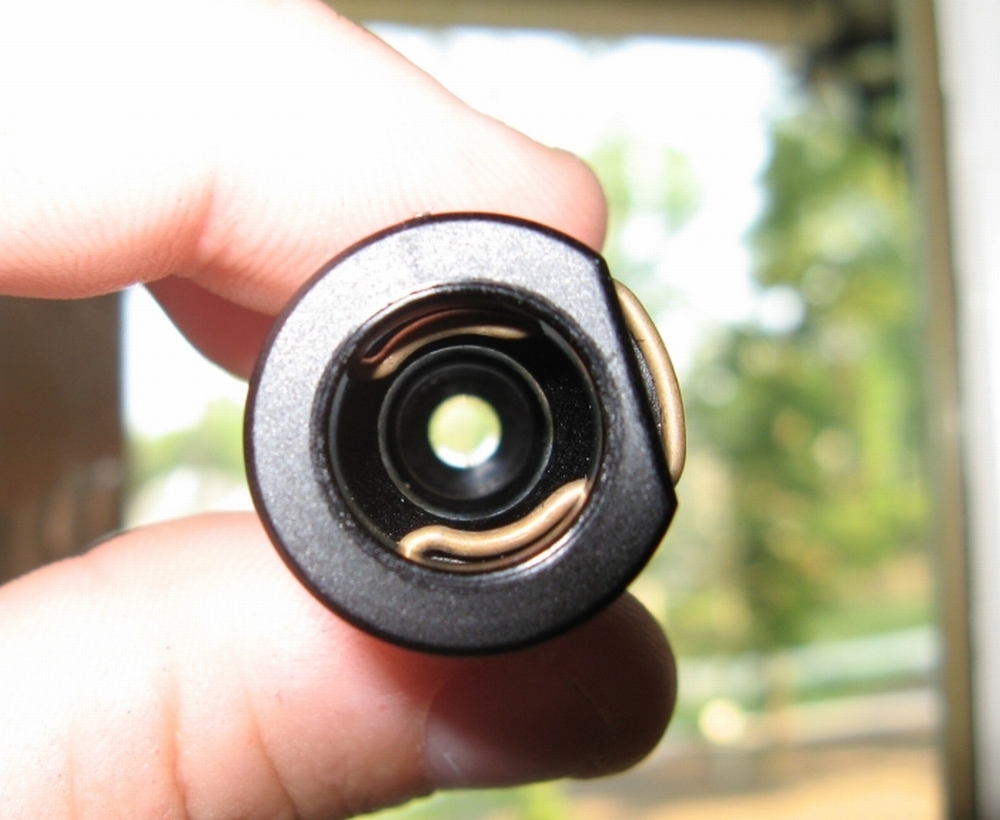
N54Tech.com's RMRC has a write-up HERE for modifying your existing valve. Another option may be to order
the E90 M3 CDV, it does not appear to have the restrictor as noted HERE.
Pics L to R: Inside OE Valve, Modified Valve, Inside modified valve, CDV Assembly:
).
N54Tech.com's RMRC has a write-up HERE for modifying your existing valve. Another option may be to order
the E90 M3 CDV, it does not appear to have the restrictor as noted HERE.
Pics L to R: Inside OE Valve, Modified Valve, Inside modified valve, CDV Assembly:


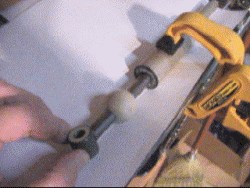
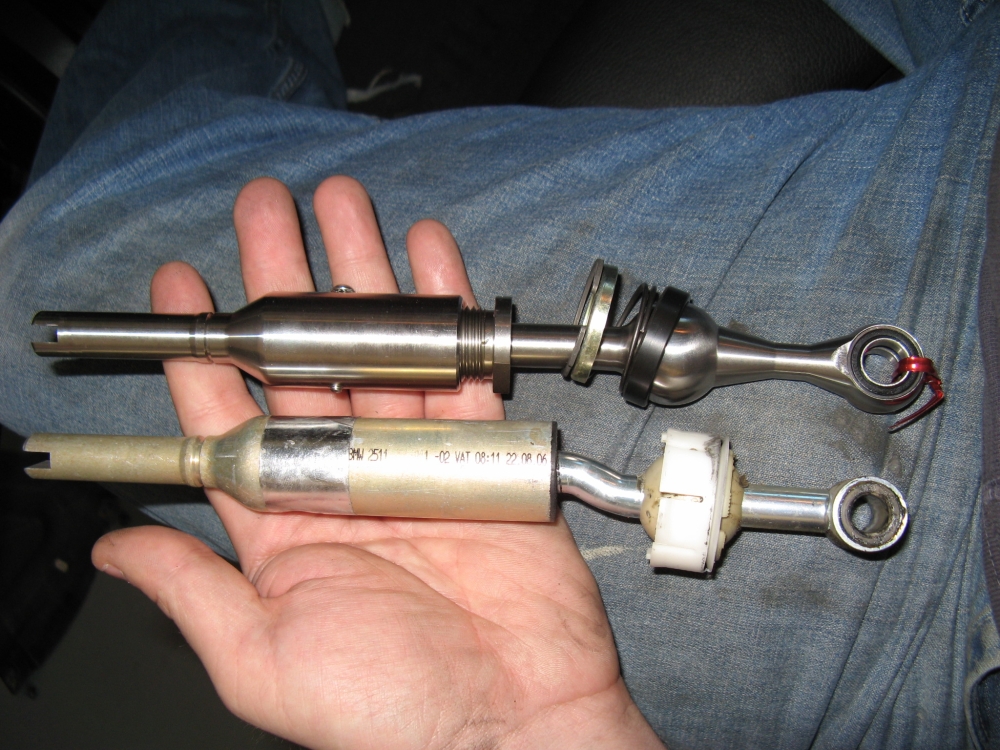
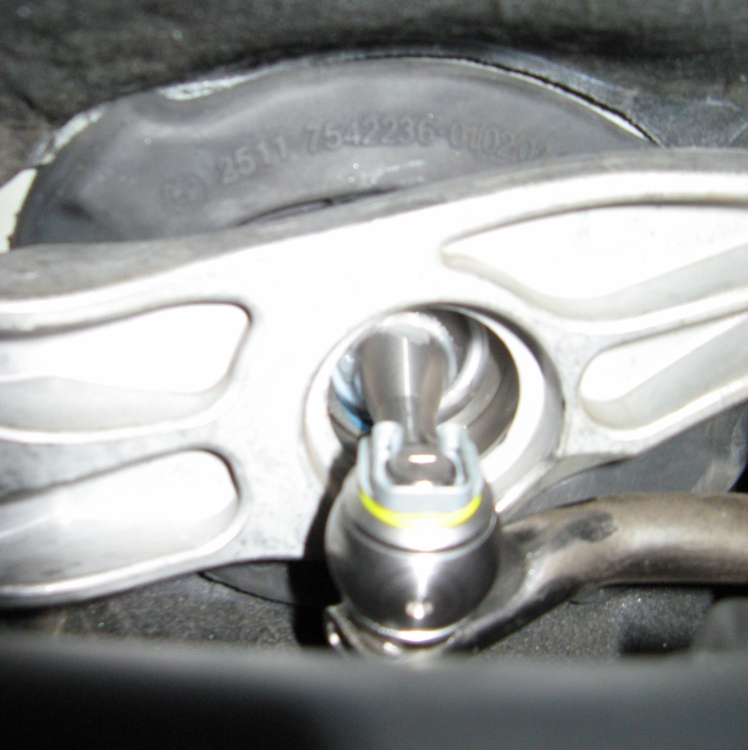
I have assembled a DIY guide HERE, UUC installation instructions HERE.
Pics: Sloppy OE shifter, Evo3 Height Adjustability, parts comprising the Evo3, comparison pic, installation view from top/bottom, completed installation:


 . Some forum threads about this are at 6SpeedOnline HERE
and HERE.
Dynos below from their car at Fabspeed facility:
. Some forum threads about this are at 6SpeedOnline HERE
and HERE.
Dynos below from their car at Fabspeed facility: 
 .
The installation instructions provided (HERE) worked great:
.
The installation instructions provided (HERE) worked great: 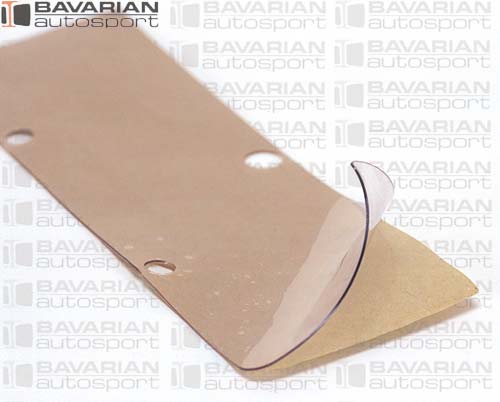
The VEI Systems Boost Monitor installation instructions are
HERE and the technical specifications are HERE.


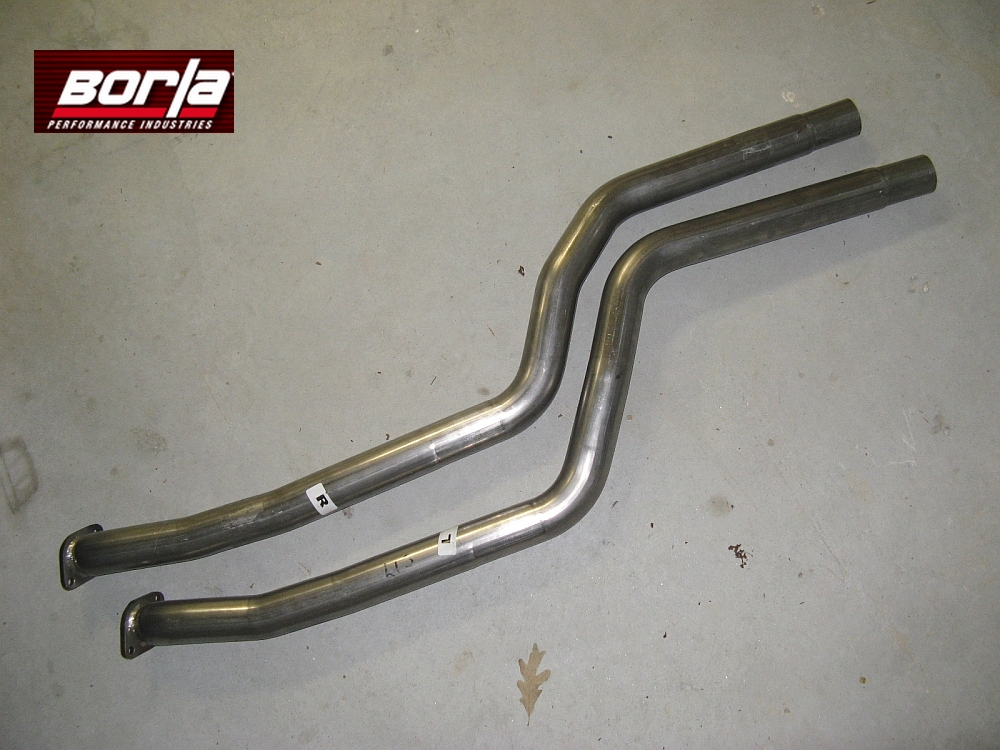
Borla secondary cat delete pipes (P/N A-35435) were also purchased to install with this cat-back system, documentation
HERE.
Due to time constraints and some required customization for the Borla and Magnaflow sections to work together (and the fact my project car was using all four of my jack stands), I had
Stone Mountain Muffler and Brake install this- no clamps, all pieces welded together like OE.
An additional benefit was a weight savings of 25-30 pounds over the OE system.


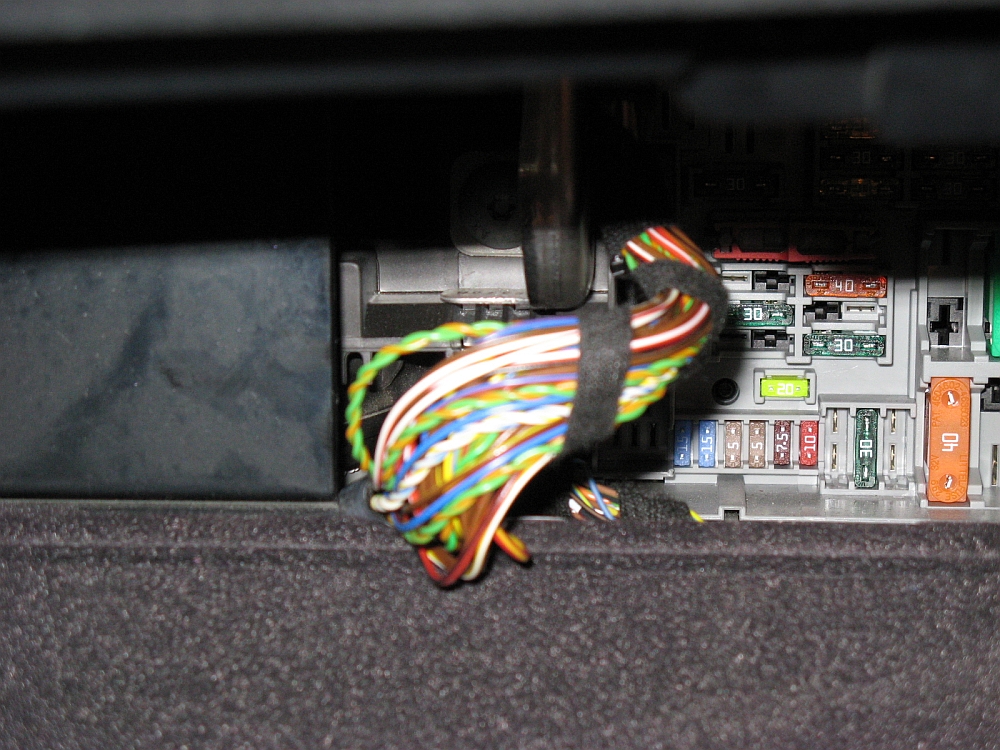
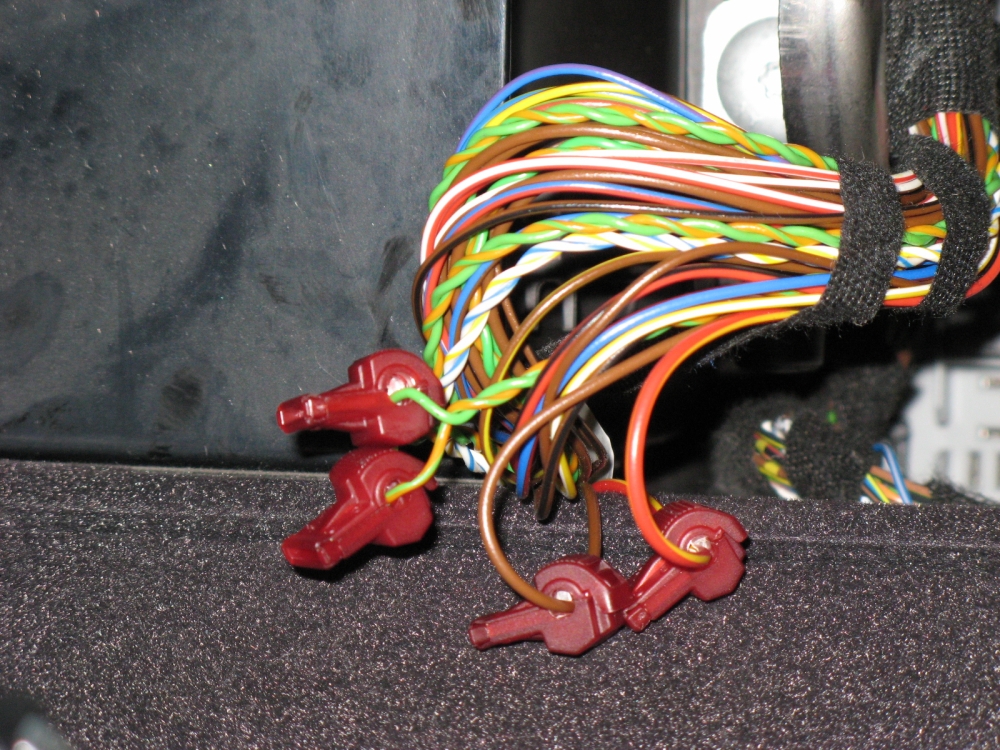
The installation and operation instructions are HERE. Note that there are multiple twisted pairs of green/green-orange and
multiple brown wires in the harness- I just picked correct colors where multiples existed at random. I did not undo any tape or have to pull the wire loom off
the metal bracket- pulling the wiring loom up I installed the taps as close to the bottom of the wire loom as possible.
Once wiring is complete/connected and unit/wiring tucked away, unit is not noticeable.
Folding mirror demo video HERE,
Power window demo video HERE.

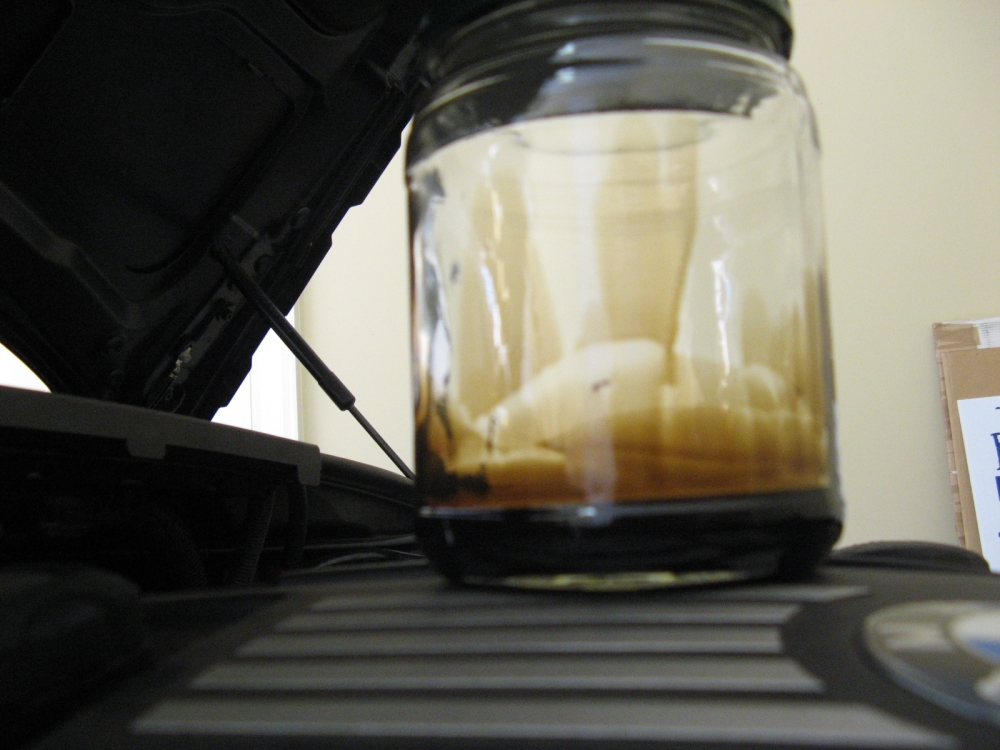
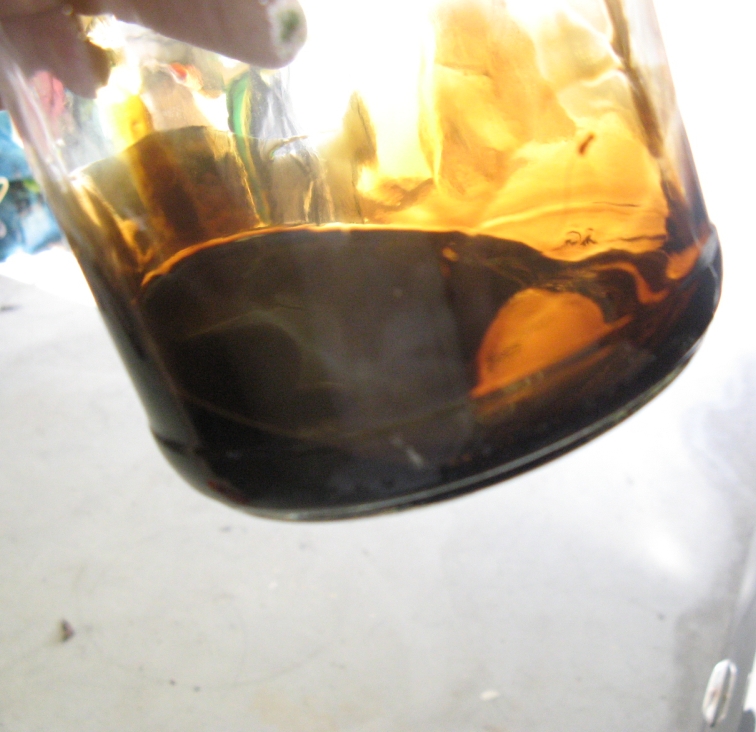
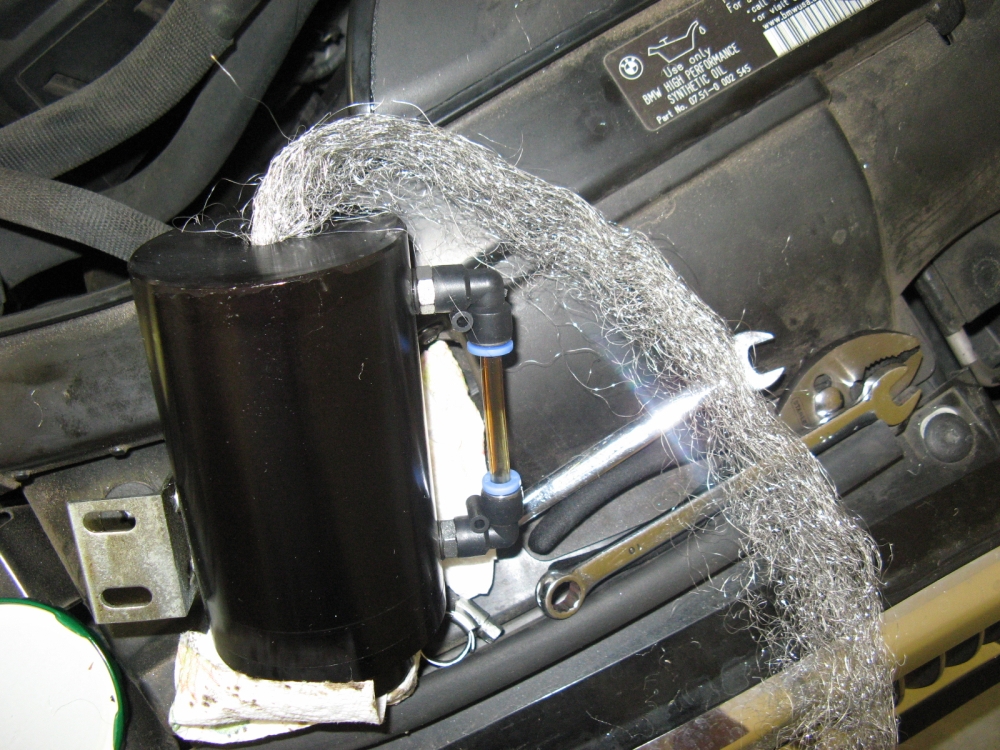
[UPDATE] After 7 months in place I decided to see how much oil the can collected and drain it. As you can see it is quite a bit. I was one of the early adopters of the RR
Catch Can and did not get one that was baffled, so I decided to correct that by buying some medium stainless steel wool and loosely packing it in the catch can through the drain hole.
This should allow more surface area for the oil to condense on and make for even less oil getting out in the crankcase air returning to the intake. I also noticed
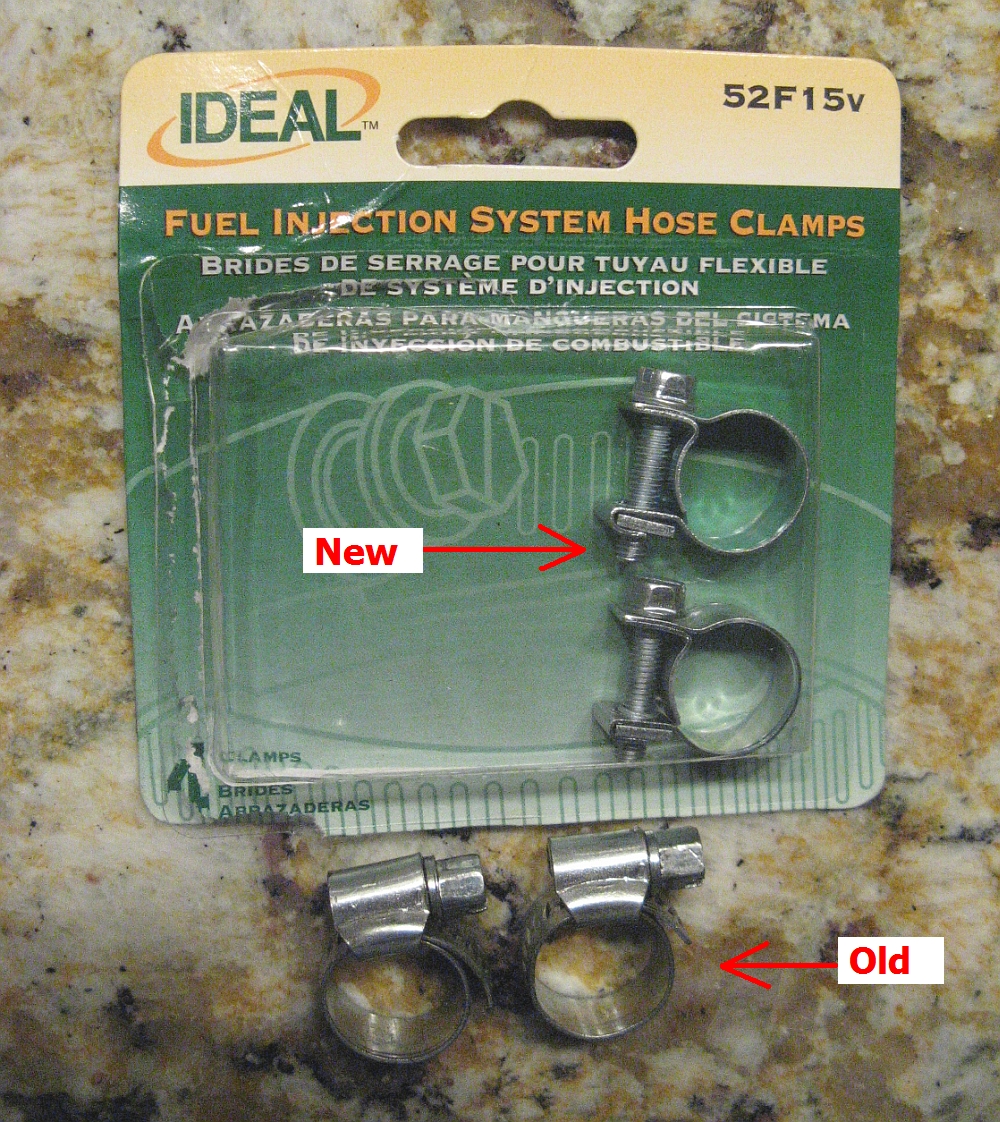
that the supplied worm gear clamps had loosened and would not get any tighter, I replaced these with some fuel injection hose clamps that work MUCH better.


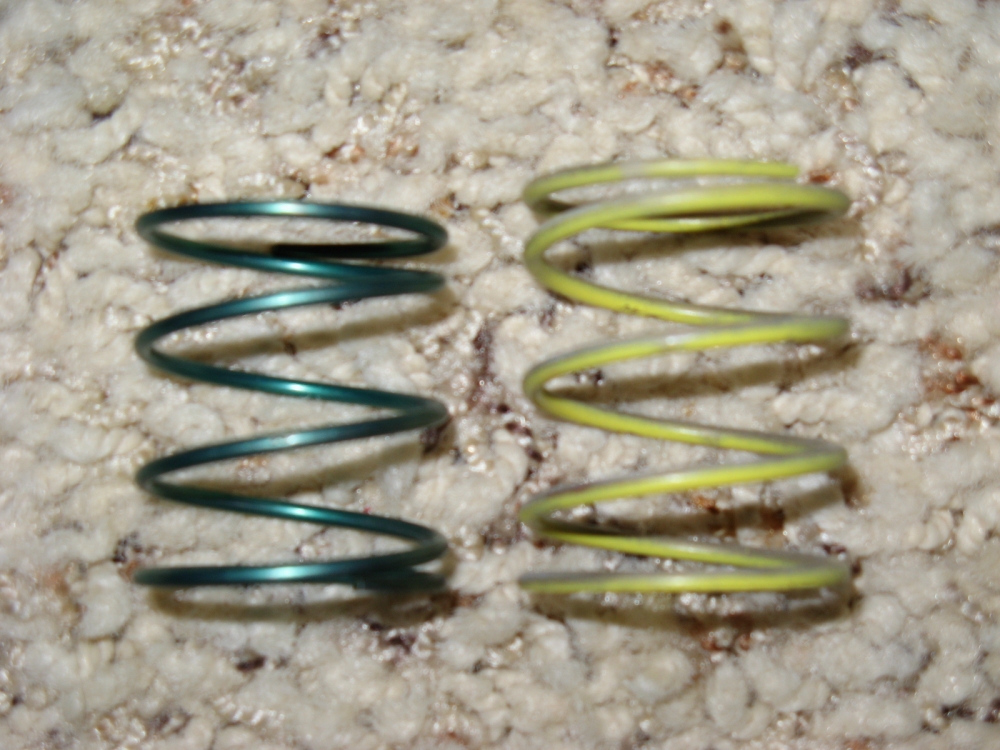
 ). Green spring comes installed and is reputed to be fine for stock boost, many on the forums
have swapped in the yellow spring with chips/higher boost.
). Green spring comes installed and is reputed to be fine for stock boost, many on the forums
have swapped in the yellow spring with chips/higher boost.
The installation instructions are HERE, maintenance/service guide is HERE,
and Diverter Valve Spring Tuning is HERE.

 O-cha at E90Post did some testing and found IAT to be a good bit lower than
with the OE airbox or dual filters HERE.
O-cha at E90Post did some testing and found IAT to be a good bit lower than
with the OE airbox or dual filters HERE.
The installation instructions are HERE, vendor dyno is HERE.
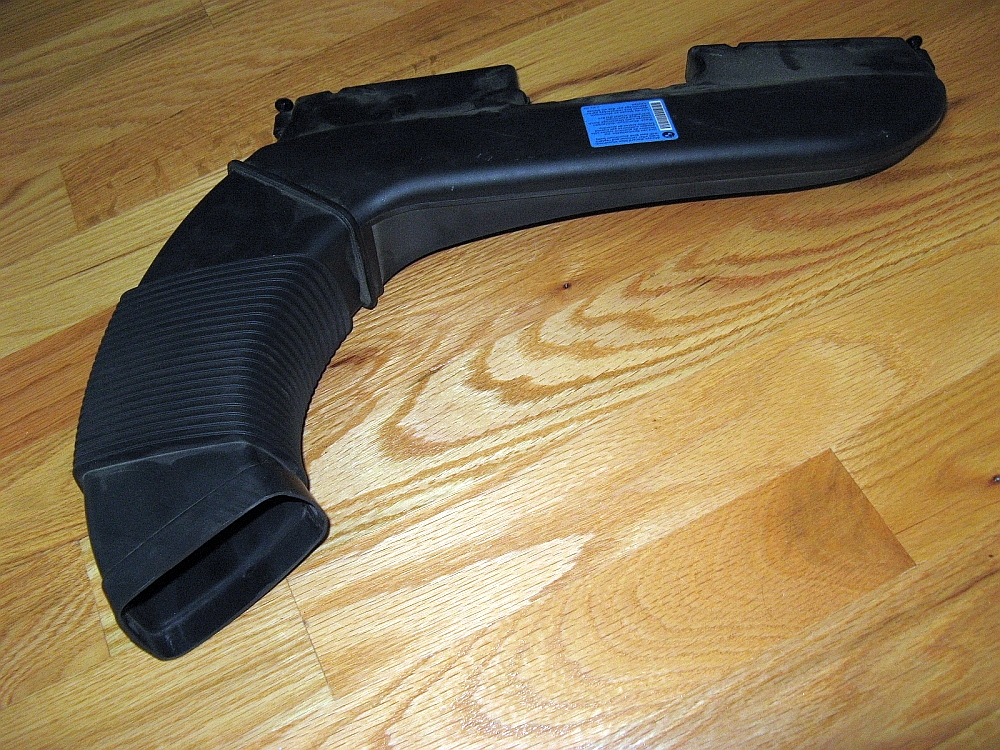
I initially was not worried about the unsightly radiator and wires now visible with the OE airbox intake removed, but got bored and decided to make it a little better.
I started by ordering a new intake from Tischer BMW (P/N 13717556546) in case I ever wanted to return to stock, $42 plus shipping. I used a Dremel with a drill bit
like a Roto-Zip to cut the intake pieces off that were no longer needed, slow process. On the side that fed the airbox I made a pattern from the other side to
trace on to the intake, after cutting it looks almost symetrical. To make the piece look finished, some door edge trim was added to the cut edge. I think it
looks better. I also noticed that the air that used to go through these ducts to feed the OE airbox is now directed to the oil filter housing, maybe a placebo
effect but the oil temps seem to be cooler.


[UPDATE] I did decide to try the oiled filter, P/N 24-30508. It is supposed to be an inch longer but is not much bigger than the 21-30003 it replaced. This is probably
the largest filter that will fit without contacting surrounding parts. Notice the fender liner bolts back in without any visible filter protrusion.
Cleaning instructions HERE, warranty information HERE,
and comparison of Pro Dry S vs oiled Pro 5R HERE.
Click HERE
for an independent filter test that illustrates why aFe is the better choice


Mercedes Benz Magazine wrote an article about the company HERE.


Preliminary information HERE.
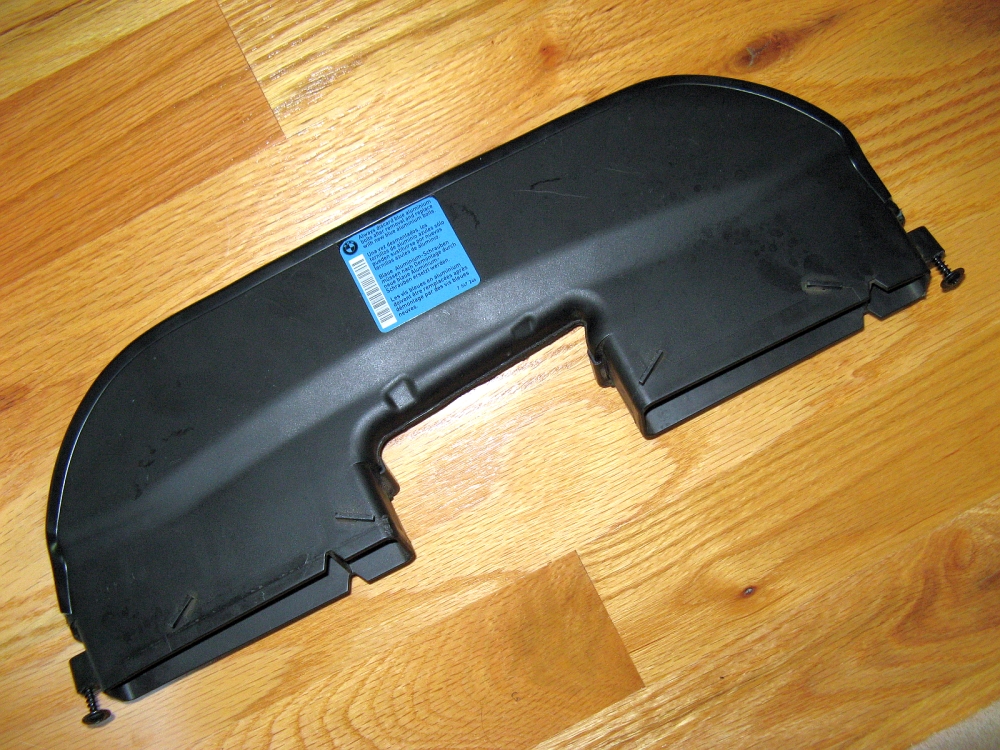
I started the installation by backing the car up on Rhino Ramps and chocking the front wheels. Removing the brace involves removing the two rear bolts on either side (18mm socket)
and the eight Torx bolts (T50). Installation of the Hotchkis brace is reverse of removal, about 20 minutes total for the R&R including backing onto the ramps.
The exhaust shop that mated my Borla and Magnaflow exhaust sections had to slightly modify the OE brace to clear the exhaust, the Hotchkis
brace clears it with no problem. It is apparent by comparing the OE brace to the Hotchkis brace that the rear will be more solid, driving the car after installation confirms this as
the rear of the car seems less flexible around corners and more planted.


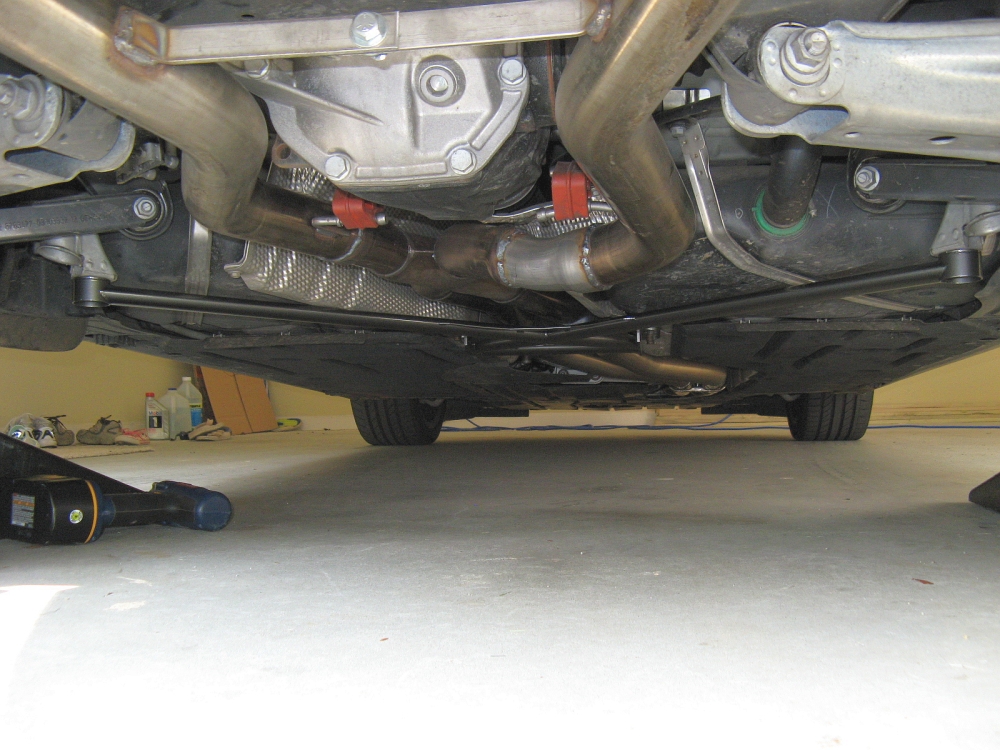
This brace will not fit a 335i with the OE airbox due to interference, some have had luck shimming the bar with washers to clear the OE airbox. Since my OE airbox
is history, the brace fit fine with no issues. Two bolts and two nuts are removed (mine were E14 Reverse Torx and 13mm Hex Head) from both strut towers, one of each
per side. I loosely installed ALL nuts/bolts before tightening anything. The brace side pieces are installed with the supplied 15mm bolts and 13mm well nuts, one of each per side.
The brace is bolted into place with four 13mm nuts, two per side. I hand-tightened the 4 bolts for the brace first, and then the bolts/nuts on the strut towers making sure the bar
and end pieces were centered while tightening. I then used a torque wrench to final tighten all: Torque specs I found on the web were 52 Nm (38.4 Ft-Lbs) for the 15mm bolts and
35 Nm (25.8 Ft-Lbs) for the 13mm nuts. The six plastic caps were then fit over the 13mm nuts. I know, next I need to hose out the engine compartment, it gets dusty at the kids soccer field

Goodyear F1 All-Season tires came installed on wheels.
All above was purchased with ~3000 miles on them from E90Post forum member mack82097.


I had to do a bit of trimming to get the Helix intercooler to fit, YMMV (see DIY guide link above for more details).
Comparison of test data between Helix and Code3 (same as Spearco/Dinan) HERE and design thread
HERE.
First Impressions- Similar to my past experience with other cars with upgraded intercoolers installed, power stays consistent throughout and does not taper off after
things begin to heat up. The IATs must be lower because the peak boost has dropped by about 1.5 PSI but the power feels the same or maybe a little better,
I believe the boost target is adjusted based on IAT by the DME.


Pics show the new parts when they arrived and some of Mr. 5's comparison pics. You'll notice the different bushing design and longer length of the M3
pieces pictured on the bottom of the comparison pics. This should allow for more precise and quicker steering control with more feedback, the length allows
for more negative camber to be dialed in.
The factory strut assembly index pins were also removed (drill) to allow some camber adjustment, these are the rivets that look like they have a
hex head for removal, one on either side. Also pictured is the assembly with the OE pieces for reference.
After alignment the front camber was at about -1 degree. The car is so much more responsive and direct, this is a great mod.
The increased camber allows the car to corner more confidently with much less understeer.

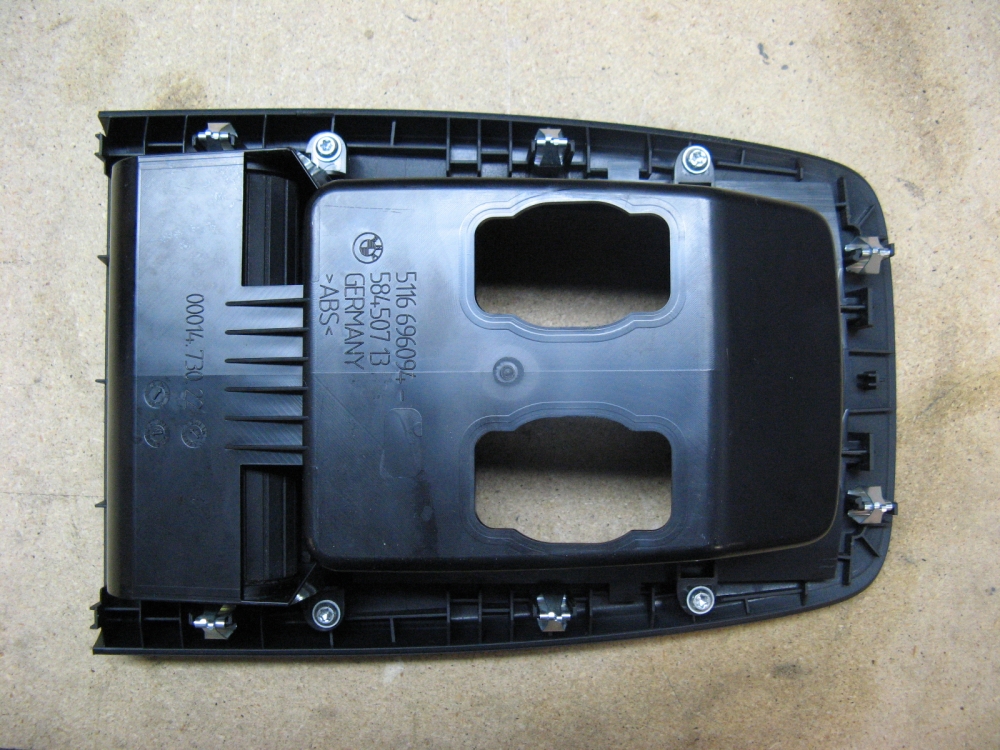
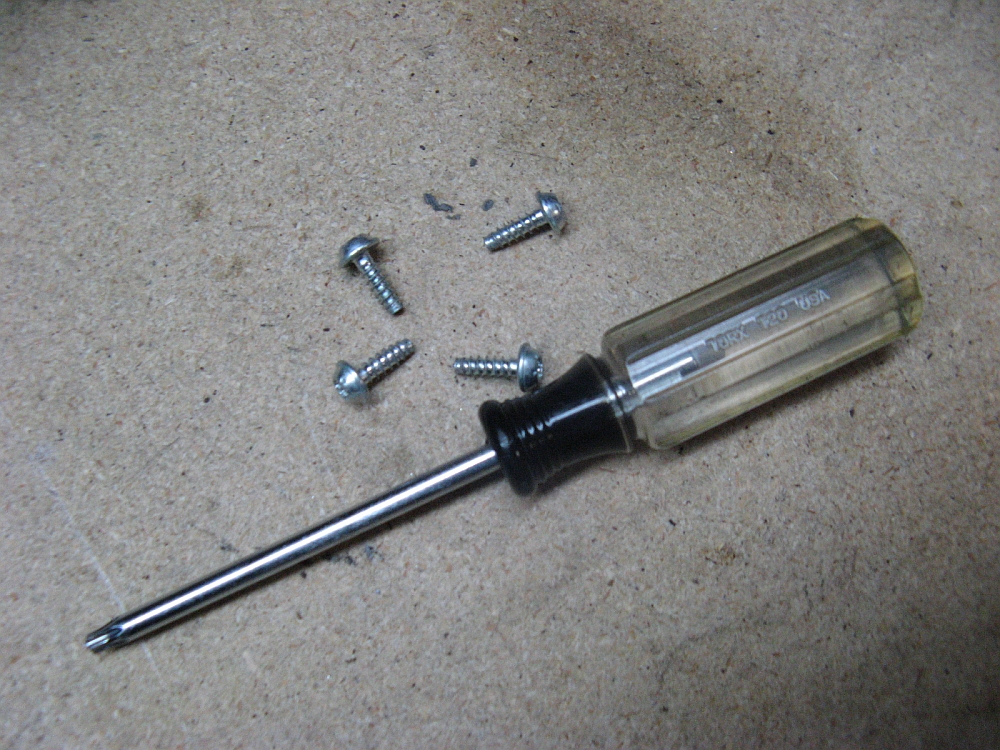
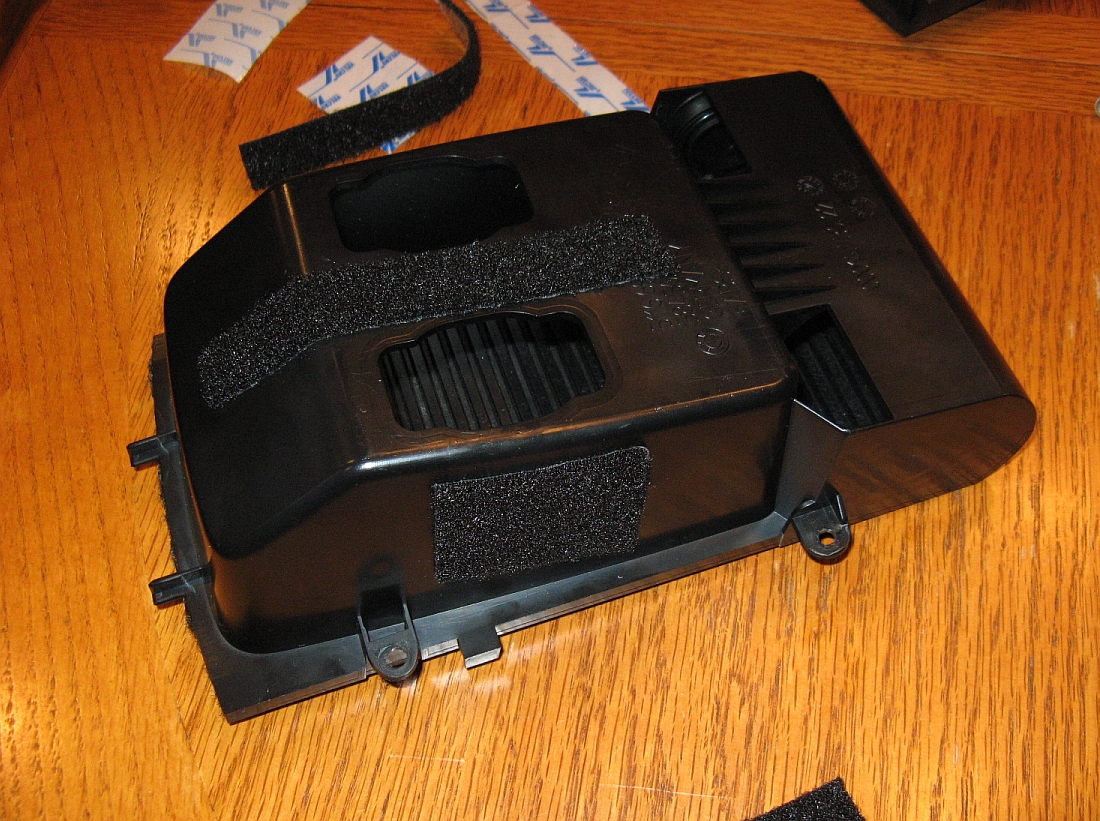
By pulling up on the bin, the 6 clips for the storage bin will pop out of the console, and then you can pull up, forward, and out from the back seat. Once out, the bin can
be disassembled by removing 4 T20 Torx head screws and sliding the lower section out of the two locating holes in front.
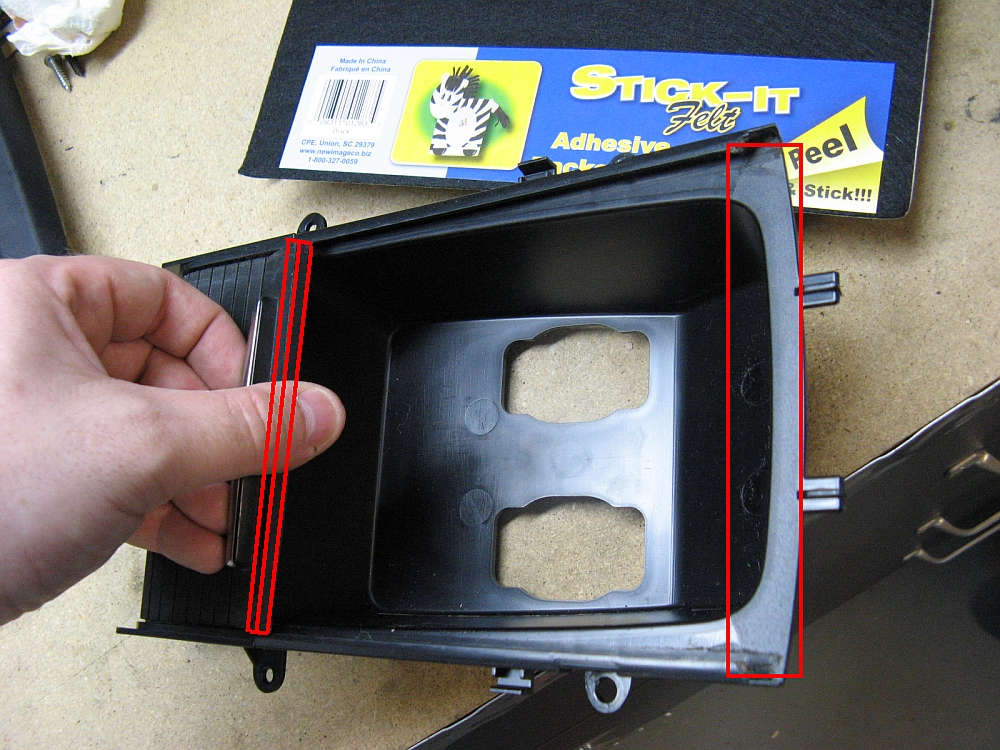
Now that you have access to the inside of the
lower and upper pieces, you can apply felt tape (or the soft side of some Velcro strips) to the leading edge of the sliding cover and the top and bottom
lip that the cover slides into- I used felt tape on top and Velcro on the lower piece, it is tight so use care when closing. It is a good idea to reassemble the bin and
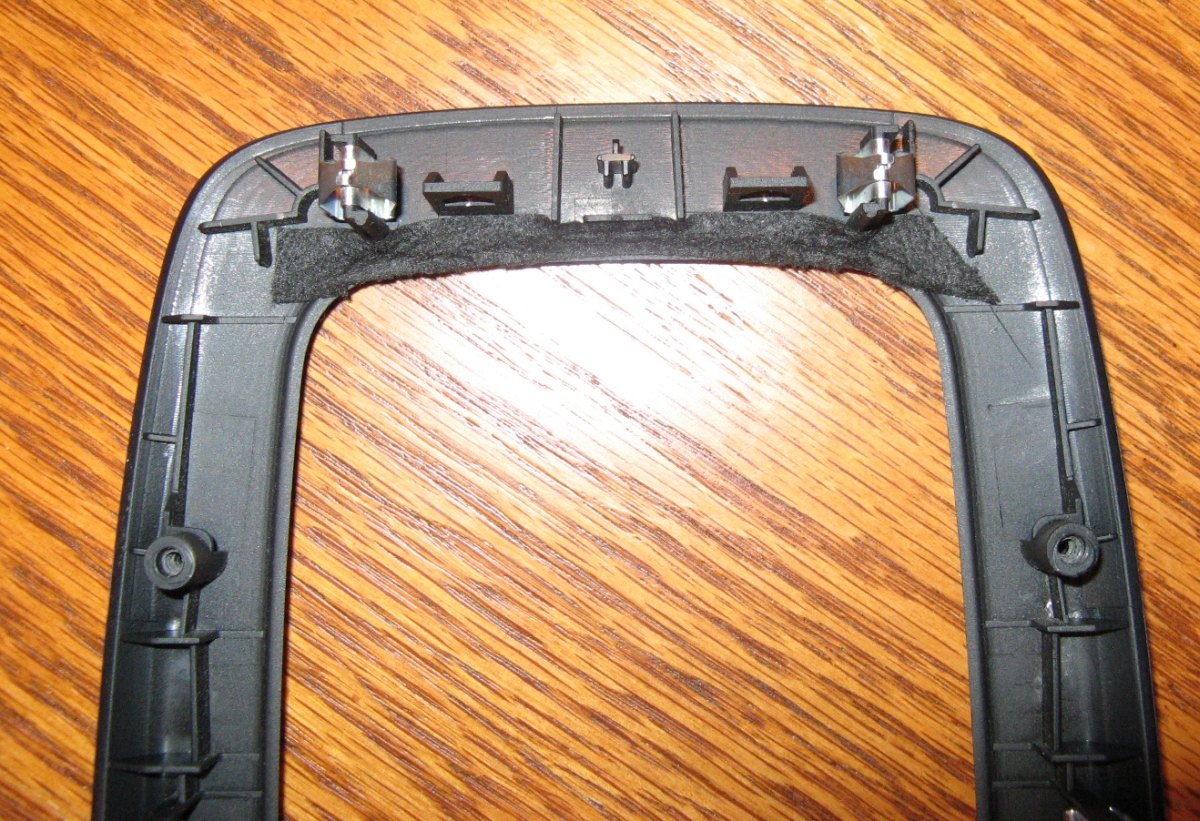
test the function so adjustments can be made for variances in materials used before reinstalling the bin in the car . I also went ahead and used
some soft Velcro on possible contact points when the bin is reinstalled to further isolate it.
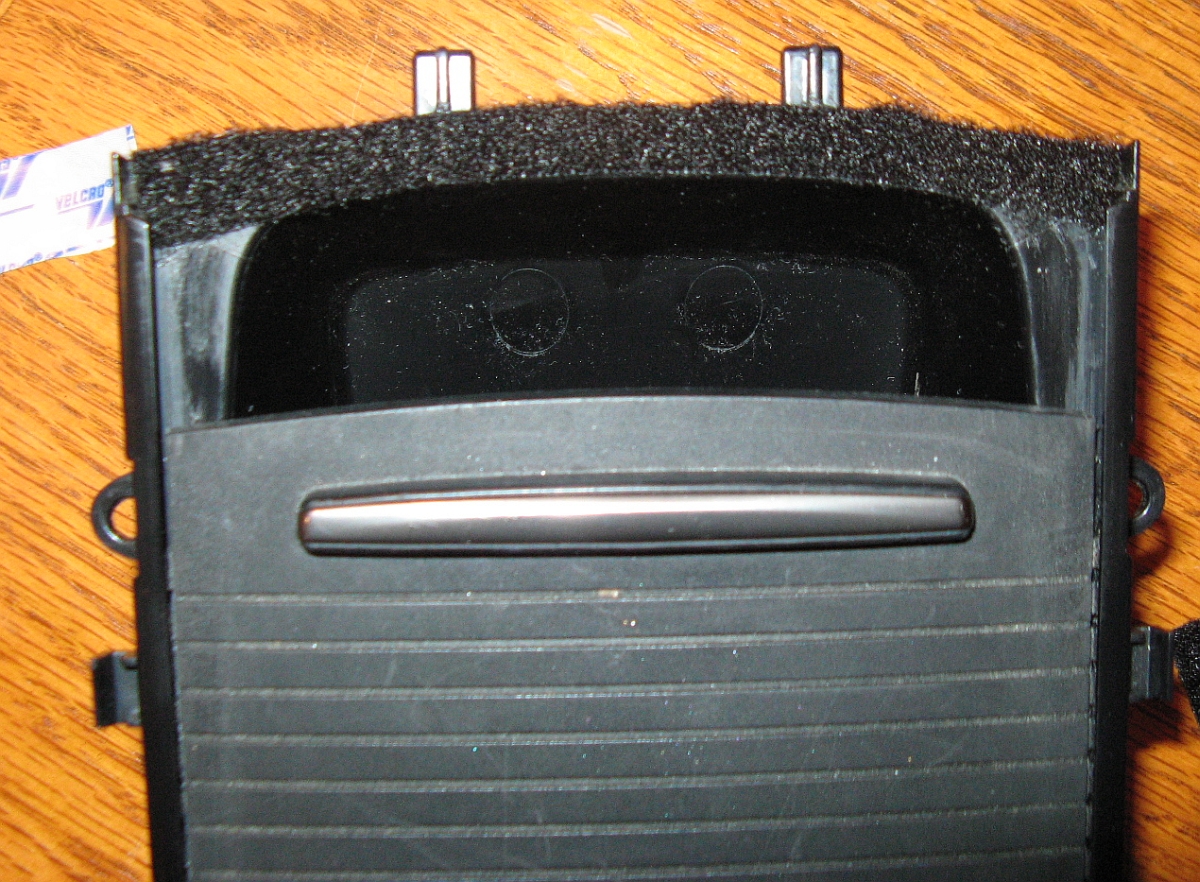
This has eliminated 99% of the noise for me although if I turn the stereo down and roll the windows up, I
can almost hear a little buzz sometimes.
[UPDATE] I decided to eliminate all of the noise, and cut a piece of foam to fit the storage compartment tightly and closed it up. There is now NO noise  :
:


I was kind of surprised because we had numerous soft touch pieces replaced under warranty at Dwight Harrison VW on both our Touaregs for the same peeling issue without complaint and they NEVER tried to
shift the blame to us.
KUDOs Dwight Harrison VW, BOO United BMW Gwinnett. My SA heard my opinion of BMW vs VW warranty service per my experience.
This issue has become progressively worse over the past year, so I started looking around and found this was a common issue and most dealerships were
replacing this piece with a redesigned part with no hassle. The
BMW SIB 51 18 06 came out in December of 2007 to address
the problem with a part that was molded in color with no coating. I was disgusted that my dealer knew less about this SIB than forums I frequent, the SIB was dated six months
before my initial complaint at the dealer. I wish I had known about this SIB at my last visit to question their knowledge. 
[UPDATE] Nearly a year after the initial complaint, I finally was able to get them to replace the door handle with the revised piece after showing them the
SIB- it looks the same and has the same texture as the soft touch material but no soft touch material to wear off:


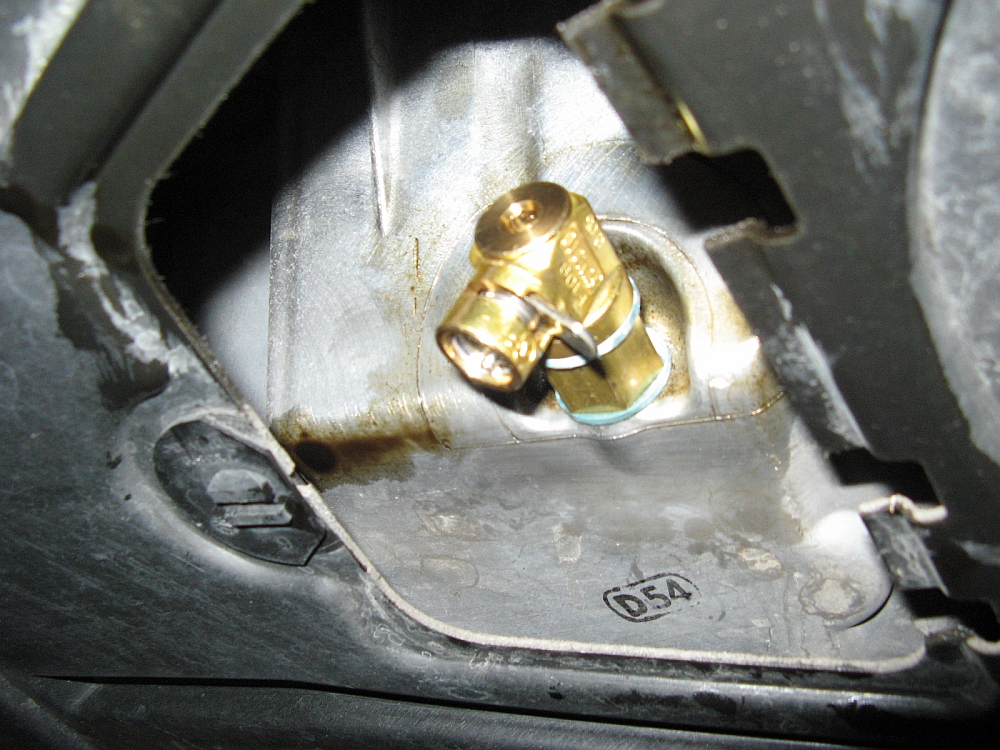
Cliffs Notes DIY: Raise car so that it is level front to back and side to side (4 jack stands work great), remove plastic tray under transmission (my
CDV write-up details this), remove fill bolt first (8mm hex socket), then remove drain bolt and drain
all old fluid, reinstall drain bolt (35 Nm or ~26 ft/lbs), fill through fill hole using tubing and/or pump until fluid starts to come out, reinstall fill bolt (35 Nm or ~26 ft/lbs)- ENJOY 
BMW recommends replacing the fill and drain bolts, something I found out after doing fluid changes on both of my cars. No leaks but I will do this next time.
I did not remove the bracket like Mr.5 did, but I did use the tubing and squeeze method he used to fill the transmission-about 2 quarts or a little less. The
car should be at operating temperature when you do the change, this affects the oil level since heat=expansion and it also helps in draining all the old fluid:
![]()
![]()
I assembled a DIY guide HERE with lots of pics of each step for installation.


The downpipe installation instructions are here in Adobe PDF Format OR Web (HTML) Format.
O2 sim installation instructions are here in Adobe PDF Format OR Web (HTML) Format.
The RR V1 downpipes were definitely a "fun" installation, several heat shields had to be massaged and a screw replaced- clearance was still about the
thickness of a sheet of paper but I am always up for a challenge. No apparent contact points, leaks, or noises post install.
[UPDATE] I just drove my first 400 miles post installation to Barber Motorsports Park for the Porsche 250 and the car ran GREAT. No check engine lights, no limp mode,
and still no noises other than the slightly different sound. The car was already louder than OE with the Magnaflow Catback/Borla Midpipes, not really that much louder
with downpipes as I expected it would be but a little more aggressive and now you can hear the turbos a little better
I assembled my own DIY guide with lots of pics HERE, kind of a downpipes for dummies approach.

Monroe Muffler and Brake did a good job, they had to enlarge the tips 2.25" to work with the 2.5" exhaust pipe, but these tips only accentuated the
horrible alignment that the pre-fab MagnaFlow system had. I decided to try another
exhaust shop to correct the alignment issue and make sure that both tips were symmetrical and centered in the cutout.
Paul's Custom Exhaust in Snellville did a great job,
Paul is a guy who appreciated (or maybe not) how AR I am and worked to make sure I was satisfied:
 .
.
The vendor installation instructions are HERE,
preliminary test HERE, and
OE/vendor comparison chart is HERE.
I had all the tools required except for the T20H (security Torx) and a 7/8" stubby wrench. I found a security bit set that included the bit I needed for $7
at a local auto parts store and after hitting all the local hardware and McParts stores made a trip to Sears for the stubby 7/8" wrench, Item# 00944100000-Model# 44100 for $13....
I was almost resigned to buying a regular size wrench and cutting it.
I have a web version of the vendor installation guide HERE with some additional notes and pictures....
not as easy an install as I expected, but the around town oil temps even when pushing don't get over 230 now, about 20 degrees cooler than OE when driven the same.


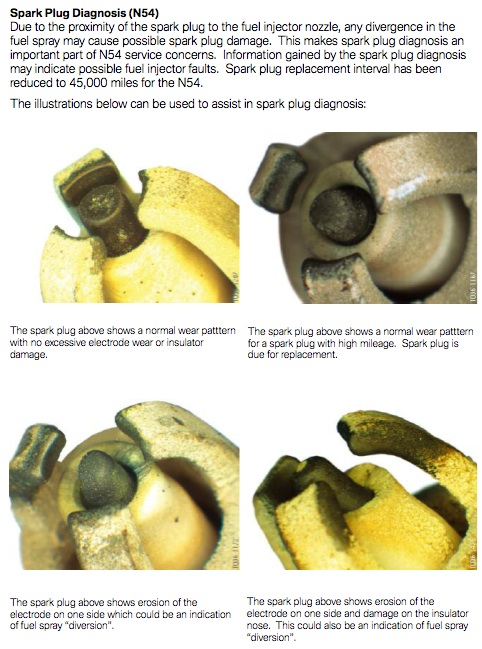
NGK has a great guide on how to read spark plugs HERE and a
BMW N54 specific guide is HERE.
A nice DIY guide to changing your spark plugs can be found HERE.