![]()
R32 Brake Pad Installation BY Anthony@vwvortex
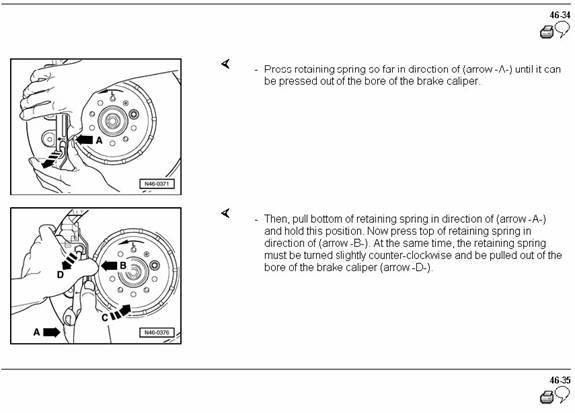
Now, the picture makes it
look easier then it really is. The first step is simple, but the top part of
the clip which has a double "edge" on it to secure it in the hole is
a pain to remove.
Anyway, whoever decided to
run the brake line directly behind the top caliper bolt is an idiot. Since the
brake line is in the way, I couldn't get my 7mm allen
socket in there, so I had to use a 7mm allen wrench. Not really an issue, just
an inconvenience.
The driver’s side front pad
has a wear sensor. As these front brakes are the 2FN caliper which is used on
the previous generation 750iL, they are essentially BMW brakes, so they have
the poor BMW style wear sensor for the front pads.
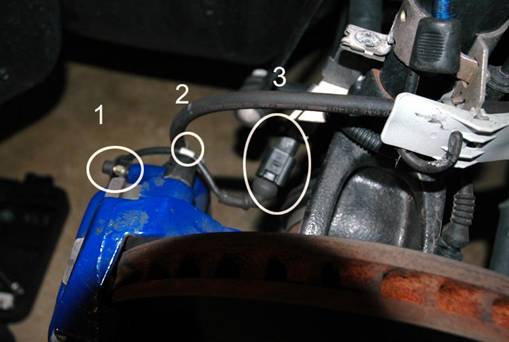
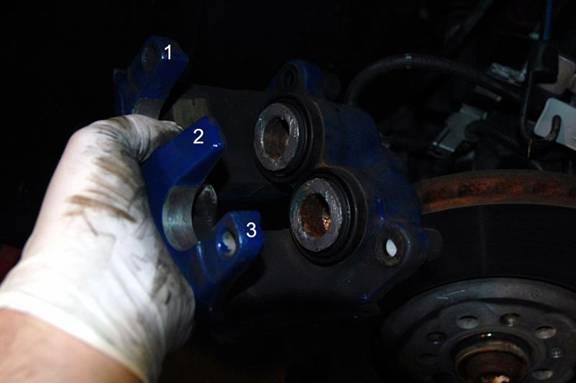
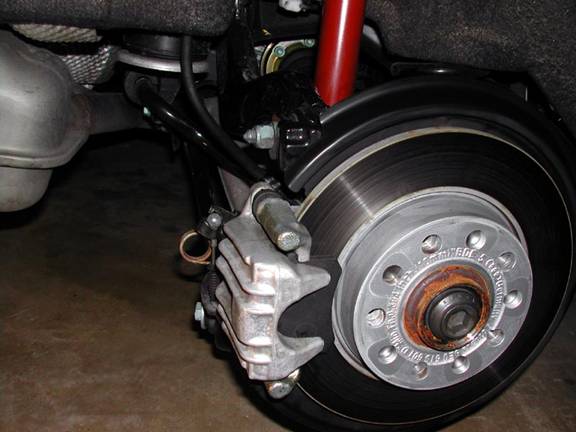
As you can see, the brake
line runs right behind the top caliper bolt. Also, the top caliper screw cap
(#2) has a hook on it to hold the brake sensor line in place, and the line is
secured by #1, which is just a rubber hat that comes off easily. What is nice
about this sensor in comparison to BMW brakes is the location of the connection
(#3), so you can just pop the sensor off and this makes it much easier to pull
off the actual sensor from the pad:
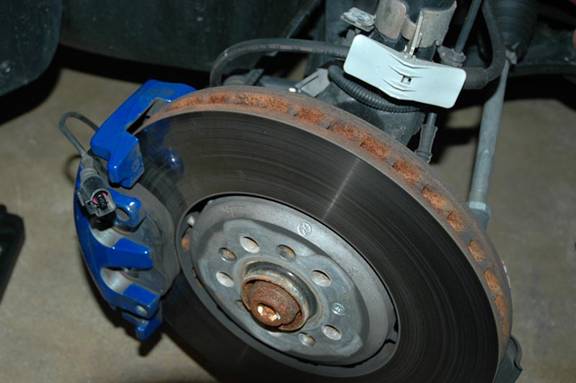
Now you just have to remove
the bottom caliper bolt and the caliper will slide off. Now remove the back pad
and carefully remove the wear sensor as follows:
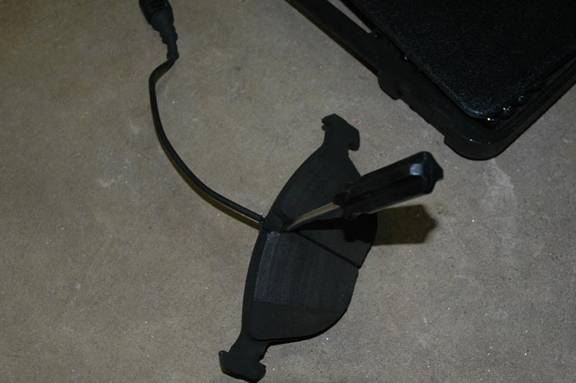
Get a flat head screw driver,
fit it behind the sensor and push it out. If you are careful, the sleeve that
the sensor sits in will remove with the sensor. You'll see what I mean when you
do it.
Porterfield sent me a kit
with anti squeal, rotor soap, and rotor squeal stop. Since I was just swapping
pads, I just decided to use the anti-squeal only. I just coated the parts that
the pad touches, including the two pistons, and also #1, 2, and 3 in the
picture below:
Pop the wear sensor into the
new pad, snap the pad into the two pistons, put the front pad in the mounting
bracket, and screw back in the caliper screws and put back the front retaining
clip – you’re all set! I did not have to push back the pistons as I only have
4900 miles and the pads weren’t very worn. If you did
have to push back the pistons, I would just stick a big set of pliers in-between the pads and expand them, thus pushing
back the pistons.
The rear brakes for most VWs
are the same, and I did a how-to for my previous 2003 Audi A4 3.0 Quattro on
Fourtitude (see below). It was
essentially the same thing, but a few things to note are: There is yet another
thing blocking the top caliper bolt, so I had to use a ¼” drive ratchet and
13mm socket to remove the caliper bolts. Also, the AP340T’s that I got had a
little bit smaller “springs” on the pads than the factory ones, and this made
the install a little tricky as they liked to not sit properly. I will pass this
information on to Porterfield, as I am the first person to install their rear
pads on a R32; they may want to make a few tweaks. I also did have to compress
the piston, so make sure you unscrew the brake fluid reservoir cap under the
hood.
As for impressions on the
pads, I am still in bed in phase so I haven't stepped on them. However, the
pedal feel is great, there is no squealing or noise, and I have no doubt they
will stop on a dime when I get on them. As for dust, I drove around probably 25
miles since I installed them, and when I got back I had absolutely no brake
dust on my wheels, which in comparison to the stock pads is unbelievable, and
the pads are in their break in phase where they usually dust more. On other
cars I buy these pads for less dust and better stopping, but our brakes are so
big I was primarily concerned with less dust, and these pads do dust
considerably less.
B6/8E: Rear Brake Install
How-To (Pictorial) « » 3:11 PM
9-1-2003
Well, last week I decided I
have had enough with the dusty OEM pads, especially the rears. I had done a lot
of research on Brake Pads before, when I was looking for new brakes for my 2001
GTI VR6 (my previous car). I went with Porterfield Pads
(www.porterfield-brakes.com) with that car, and I liked them so much I ordered
a set for the Audi. The pad line I chose was the R4-S, which is a
street/weekend pad. This is the pad you want.
Porterfields are the best pad
I have ever used. Much softer on the rotors than EBC (which killed 3 sets of
rotors on my GTI), better stopping power than Mintex, and virtually no squeal.
And at a price of $69 for rear pads and $119 for front pads, they aren't too
expensive.
Anyway, I put them on Friday,
and on Saturday I took a 260 mile trip to visit some friends. When I got home
Saturday night, I checked the rear wheels and there was barely any brake dust,
and the little dust on the wheel was extremely light, not thick and heavy like
the OEM pads. I am extremely pleased.
Brake feel is the same as the
stock pads, but I haven't gotten on these to see if there is any difference. I
most likely won't be able to tell any difference since I only got the rear pads
for now, and will change the fronts sometime in the near future.
For your reference, the rear
pads are AP 340T R4-S and the fronts are AP 840 R4-S. The pads are the same for
the 1.8T and the 3.0L. Although the rotor size is different, the calipers are
the same.
Materials Needed:
Brake Piston Compressor Tool
& 14mm socket
13mm Wrench
15mm Wrench
Torque Wrench and 17mm Socket
Procedure
1. Refer to the manual for
proper jacking of the car and also follow their instructions for removing the
wheel. Break the wheel bolts while the wheel is on the ground because you won't
be able to have the hand brake applied while doing this job.
2. Do NOT work under the car
with the flimsy Audi jack. You are just asking for an accident if you do. Use a
floor jack, or use a jack stand (best choice).
3. Here is a view from the
top looking down on the caliper. In this picture, I have already removed the
13mm bolt on the top, but not on the bottom (that's why it's leaning).
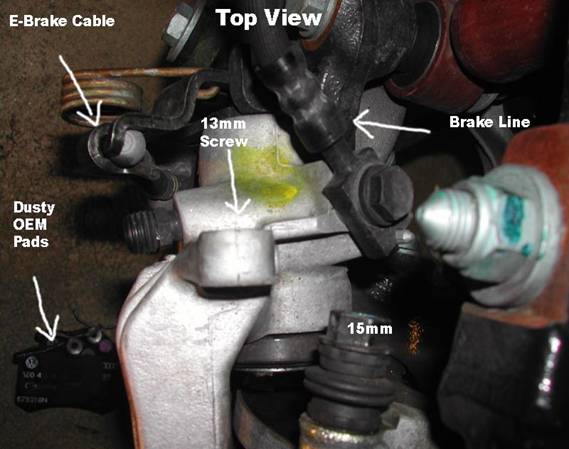
You don't have to touch the
e-brake cable, as you don't need to unhook it just for pads. To unscrew the
13mm bolt, hold the 15mm nut with your open end 15mm wrench, and then turn the
bolt. Pretty straight forward. It's not a very big
bolt, so it will come out fairly easily. Repeat and do the same on the bottom.
4. The caliper will be lose
now, although you may need to slightly pull it a bit as it will be somewhat
stuck to the pads that are in there. Be sure NOT to let the caliper just dangle
there, as it will stretch the brake line!
5. Remove the pads from the
rotor. Get your Brake Tool. I believe this is a Lisle.
It has to push and TURN the piston at the same time - You CAN NOT use a c-clamp
on the rear brakes.
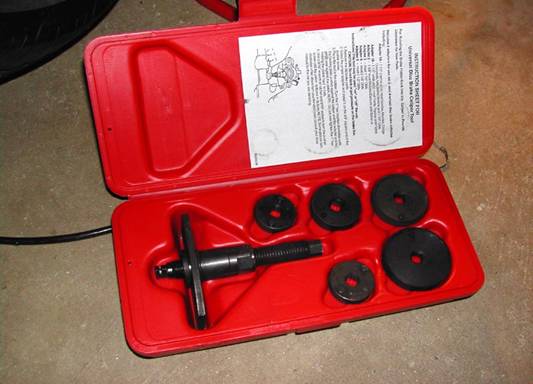
6. Put the brake tool on the
caliper:

You will hand tighten it
until it is locked in there, then get a 14mm socket and tighten so it will turn
and push in on the piston. If your old pads were fairly new (mind only have 4k
miles) then you won't need to compress the piston very much.
7. Put the new pads back on
like the OEM pads were (they sit on both sides of the rotor in the mounting bracket. The caliper basically just pushes them from the
back to keep them in place, so when putting the caliper into place, you may
feel some resistance from the brake pads - that is normal. Tighten the bottom
screw first as that goes in easiest. Remember you have to hold the 15mm nut
while tightening the bolt. It should look like this with just the bottom bolt
in:
8. Push the top of the
caliper forward so you can get the top bolt in. This is the hardest part as
it's kind of hard to push it, it takes some strength. After you have the put in
both bolts, be sure to tighten the bottom one again and then do the top once more.
I don't know the exact torque for these bolts, but they just have to be tight,
but don't get them too tight. There is not enough room back there for a torque
wrench anyway. If you have some loctite, you may want to put it on the bolt,
but it's not necessary. If you have already removed the rear calipers before,
be sure to use NEW bolts! These are aluminum stretch bolts so if you remove
them too many times, they run the risk of not staying tight enough. They should
only be a couple bucks at your dealer.
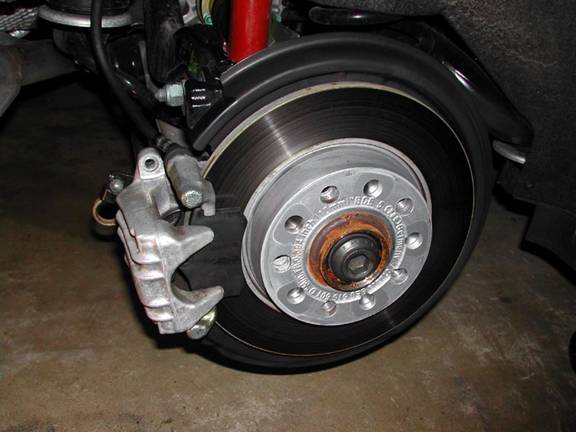
9. After you have tightened
all the bolts and made sure everything is secure, you're done! Since you
already have the wheel off, you owe it to your car to clean off the suspension
and the brake parts. You should look like this when you are done. If you have a
lot of rust on your hub you may want to file that down also.
10. Re-attach wheel. Be sure
to use the star pattern, and if you have a safety bolt be sure to put that one
directly opposite of the valve stem. Also tighten that one last. Torque to 92
lbs/ft.